My neighbor Gina watched me fumbling with three different cheese knives last November, trying to make a proper board for a Friendsgiving that was starting in two hours. She didn’t say anything at first—just leaned against my kitchen counter, sipping her coffee, taking in the chaos. Then she reached into my fruit bowl, grabbed a persimmon I’d bought on a whim, and sliced it into these perfect little stars. “There,” she said. “Now you’ve got fall.” That was it. No lecture about proper charcuterie ratios or expensive ingredients. Just one simple piece of fruit, cut differently than I’d ever thought to cut it.
That moment changed how I approach entertaining entirely. I mean, I used to think a good charcuterie board required fancy imported meats and cheeses I couldn’t pronounce. Honestly, I’d spend more time stressing about the board than actually enjoying the people coming over. But Gina’s persimmon stars taught me something—the best boards aren’t about perfection. They’re about making what you have look intentional. And when you’re hosting a Friendsgiving with everyone bringing a dish, the last thing you need is a complicated appetizer that takes hours.
Maybe you’ve been there—standing in the grocery store aisle, cart already full of sweet potatoes and cranberry sauce, realizing you forgot to plan something for people to nibble on while the turkey finishes. That’s exactly why I developed this Quick Friendsgiving Charcuterie Board with Fall Fruit. It comes together in under twenty minutes, uses ingredients you can grab alongside everything else, and honestly looks way more impressive than the effort it requires. The key is letting the seasonal fruit do the heavy lifting—crisp apples, juicy pears, maybe those persimmons if you’re lucky enough to find them. I’ve been making this board for three Friendsgivings now, and every single time, someone asks for the recipe. They’re always surprised when I tell them it’s basically just arranging pretty things on a board. But that’s the magic, isn’t it? Sometimes the simplest things become the most memorable.
Why You’ll Love This Recipe
This Quick Friendsgiving Charcuterie Board with Fall Fruit isn’t just another appetizer—it’s the appetizer that saves your sanity while impressing everyone. Here’s why it works so well:
- Ready in 20 Minutes: No cooking required. No complicated steps. Just slice, arrange, and serve while you focus on the main meal.
- Simple Grocery List: Everything comes from a standard supermarket. No specialty shops, no expensive imported ingredients, no hunting down obscure items.
- Perfect for Friendsgiving: It’s the ideal grazing board for people mingling before the big meal. Everyone can pick at it without getting too full for turkey.
- Naturally Crowd-Pleasing: The combination of salty meats, creamy cheeses, sweet fruit, and crunchy nuts hits every craving. I’ve watched picky eaters and foodies alike go back for thirds.
- Unbelievably Beautiful: The fall colors—deep reds, golden yellows, rich browns—make this board look like something from a magazine. It’s genuinely stunning with minimal effort.
What makes this different from other charcuterie boards? It’s designed specifically for the Friendsgiving table. Traditional boards focus on summer fruits or year-round staples, but this one celebrates what’s actually in season during November. The combination of crisp Honeycrisp apples, Bosc pears, and dried figs creates a flavor profile that complements everything from roast turkey to sweet potato casserole. Plus, the board itself is built to feed a crowd without needing constant refilling—something I learned the hard way after my first attempt ran out in fifteen minutes.
This recipe isn’t just good—it’s the kind that makes you close your eyes after that first bite of brie with a slice of pear. It’s comfort food reimagined for sharing, with the same soul-soothing satisfaction as a homecooked meal but none of the stress. Perfect for impressing guests without breaking a sweat, or turning a simple gathering into something memorable.
What Ingredients You Will Need
This recipe uses simple, seasonal ingredients to deliver maximum flavor and visual appeal with minimal effort. Most items are pantry staples or easy to find in any grocery store during fall.
For the Meats
- 8 ounces prosciutto (ask for it sliced thin at the deli counter)
- 6 ounces salami (I prefer Genoa salami, cut into thin rounds)
- 4 ounces soppressata (optional, but adds nice variety—use capicola if you can’t find it)
For the Cheeses
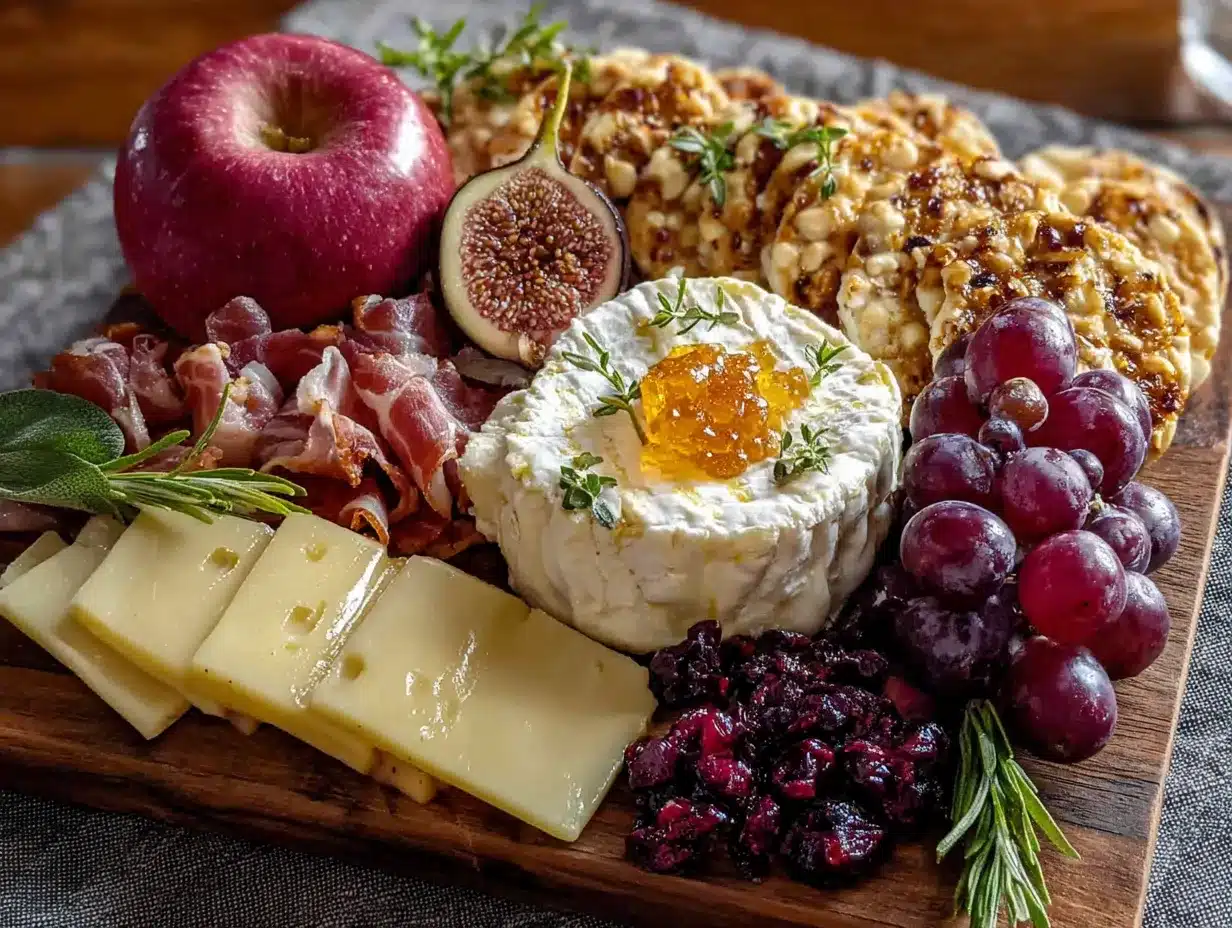
- 8 ounces brie (leave it whole for that beautiful gooey center)
- 6 ounces aged cheddar (sharp white cheddar is my favorite here)
- 4 ounces goat cheese log (the tanginess cuts through the richness)
For the Fall Fruit
- 2 Honeycrisp apples (fuji or pink lady work great too)
- 2 Bosc pears (they hold their shape better than softer varieties)
- 1 cup dried figs (mission figs have the best chewy texture)
- 1 cup red grapes (seedless, washed and stemmed)
- 1 pomegranate (seeds only—this adds that pop of jewel-like color)
For the Crunch
- 1 cup candied pecans (store-bought is fine, but homemade takes it next level)
- 1 cup Marcona almonds (regular almonds work too, but Marconas are buttery and soft)
- Assorted crackers and crostini (about 40 pieces total—mix textures)
For the Extras
- 1/4 cup honey (for drizzling over brie or goat cheese)
- Fresh rosemary sprigs (for garnish and that herbal fall aroma)
- 1 tablespoon flaky sea salt (like Maldon—sprinkle over everything at the end)
I usually grab my prosciutto from the deli counter at Whole Foods—their sliced-to-order prosciutto di Parma has the perfect melt-in-your-mouth texture. For the brie, I’m partial to Président because it’s reliably creamy without being runny. If you’re looking for a dairy-free option, Miyoko’s makes an excellent cashew-based brie that works beautifully here. And for the candied pecans, I’ve found that the ones from Trader Joe’s are surprisingly good and save you the hassle of making them from scratch.
Equipment Needed
You don’t need much for this board, which is part of the appeal. Here’s what I use:
- Large wooden cutting board or serving platter (at least 16 inches across—the more surface area, the better)
- Small bowls or ramekins (for honey, nuts, and pomegranate seeds to keep them contained)
- Cheese knives (at least two—one for soft cheese, one for hard)
- Sharp chef’s knife (for slicing fruit and meats)
- Cutting board (for prep work)
- Small tongs or toothpicks (for serving)
If you don’t have a large wooden board, a rimmed baking sheet lined with parchment paper works perfectly—honestly, I’ve done it before when mine was in the dishwasher. For the cheese knives, a butter knife works fine for soft cheeses, and any sharp knife handles hard cheeses. The key is having separate utensils so you don’t mix cheese types on the board.
Preparation Method
This board comes together in about twenty minutes. Here’s exactly how I do it:
- Start with the bowls. Place your small bowls or ramekins on the board first—this anchors the layout. Put the honey in one, pomegranate seeds in another, and candied pecans in a third. Spread them out so they create natural sections on the board. (I usually place them in a triangle pattern—honey at the top, pomegranate seeds at the bottom left, pecans at the bottom right.)
- Add the cheeses. Place the brie whole on the board—don’t cut it yet. Position the cheddar on the opposite side, cut into rough 1-inch cubes. Place the goat cheese log nearby, and if you want, roll it in some crushed black pepper or fresh herbs for extra flair. Leave space between each cheese so they don’t blend together visually.
- Fold the meats. Take each slice of prosciutto and fold it loosely into ribbons—don’t roll it tight, you want those ruffled edges. Place them in a cluster near one corner. For the salami, simply fan out the rounds in a line or small pile. The soppressata can be folded in half and stacked. (Pro tip: slightly separate the folds so people can grab individual pieces without pulling everything apart.)
- Slice the fruit. Core the apples and pears, then slice them into thin wedges—about 1/4 inch thick. For the apples, I cut them into half-moons; for the pears, I go with longer slices that show off their shape. Arrange them in overlapping fans near the cheeses. Scatter the dried figs and grapes in the gaps. (If you’re worried about the apples browning, toss them with a little lemon juice, but honestly, they’ll get eaten before that becomes an issue.)
- Fill the gaps. Now comes the fun part—fill every empty space with crackers, almonds, and any extra fruit. The goal is to make it look abundant, like you piled everything on generously. Don’t leave bare wood showing.
- Finish with garnish. Drizzle the honey over the brie and goat cheese in a zigzag pattern. Sprinkle the flaky sea salt over the entire board—especially the cheese and fruit. Tuck fresh rosemary sprigs between the piles for that pop of green and the lovely scent.
Here’s the thing—your board will look different every time, and that’s totally fine. Some days I have more prosciutto than salami, or I use figs instead of grapes. The structure stays the same, but the details change based on what looks good at the store. Trust your eyes more than the recipe. If something looks beautiful, it probably belongs on the board.
Cooking Tips & Techniques
After making this board for several Friendsgivings, I’ve picked up a few tricks that make the process smoother and the result more impressive.
Room temperature is your friend. Take the cheeses out of the fridge at least 30 minutes before serving. Cold cheese doesn’t have the same creamy texture or full flavor. I learned this the hard way when my brie was practically rubbery at a party—now I set everything out before I start prepping other dishes.
Don’t overthink the layout. The biggest mistake people make is trying to create a perfect, symmetrical design. Boards look best when they feel organic—like you just threw everything together with confidence. Start with the bowls, then the cheeses, then build outward. If something looks off, just move it. You can’t ruin it.
Think about traffic flow. Place the crackers and softer items near the edges where people can easily grab them. Put the harder-to-reach items like the honey and pomegranate seeds in the center. This way, guests don’t have to reach across the whole board to get what they want.
Use color contrast. Dark meats next to pale cheeses, red grapes next to green rosemary, golden pears next to deep purple figs. The visual contrast makes everything pop. I once made a board with all beige items—cheese, crackers, almonds, pears—and it looked sad. Now I always include at least one bright element like pomegranate seeds or fresh herbs.
Prep in stages. Slice the fruit and arrange the meats up to an hour ahead, but add the crackers and garnish right before serving. Crackers get stale quickly, and the rosemary loses its freshness. I usually do the heavy lifting, then add the finishing touches while guests are walking in the door.
Variations & Adaptations
This board is endlessly customizable. Here are some ways I’ve adapted it over the years:
Dairy-Free Version: Swap the brie for a cashew-based soft cheese (Miyoko’s is my go-to), use a plant-based cheddar, and skip the goat cheese. The fruit and nuts carry the board beautifully, and honestly, nobody misses the dairy when the pomegranate seeds are that vibrant.
Meat Lover’s Board: Double the prosciutto and add a spicy capicola or chorizo. I’ve also thrown in some thinly sliced roast beef from the deli counter when I wanted more variety. Just make sure you have enough cheese to balance the saltiness.
Sweet & Savory Twist: Add a small bowl of fig jam or apple butter alongside the honey. The sweetness pairs perfectly with the sharp cheddar and salty prosciutto. I discovered this combination at a local farmers market and now I can’t go back.
Seasonal Swap: In early fall, use fresh figs and blackberries instead of dried figs and grapes. In late fall, add slices of fuyu persimmon or pomegranate arils for that extra crunch. The beauty of this board is that it adapts to whatever looks good at the market.
Individual Servings: For a more formal gathering, make mini boards on small plates or wooden paddles. Each person gets their own selection of meats, cheeses, and fruit. It’s a fun twist that works especially well for seated dinners.
Serving & Storage Suggestions
This board is best served at room temperature, so let it sit out for about 15-20 minutes after assembly before guests dig in. I usually put it on the table about 10 minutes before everyone sits down, so it’s ready when they start mingling.
For presentation, I love arranging the board on a large wooden slab or marble pastry board. If you don’t have either, a large white platter works beautifully—the contrast makes the fall colors pop. Add a few small spoons for the honey and pomegranate seeds, and provide small plates and napkins for guests to build their own combinations.
This board pairs wonderfully with a crisp white wine like Sauvignon Blanc or a light red like Pinot Noir. For non-alcoholic options, sparkling apple cider or a warm spiced tea complements the fall flavors perfectly. I’ve also served it alongside a bowl of butternut squash soup for a light starter course.
Leftovers keep well for up to 3 days in the refrigerator. Store the meats and cheeses separately in airtight containers, and keep the fruit in a separate container to prevent it from making everything soggy. The crackers will get stale, so plan to eat those within a day. For reheating, let the cheeses come to room temperature again before serving—they’ll taste much better.
One thing I’ve noticed: the flavors actually meld together beautifully overnight. The prosciutto gets slightly saltier, the cheese develops more depth, and the fruit softens just a bit. Sometimes I intentionally make extra so I can have leftovers for lunch the next day.
Nutritional Information & Benefits
This board is designed for sharing, so portion sizes vary. Here’s an approximate breakdown per serving (assuming 8-10 servings):
- Calories: 350-450 per serving
- Protein: 15-20g
- Fat: 25-30g
- Carbohydrates: 20-25g
- Fiber: 4-6g
- Sugar: 12-15g (mostly from fruit)
The fall fruit provides a good dose of vitamin C and antioxidants—especially the pomegranate seeds, which are packed with anti-inflammatory compounds. The nuts offer healthy fats and protein, while the cheese contributes calcium. It’s a balanced appetizer that won’t leave you feeling overly full before the main meal.
This board is naturally gluten-free if you use gluten-free crackers or skip them entirely. It’s also relatively low in added sugar, with the honey being the only sweetener. For those watching sodium, the meats and cheeses are the main contributors, so go easy on the flaky salt if that’s a concern.
Conclusion
This Quick Friendsgiving Charcuterie Board with Fall Fruit has become my go-to for a reason. It’s the appetizer that actually lets me enjoy the party instead of hovering over the stove. The combination of salty prosciutto, creamy brie, crisp apples, and sweet honey is just perfect—and it looks like you spent hours on it when you really didn’t.
I love that this board invites people to build their own combinations. Some guests go for the classic cracker-cheese-meat stack, while others pile on the fruit and honey for a sweeter bite. Everyone finds something they love, and that’s what Friendsgiving is all about—sharing food that brings people together.
Try this board at your next gathering, and don’t be afraid to make it your own. Swap in your favorite cheese, add a different fruit, or skip the meat entirely for a vegetarian version. The formula works no matter what you choose. And when someone asks for the recipe (they will), just smile and tell them it’s easier than it looks. That’s the best part.
I’d love to hear how your board turns out! Drop a comment below with your favorite fall fruit combination, or share a photo of your creation on Pinterest. Happy Friendsgiving, friends—now go make that board!
Frequently Asked Questions
Can I make this board ahead of time?
Yes, you can prep most components up to 24 hours in advance. Slice the fruit, arrange the meats and cheeses, and store everything covered in the refrigerator. Add the crackers and garnish just before serving to keep them fresh.
What if I can’t find persimmons or pomegranates?
No problem at all! Substitute with sliced fuyu persimmons if available, or use extra apples and pears. Dried cranberries or fresh blackberries work great in place of pomegranate seeds.
How much should I make for a crowd?
For a Friendsgiving with 8-10 people, this recipe is perfect. If you’re feeding more, simply double the amounts. As a general rule, plan for about 2-3 ounces of meat and 2-3 ounces of cheese per person.
Can I skip the meat for a vegetarian version?
Absolutely! The board works beautifully without meat. Add extra cheese varieties (like a smoked gouda or aged manchego), more nuts, and maybe some marinated artichoke hearts or roasted red peppers for savory depth.
What’s the best way to store leftovers?
Separate the components into airtight containers—meats, cheeses, fruit, and crackers all go in different containers. Store in the refrigerator for up to 3 days. Let the cheeses come to room temperature before serving leftovers for the best flavor.
PrintQuick Friendsgiving Charcuterie Board with Easy Fall Fruit
This Quick Friendsgiving Charcuterie Board with Fall Fruit comes together in under twenty minutes, uses simple seasonal ingredients, and looks way more impressive than the effort it requires. Perfect for impressing guests without breaking a sweat, or turning a simple gathering into something memorable.
- Prep Time: 20 minutes
- Cook Time: 0 minutes
- Total Time: 20 minutes
- Yield: 8-10 servings 1x
- Category: Appetizer
- Cuisine: American
Ingredients
- 8 ounces prosciutto (sliced thin)
- 6 ounces salami (Genoa, cut into thin rounds)
- 4 ounces soppressata (optional, or use capicola)
- 8 ounces brie (whole)
- 6 ounces aged cheddar (sharp white cheddar, cut into 1-inch cubes)
- 4 ounces goat cheese log
- 2 Honeycrisp apples (or fuji or pink lady)
- 2 Bosc pears
- 1 cup dried figs (mission figs)
- 1 cup red grapes (seedless, washed and stemmed)
- 1 pomegranate (seeds only)
- 1 cup candied pecans
- 1 cup Marcona almonds (or regular almonds)
- Assorted crackers and crostini (about 40 pieces total)
- 1/4 cup honey
- Fresh rosemary sprigs (for garnish)
- 1 tablespoon flaky sea salt (like Maldon)
Instructions
- Start with the bowls. Place small bowls or ramekins on the board first—this anchors the layout. Put the honey in one, pomegranate seeds in another, and candied pecans in a third. Spread them out so they create natural sections on the board. (Place them in a triangle pattern—honey at the top, pomegranate seeds at the bottom left, pecans at the bottom right.)
- Add the cheeses. Place the brie whole on the board—don’t cut it yet. Position the cheddar on the opposite side, cut into rough 1-inch cubes. Place the goat cheese log nearby, and if you want, roll it in some crushed black pepper or fresh herbs for extra flair. Leave space between each cheese so they don’t blend together visually.
- Fold the meats. Take each slice of prosciutto and fold it loosely into ribbons—don’t roll it tight, you want those ruffled edges. Place them in a cluster near one corner. For the salami, simply fan out the rounds in a line or small pile. The soppressata can be folded in half and stacked. (Pro tip: slightly separate the folds so people can grab individual pieces without pulling everything apart.)
- Slice the fruit. Core the apples and pears, then slice them into thin wedges—about 1/4 inch thick. For the apples, cut them into half-moons; for the pears, go with longer slices that show off their shape. Arrange them in overlapping fans near the cheeses. Scatter the dried figs and grapes in the gaps. (If you’re worried about the apples browning, toss them with a little lemon juice, but honestly, they’ll get eaten before that becomes an issue.)
- Fill the gaps. Now comes the fun part—fill every empty space with crackers, almonds, and any extra fruit. The goal is to make it look abundant, like you piled everything on generously. Don’t leave bare wood showing.
- Finish with garnish. Drizzle the honey over the brie and goat cheese in a zigzag pattern. Sprinkle the flaky sea salt over the entire board—especially the cheese and fruit. Tuck fresh rosemary sprigs between the piles for that pop of green and the lovely scent.
Notes
Take the cheeses out of the fridge at least 30 minutes before serving for best flavor and texture. Don’t overthink the layout—boards look best when they feel organic. Prep in stages: slice fruit and arrange meats up to an hour ahead, but add crackers and garnish right before serving. Leftovers keep well for up to 3 days in the refrigerator; store components separately.
Nutrition
- Serving Size: 1 serving (based on
- Calories: 350450
- Sugar: 1215
- Fat: 2530
- Carbohydrates: 2025
- Fiber: 46
- Protein: 1520
Keywords: charcuterie board, Friendsgiving, fall fruit, appetizer, easy, no-cook, prosciutto, brie, pomegranate, seasonal


