I was at my local hardware store last November, waiting for a key to be copied, when the woman behind the counter started talking about cookies. Not the kind you buy in a plastic tub at the grocery store, but the kind that make people stop mid-conversation and ask, “Wait, you made these?” She was maybe sixty, with flour dusted on her apron, and she was telling another customer how she’d been making the same cutout cookies for thirty-seven years. I wasn’t trying to eavesdrop, honestly, but when she mentioned she could get them from mixing bowl to iced cookie in under an hour, I sort of just… stood there. She caught me listening, laughed, and said, “Honey, it’s not about the fancy decorating. It’s about having a system.” She scribbled her method on the back of a receipt, and I still have that crumpled piece of paper tucked into my favorite cookbook. These Quick Iced Thanksgiving Cookie Cutouts are the result of that chance encounter, and let me tell you, they changed my entire holiday baking game.
Maybe you’ve been there — you want to make cute, festive cookies for Thanksgiving, but the thought of spending all day rolling, chilling, baking, and decorating feels exhausting. That was me for years. I’d look at those gorgeous, intricately iced turkey and pumpkin cookies on Pinterest and just close my laptop. But this method? It’s different. The dough comes together in one bowl, no chilling required, and the icing sets in about twenty minutes. You get all the charm of a decorated sugar cookie without the marathon baking session. I’ve made these for three Thanksgivings now, and every single time, someone asks for the recipe. The best part? You can involve the kids without losing your mind. The icing is thick enough that it doesn’t run everywhere, and the sprinkles hide a multitude of sins. It’s a win-win.
The secret is in the texture — a slightly sturdier dough that holds its shape perfectly, even without refrigeration. And the icing? It’s a simple powdered sugar glaze that dries matte and firm, not sticky. You can pipe it, spread it, or even just dip the cookies. I’ve learned that perfection is overrated when it comes to holiday baking. What matters is the smell of cinnamon and nutmeg filling your kitchen, the laughter when someone’s turkey cookie ends up looking more like a duck, and the way a plate of homemade cookies makes everyone feel welcomed. These Quick Iced Thanksgiving Cookie Cutouts deliver all of that, and they do it in a fraction of the time. So grab your rolling pin and let’s make some magic — the fast way.
Why You’ll Love This Recipe
Let’s be honest — Thanksgiving week is chaos. Between the grocery runs, the turkey prep, and the unexpected guests, the last thing you need is a cookie recipe that demands a full day of your attention. That’s where these Quick Iced Thanksgiving Cookie Cutouts come in. They’re designed for real life, not a baking competition. Here’s why they’ll become your new holiday tradition:
- Ready in Under an Hour: From mixing to decorating, you’ll have finished cookies in about 45 minutes. No chilling, no complicated steps, just straight-forward baking that fits into your busy schedule.
- Simple Pantry Ingredients: Butter, sugar, flour, eggs, and a few spices — you probably already have everything you need. No hunting down specialty extracts or hard-to-find sprinkles.
- Perfect for Thanksgiving Gatherings: Whether it’s a classroom party, a Friendsgiving potluck, or the dessert table at your family dinner, these cookies fit right in. They’re festive without being fussy.
- Crowd-Pleaser for All Ages: Kids love the cookie cutters and decorating. Adults appreciate the nostalgic flavor. Everyone eats them. That’s a holiday win.
- Unbelievably Delicious: The dough has a hint of vanilla and warm spices, but it’s not overpowering. The icing adds just the right amount of sweetness. They taste like the best version of a classic sugar cookie.
What makes these different from every other cutout recipe out there? It’s the technique. By using melted butter instead of creaming cold butter, you skip the chilling step entirely. The dough is soft but not sticky, easy to roll, and it bakes up with clean edges. No spreading, no puffing, no distorted shapes. And the icing? It’s a game-changer. I’ve tested dozens of royal icing recipes, and they all require precision and patience. This one is forgiving. If it’s too thick, add a drop of milk. Too thin, add more sugar. It dries in 20 minutes, so you can pack them up or serve them right away. I’ve had professional bakers ask me how I get such clean lines. The answer is always the same: it’s not skill, it’s the recipe.
There’s also something deeply satisfying about making these cookies. Maybe it’s the way the pumpkin cutter presses into the dough, leaving a perfect little shape. Or the way the turkey cutter’s feathers fan out. It feels like a small, manageable creative project in the middle of a hectic holiday season. You get to be artistic without the pressure of perfection. And when you see that plate of iced turkeys and pumpkins, all slightly imperfect and completely charming, you’ll feel a genuine sense of accomplishment. That’s what I love most about this recipe — it delivers results that look impressive but feel achievable. No stress, just cookies.
What Ingredients You Will Need
This recipe uses simple, everyday ingredients to create something special. The magic is in the proportions and the technique, not in fancy additions. Here’s what you’ll need to gather, along with a few tips I’ve learned from making these dozens of times.
For the Cookie Dough
- 2 ½ cups (310g) all-purpose flour — Spoon and level it for accuracy. Too much flour makes the dough dry and crumbly. I prefer Gold Medal or King Arthur for consistent results.
- 1 teaspoon baking powder — This gives the cookies a slight lift without making them puffy. Make sure it’s fresh (test it by dropping a bit in warm water — it should fizz).
- ½ teaspoon salt — Fine sea salt works best. It balances the sweetness and enhances the other flavors.
- 1 teaspoon ground cinnamon — Adds that warm, cozy Thanksgiving vibe. You can substitute pumpkin pie spice if you prefer.
- ½ teaspoon ground nutmeg — Freshly grated is amazing, but pre-ground works perfectly fine. Don’t skip it — it makes the cookies taste like fall.
- ¾ cup (170g) unsalted butter, melted and slightly cooled — Melted butter is the secret to the no-chill dough. Let it cool for about 5 minutes after melting so it doesn’t cook the eggs.
- 1 cup (200g) granulated sugar — Regular white sugar. No need for superfine or organic — standard works great.
- 1 large egg, room temperature — Cold egg will seize the melted butter. If you forgot to take it out of the fridge, place it in a bowl of warm water for 5 minutes.
- 2 teaspoons vanilla extract — Pure vanilla extract makes a difference. Imitation works in a pinch, but the flavor won’t be as rich.
For the Quick Icing
- 2 cups (240g) powdered sugar — Sift it if it’s lumpy. I’ve learned this the hard way — lumps in the icing are nearly impossible to pipe around.
- 3-4 tablespoons milk — Whole milk gives a creamier texture, but any milk works. Start with 3 tablespoons and add more if needed.
- 1 teaspoon vanilla extract — Or use almond extract for a different flavor. Vanilla is classic and pairs well with the spices.
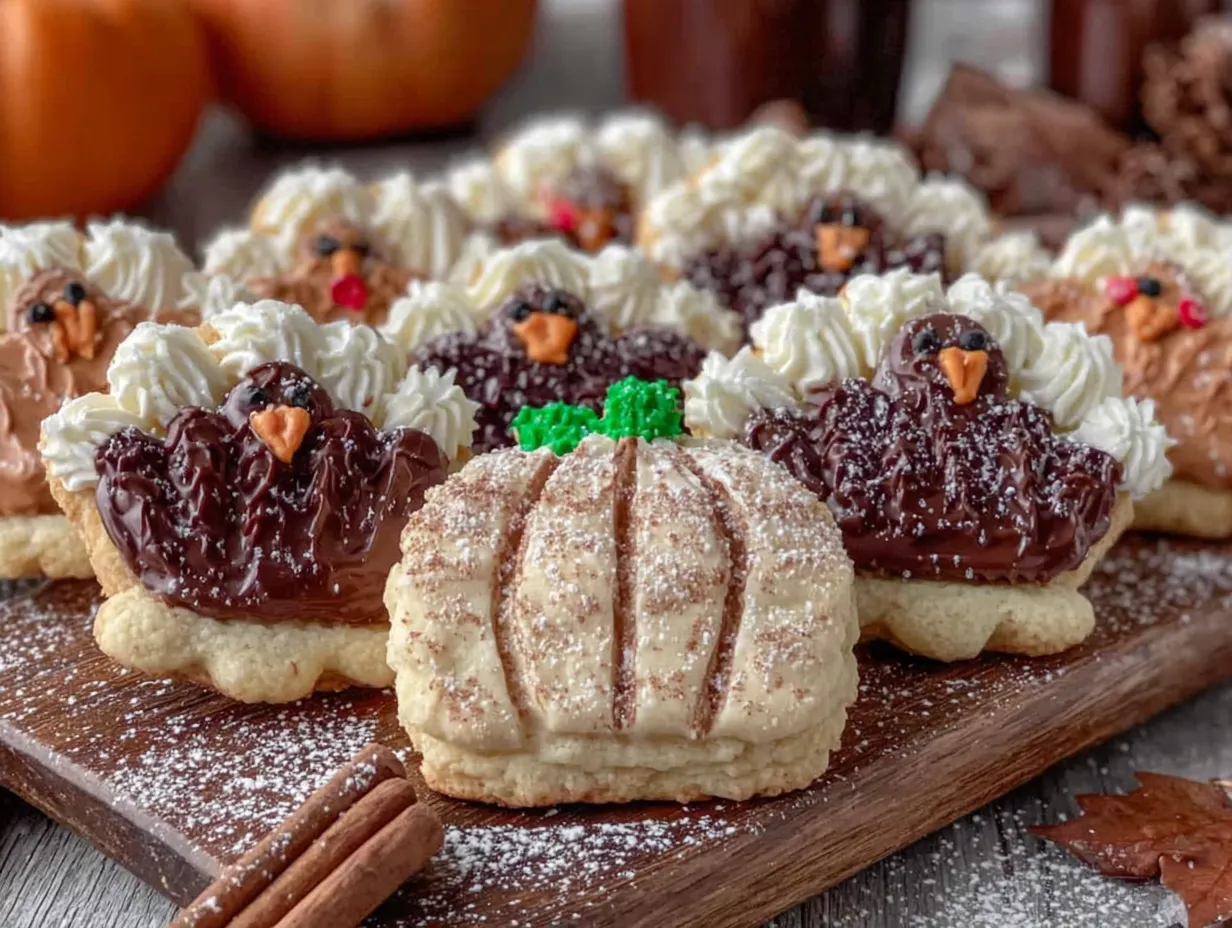
- Food coloring (orange, yellow, red, brown) — Gel food coloring is best because it doesn’t thin the icing. I use Wilton brand. For pumpkins, mix red and yellow to make orange. For turkeys, use brown for the body and a mix of colors for the feathers.
- Sprinkles and candy eyes (optional) — These make decorating faster and more fun. I like the fall mix from Sweetapolita, but any autumn-themed sprinkles work.
Ingredient Selection Tips: For the best texture, use unsalted butter so you control the salt level. If you only have salted butter, reduce the added salt to ¼ teaspoon. For the spices, make sure they’re not ancient — spices lose their potency after about six months. If your cinnamon doesn’t smell strong, it won’t taste strong either. And for the powdered sugar, avoid brands that contain cornstarch as an anti-caking agent if you can — it can affect the icing’s drying time. Domino and C&H are both reliable choices.
Substitution Guidance: Need a dairy-free version? Use vegan butter (I like Miyoko’s) and plant-based milk. For a gluten-free option, swap the all-purpose flour with a 1:1 gluten-free baking flour blend. I’ve tested this with King Arthur Measure for Measure, and it works beautifully. The cookies are slightly more tender, so handle them gently. If you don’t have pumpkin pie spice, mix ½ teaspoon cinnamon, ¼ teaspoon nutmeg, ¼ teaspoon ginger, and a pinch of cloves. That’s basically the same thing.
Equipment Needed
You don’t need a professional bakery setup to make these cookies. Here’s what you’ll actually use:
- Mixing bowls — One large bowl for the dough, one medium bowl for the icing. Glass or stainless steel works best.
- Electric mixer or whisk — A hand mixer makes the dough come together quickly, but a sturdy whisk and some elbow grease works too. I’ve done it both ways.
- Rolling pin — A standard rolling pin is fine. If you have adjustable rings, they help ensure even thickness, but you can also use two wooden spoons as guides.
- Cookie cutters (turkey and pumpkin shapes) — These are the stars of the show. I found a set of 4 on Amazon for under $10. You can also use leaf or acorn shapes for variety.
- Baking sheets — Two standard half-sheet pans work well. Line them with parchment paper or silicone baking mats for easy cleanup.
- Cooling rack — Essential for letting the cookies cool completely before icing. A wire rack allows air to circulate underneath.
- Piping bags or zip-top bags — For the icing. I use disposable piping bags with a small round tip (Wilton #2 or #3). In a pinch, snip a tiny corner off a zip-top bag.
- Small offset spatula — Helpful for spreading icing smoothly. A butter knife works in a pinch.
Budget-Friendly Tip: If you don’t have cookie cutters, you can freehand shapes by cutting around a cardboard template. It takes a bit more time, but it works. Also, skip the fancy piping tips — a zip-top bag with a snipped corner does the job perfectly. I’ve been using the same set of $5 cookie cutters for years, and they’re still going strong. Wash them by hand to prevent rust, and they’ll last forever.
Preparation Method
Let’s get baking. This method is designed to be efficient, so read through once before starting. I’ve included all the little details that make the difference between good cookies and great ones.
- Preheat your oven to 350°F (175°C). Line two baking sheets with parchment paper or silicone mats. This step is non-negotiable — ungreased sheets can cause the cookies to spread.
- Make the dough. In a large bowl, whisk together the flour, baking powder, salt, cinnamon, and nutmeg. Set aside. In another bowl, whisk the melted butter and sugar together until smooth. It should look like wet sand. Add the egg and vanilla, and whisk until fully combined. Pour the dry ingredients into the wet mixture and stir with a wooden spoon or spatula until a soft dough forms. It will be slightly greasy and very pliable — that’s exactly what you want. Don’t overmix, or the cookies will be tough.
- Roll the dough immediately. No chilling! Place the dough on a lightly floured surface. Sprinkle a little flour on top of the dough and on your rolling pin. Roll it out to about ¼-inch (6mm) thickness. If the dough sticks, add a tiny bit more flour to the surface, but not too much — you don’t want dry cookies. I like to roll between two sheets of parchment paper for zero mess, but a floured counter works fine.
- Cut the shapes. Press your turkey and pumpkin cutters firmly into the dough. Give them a little wiggle to release the edges. Transfer the cut shapes to the prepared baking sheets, spacing them about 1 inch (2.5cm) apart. Gather the scraps, gently press them together, and re-roll. You can get about 18-24 cookies depending on the size of your cutters. Pro tip: dip the cutters in flour between cuts to prevent sticking.
- Bake. Place the baking sheets in the preheated oven, one at a time if they don’t fit side by side. Bake for 8-10 minutes, rotating the pan halfway through. The cookies are done when the edges are just barely golden brown. The centers will look pale and slightly puffed — that’s perfect. They’ll continue to set as they cool. Overbaking makes them dry and hard.
- Cool completely. Let the cookies rest on the baking sheet for 5 minutes. This allows them to firm up enough to transfer without breaking. Then move them to a wire rack to cool completely. This is crucial — warm cookies will melt the icing into a puddle. I’ve made that mistake, and it’s not pretty. Give them at least 20 minutes.
- Make the icing. While the cookies cool, whisk together the powdered sugar, 3 tablespoons of milk, and vanilla extract in a medium bowl. Start with 3 tablespoons of milk. The icing should be thick but pipeable — think the consistency of toothpaste. If it’s too thick, add another teaspoon of milk. If it’s too thin, add a tablespoon more powdered sugar. Divide the icing into small bowls and tint with food coloring. For pumpkins, make orange. For turkeys, make brown for the body and any color you like for the feathers (I do red, yellow, and orange).
- Decorate. Spoon each colored icing into a piping bag or zip-top bag. Snip a tiny corner off the bag. Pipe outlines around the edges of the cookies first, then fill in the centers. Use the tip of the piping bag or a toothpick to spread the icing into corners. For turkeys, pipe a brown body, then add colorful dots for feathers. For pumpkins, pipe orange and add a small green stem. Add sprinkles and candy eyes while the icing is still wet. Let the icing set for about 20 minutes — it should be dry to the touch but not rock hard.
- Serve or store. Once the icing is set, the cookies are ready to eat. Or package them in an airtight container for later.
Sensory Cues Throughout: When you mix the dough, it should smell like butter and cinnamon — that’s your cue that the spices are fresh. When you roll it, the dough should feel soft and pliable, not sticky. When you lift a cut shape, it should hold its form without drooping. When you bake, the kitchen will fill with a warm, sweet aroma. The edges should look set, not brown. And when you bite into a finished cookie, you should get a slight crunch from the icing, then a soft, tender cookie underneath. That’s the sweet spot.
Cooking Tips & Techniques
I’ve made these cookies more times than I can count, and I’ve learned a few things the hard way. Here are my best tips for getting perfect results every time.
Don’t Overwork the Dough. This is the number one mistake I see. When you mix the dough, stop as soon as the flour disappears. Overmixing develops gluten, which makes cookies tough and chewy. You want them tender and slightly crumbly — like a good shortbread. If you see streaks of flour, that’s fine. They’ll incorporate as you roll.
Use a Light Hand with Flour. When rolling, use just enough flour to prevent sticking. Too much flour on the surface gets incorporated into the dough and dries it out. I use a small sifter to dust the surface lightly. If the dough starts sticking, instead of adding more flour, try rolling between two sheets of parchment paper. It’s a game-changer.
Chill the Cut Shapes (Optional but Helpful). I said no chilling, and I meant it for the dough stage. But if you have time, pop the cut shapes on the baking sheet into the freezer for 5 minutes before baking. This firms up the butter and helps the cookies hold their shape even better. It’s not necessary, but it gives you extra-crisp edges. I do this when I’m making cookies for a special occasion.
Rotate Your Baking Sheets. Every oven has hot spots. Halfway through baking, rotate the pan front to back. If you’re baking two sheets at once, swap their positions too. This ensures even browning. I learned this after a batch of cookies came out with burnt edges on one side and pale on the other.
Let the Icing Set Fully. I know you’re excited to eat them, but patience pays off. If you stack or package cookies before the icing is fully dry, they’ll stick together and smudge. Give them a full 30 minutes on the cooling rack. In humid weather, it might take longer. To speed things up, you can place them in front of a fan.
Fix Icing Mistakes Fast. If you mess up a line or the icing runs where you don’t want it, use a toothpick to gently guide it back into place. If it’s really bad, scrape off the wet icing with a small knife and start over. The cookie underneath is fine. I’ve done this more times than I’ll admit.
Variations & Adaptations
One of the best things about this recipe is how adaptable it is. Here are some ways to make it your own.
Dietary Adaptations: For a dairy-free version, substitute the butter with vegan butter (I like Earth Balance) and use oat milk in the icing. For gluten-free, swap the flour with a 1:1 gluten-free baking blend. I’ve tested this with Bob’s Red Mill, and the cookies are slightly more delicate but still delicious. For a lower-sugar option, reduce the sugar in the dough to ¾ cup and use a sugar-free powdered sugar substitute in the icing. The texture will be slightly different, but they’re still tasty.
Flavor Variations: Add ½ teaspoon of ginger to the dough for a spicier cookie. Or replace the cinnamon and nutmeg with 1 teaspoon of pumpkin pie spice. For a citrus twist, add 1 teaspoon of orange zest to the dough and use orange juice instead of milk in the icing. I made a batch with orange icing last year, and they were gone in minutes. You can also add a pinch of cardamom for a unique flavor — it pairs surprisingly well with pumpkin shapes.
Seasonal Adaptations: This dough works for any holiday. Use Christmas tree and star cutters in December, heart shapes for Valentine’s Day, or egg shapes for Easter. The baking time stays the same. Just change the icing colors and sprinkles. I keep a batch of this dough in the freezer specifically for last-minute holiday baking. It thaw in the fridge overnight and rolls out perfectly.
Different Cooking Methods: If you don’t have cookie cutters, you can slice the dough into squares or use a glass to make circles. They won’t be as festive, but they’ll taste the same. You can also bake the dough as a slab and cut it into bars after cooling. For a quicker version, skip the icing altogether and sprinkle the cookies with cinnamon sugar before baking. They’re less decorative but just as delicious.
Personal Variation I Love: I once made a batch where I added ½ cup of finely chopped pecans to the dough. The nuts added a wonderful crunch and toasted flavor. I drizzled them with a simple maple icing (replace the vanilla with maple extract). They were a huge hit at my Friendsgiving. Just be aware that the nuts make the dough a bit more fragile, so handle the cut shapes gently.
Serving & Storage Suggestions
These cookies are versatile enough for any Thanksgiving occasion. Here’s how to serve and store them for the best experience.
Serving Temperature and Presentation: Serve at room temperature. Arrange them on a large platter or cake stand, mixing the turkey and pumpkin shapes for visual interest. I like to layer them on a bed of faux fall leaves for a festive look. For a dessert table, stack them in a clear glass jar tied with a ribbon — it makes a beautiful centerpiece that guests can grab from. If you’re bringing them to a party, pack them in a single layer in a sturdy container with parchment paper between layers.
Complementary Dishes: These cookies pair beautifully with a cup of hot apple cider or a pumpkin spice latte. For a dessert spread, serve them alongside pumpkin pie, pecan pie, and apple crisp. They’re also great with a cheese board — the sweetness contrasts nicely with sharp cheddar or aged gouda. If you’re making a cookie platter, include chocolate chip cookies and snickerdoodles for variety.
Storage Instructions: Store in an airtight container at room temperature for up to 1 week. Layer them with parchment paper to prevent the icing from sticking. Do not refrigerate — the fridge dries out the cookies and can cause the icing to sweat. If you live in a humid climate, add a piece of bread to the container to absorb excess moisture. Replace the bread every few days.
Freezer Instructions: You can freeze the baked, un-iced cookies for up to 3 months. Wrap them tightly in plastic wrap, then place in a freezer-safe bag. Thaw at room temperature, then ice as directed. You can also freeze the iced cookies, but the icing may lose its shine. To freeze iced cookies, place them in a single layer on a baking sheet and freeze until solid, then transfer to a container with parchment between layers. Thaw in the container to prevent condensation from ruining the icing.
Reheating Tips: These cookies are best at room temperature, but if you want a warm cookie, pop one in a 300°F (150°C) oven for 2-3 minutes. Don’t microwave them — it will make the icing sticky and the cookie tough. If you’re serving them after a meal, take them out of storage 30 minutes before serving to come to room temperature.
Nutritional Information & Benefits
Let’s be honest — these are cookies, not health food. But here’s what you’re getting in each serving, along with a few bright spots.
Estimated Nutritional Values (per cookie, based on 24 cookies):
- Calories: 145
- Fat: 6g
- Saturated Fat: 4g
- Carbohydrates: 22g
- Sugar: 14g
- Protein: 2g
- Sodium: 55mg
Health Benefits of Key Ingredients: Cinnamon has anti-inflammatory properties and can help regulate blood sugar. Nutmeg contains antioxidants and has been used in traditional medicine for digestion. Butter provides fat-soluble vitamins A, D, E, and K. And while sugar is sugar, the small serving size means you’re getting a treat, not a sugar bomb. I like to think of these as a “sometimes food” — perfect for holidays and special occasions.
Dietary Considerations: This recipe contains gluten, dairy, and eggs. For allergen-friendly versions, see the variations section above. The cookies are vegetarian and can be made vegan with the substitutions mentioned. They are not low-carb or keto-friendly due to the sugar content. If you’re watching your sugar intake, consider making a smaller batch or sharing with friends (which is always a good idea anyway).
Personal Wellness Perspective: I believe in balance. I make these cookies for Thanksgiving because they bring joy to my family and friends. I don’t stress about the nutritional profile — I focus on the experience of baking together, the laughter, and the memories. If you’re someone who tracks every bite, these cookies are a treat to be enjoyed mindfully. One cookie with a cup of tea is a lovely way to end a meal. Two cookies? That’s a celebration. And that’s okay.
Conclusion
These Quick Iced Thanksgiving Cookie Cutouts have become a staple in my holiday baking rotation, and I think they’ll become one in yours too. They’re fast enough for a busy weeknight, but special enough for the Thanksgiving dessert table. The dough is forgiving, the icing is foolproof, and the results are genuinely impressive. I’ve made them with my niece, who decorated a turkey that looked more like a blobfish, and we laughed until we cried. That’s what baking should be — not about perfection, but about connection.
I encourage you to make these your own. Use different cookie cutters, experiment with the spices, or let the kids go wild with the sprinkles. The recipe is a starting point, not a rulebook. And if you end up with a few broken cookies along the way? Those are the baker’s tax. You’ve earned them.
I’d love to hear how yours turn out. Did you try a fun variation? Did your turkey cookies look more like chickens? Share your stories in the comments below — I read every single one. And if you loved this recipe, please share it with a friend who needs a little Thanksgiving baking inspiration. Happy baking, and happy Thanksgiving!
Frequently Asked Questions
Can I make the dough ahead of time?
Yes, you can make the dough up to 3 days in advance. Wrap it tightly in plastic wrap and refrigerate. Let it sit at room temperature for about 15 minutes before rolling, as it will be quite firm straight from the fridge. You can also freeze the dough for up to 3 months. Thaw overnight in the refrigerator before using.
Why did my cookies spread in the oven?
This usually happens for one of three reasons: the dough was too warm, the baking sheet was too warm, or there wasn’t enough flour. Make sure your butter is melted but not hot when you add it to the dough. If your baking sheets are still warm from a previous batch, let them cool completely before adding more cookies. And if the dough feels very soft or greasy, add a tablespoon more flour.
Can I use royal icing instead of this quick icing?
Absolutely. Royal icing (made with meringue powder or egg whites) dries harder and shinier, which is great for detailed decorating. However, it takes longer to dry and requires more precision. This quick icing is designed for speed and ease, so if you’re short on time, stick with this version. If you want a more professional look, go ahead and use your favorite royal icing recipe.
How do I get clean, sharp edges on my cookies?
The key is to dip your cookie cutters in flour before each cut. This prevents the dough from sticking to the cutter and pulling the edges. Also, press straight down — don’t twist the cutter, as that can seal the edges and prevent even baking. If your edges are still fuzzy, try freezing the cut shapes for 5 minutes before baking. This firms up the butter and helps the cookies hold their shape.
Can I use this dough for other holidays?
Yes, this is my go-to cutout cookie dough for any occasion. The flavor is neutral enough to work with any icing color or theme. For Christmas, use tree, star, and snowflake cutters with red and green icing. For Valentine’s Day, use heart shapes with pink icing. For Easter, use egg and bunny shapes with pastel colors. The baking time and method stay the same. I always keep a batch of this dough in my freezer for last-minute holiday baking emergencies.
Pin This Recipe!
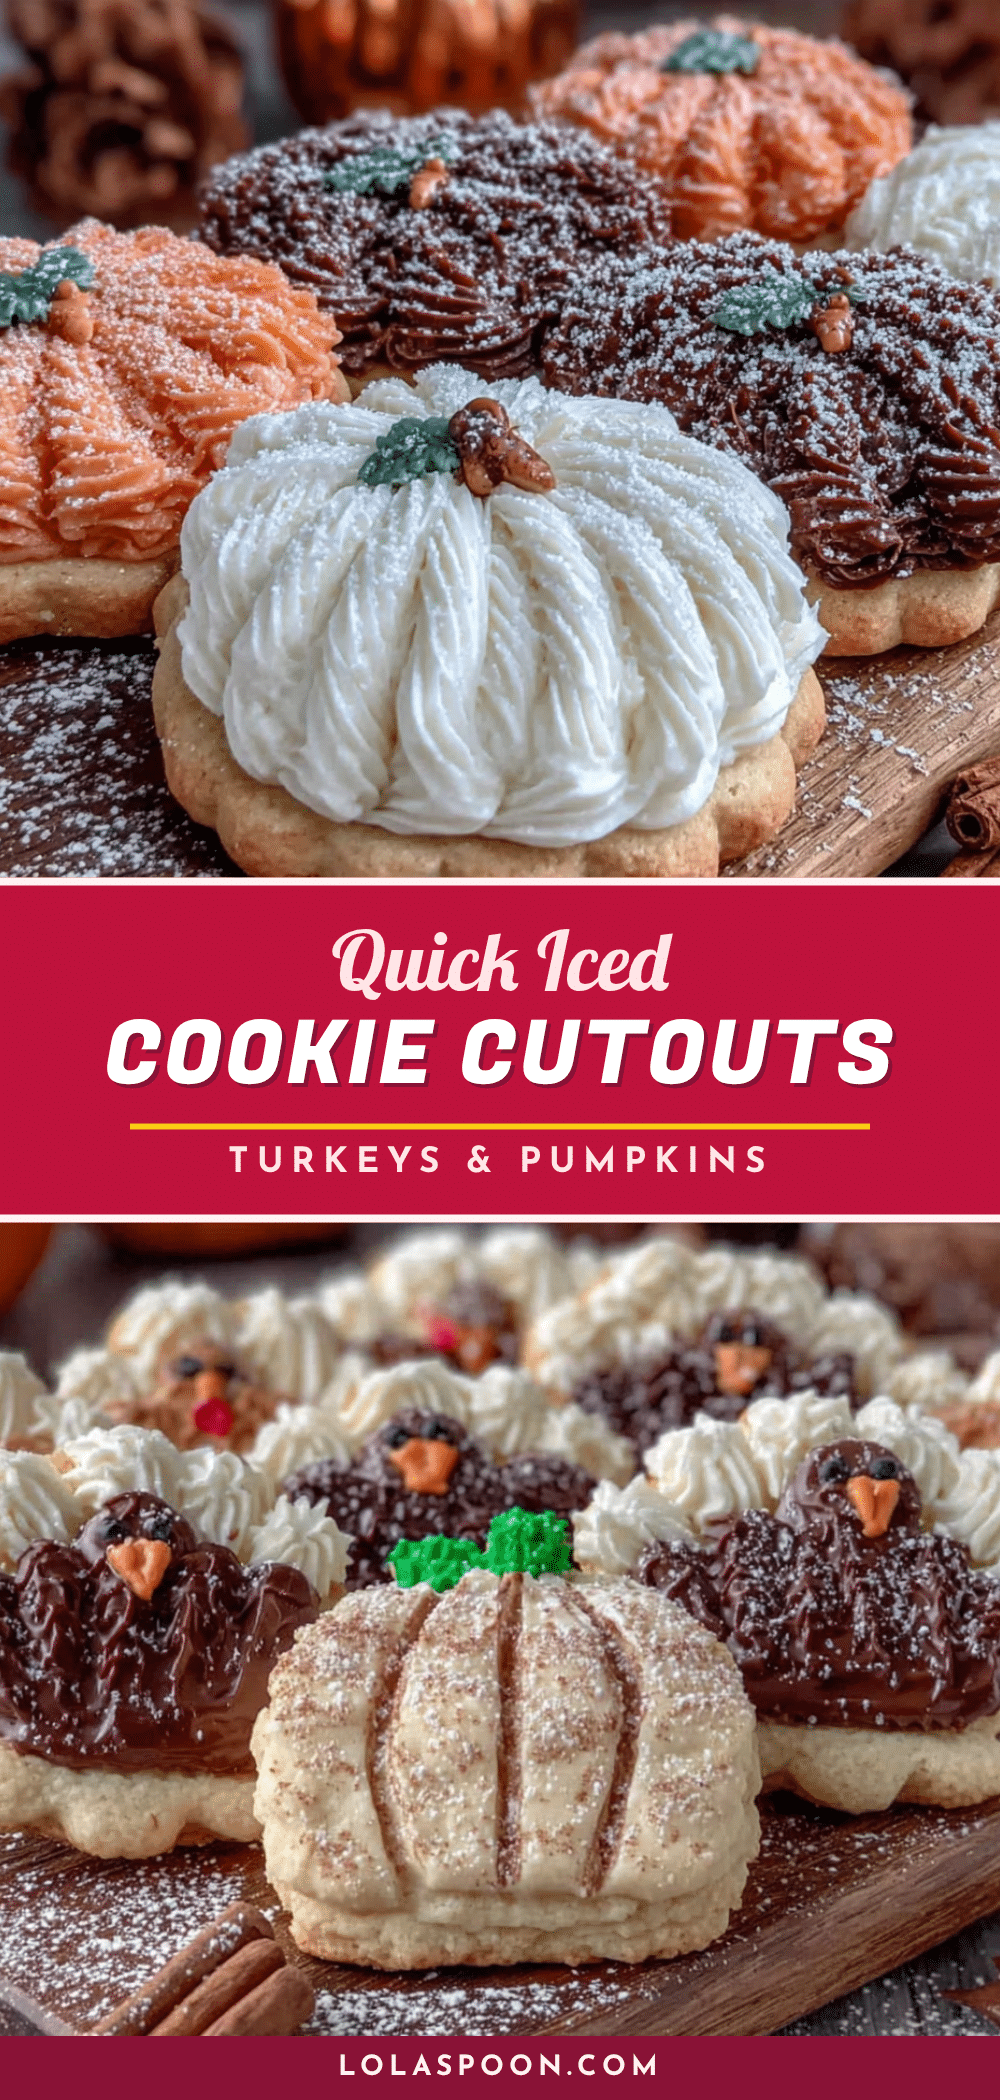
Quick & Easy Iced Thanksgiving Cookie Cutouts: Perfect Turkey Treats
These Quick Iced Thanksgiving Cookie Cutouts are designed for busy holiday bakers. With a no-chill dough and a quick-setting icing, you can have festive, delicious cookies from mixing bowl to decorated in under an hour.
- Prep Time: 15 minutes
- Cook Time: 10 minutes
- Total Time: 45 minutes
- Yield: 24 servings 1x
- Category: Dessert
- Cuisine: American
Ingredients
- 2 ½ cups (310g) all-purpose flour
- 1 teaspoon baking powder
- ½ teaspoon salt
- 1 teaspoon ground cinnamon
- ½ teaspoon ground nutmeg
- ¾ cup (170g) unsalted butter, melted and slightly cooled
- 1 cup (200g) granulated sugar
- 1 large egg, room temperature
- 2 teaspoons vanilla extract
- 2 cups (240g) powdered sugar
- 3–4 tablespoons milk
- 1 teaspoon vanilla extract
- Food coloring (orange, yellow, red, brown)
- Sprinkles and candy eyes (optional)
Instructions
- Preheat your oven to 350°F (175°C). Line two baking sheets with parchment paper or silicone mats.
- Make the dough: In a large bowl, whisk together the flour, baking powder, salt, cinnamon, and nutmeg. Set aside. In another bowl, whisk the melted butter and sugar together until smooth. Add the egg and vanilla, and whisk until fully combined. Pour the dry ingredients into the wet mixture and stir until a soft dough forms. Do not overmix.
- Roll the dough immediately on a lightly floured surface to about ¼-inch (6mm) thickness.
- Cut shapes using turkey and pumpkin cookie cutters. Transfer to prepared baking sheets, spacing about 1 inch apart. Gather scraps, re-roll, and cut more cookies.
- Bake for 8-10 minutes, rotating the pan halfway through, until edges are just barely golden. Cool on the baking sheet for 5 minutes, then transfer to a wire rack to cool completely.
- Make the icing: Whisk together powdered sugar, 3 tablespoons milk, and vanilla extract until thick but pipeable (toothpaste consistency). Adjust with more milk or sugar as needed. Divide and tint with food coloring.
- Decorate: Spoon icing into piping bags or zip-top bags, snip a tiny corner, and pipe outlines and fill centers. Add sprinkles and candy eyes while icing is wet. Let set for about 20 minutes until dry to the touch.
- Serve or store in an airtight container at room temperature.
Notes
The dough uses melted butter to skip the chilling step. The icing sets in about 20 minutes. For best results, dip cookie cutters in flour between cuts. If the dough sticks while rolling, use a light hand with flour or roll between parchment paper. For extra crisp edges, freeze cut shapes for 5 minutes before baking.
Nutrition
- Serving Size: 1 cookie
- Calories: 145
- Sugar: 14
- Sodium: 55
- Fat: 6
- Saturated Fat: 4
- Carbohydrates: 22
- Protein: 2
Keywords: Thanksgiving cookies, cutout cookies, sugar cookies, iced cookies, turkey cookies, pumpkin cookies, quick cookies, no-chill cookies


