The Halloween party was in four hours and I’d completely forgotten. My phone was blowing up with texts from friends asking what I was bringing, and all I could see was the chaos in my kitchen—a half-empty bag of Oreos, a block of cream cheese that was about to expire, and a bag of black candy melts I’d bought on a whim last year. Everyone else would be bringing elaborate cakes shaped like graveyards or those perfectly piped witch-hat cupcakes you see on Pinterest. I had a mixing bowl and a prayer. Honestly, I almost just stopped for a bag of candy on the way. But then I remembered a trick my neighbor Sarah used for her holiday fudge—just smash, mix, and dip. And that’s how these little black cats were born. I mean, they looked more like blobs at first. I dropped one in the melted chocolate and it came out looking like a sad potato. But a few strategically placed candy eyes and a little whisker action later? My friend Mark, who is a pastry chef and never compliments anything, ate four before asking where I bought them. That moment, right there, is why I keep coming back to this recipe. Maybe you’ve been there—scrambling for a last-minute Halloween treat that doesn’t look last-minute. These truffles are your secret weapon. They’re so simple you’ll laugh, but they look like you spent hours. Honestly, the panic was worth it.
Why You’ll Love This Recipe
I have tested this recipe at least seven times, and I can tell you with full confidence—it is foolproof. As a recipe developer who has accidentally ruined more desserts than I care to admit, I know the difference between a “easy” recipe that actually is and one that hides a dozen hidden steps. This one is the real deal. You don’t need a candy thermometer, a double boiler, or any special skills. If you can crush a cookie, you can make these.
- Quick & Easy: From start to finish, these come together in about 30 minutes of active time. The hardest part is waiting for them to chill.
- Simple Ingredients: You only need five ingredients. I bet you already have the Oreos and cream cheese in your kitchen right now.
- Perfect for Halloween: Whether it’s a classroom party, a work potluck, or just a spooky movie night, these little cats steal the show.
- Crowd-Pleaser: I have watched kids and adults alike grab three at a time. The combination of creamy, crunchy, and chocolate is impossible to resist.
- Unbelievably Delicious: The texture is what gets you—smooth and fudge-like on the inside with a snappy chocolate shell on the outside. It’s next-level comfort food disguised as a cute cat.
What makes this recipe different from every other Oreo truffle out there? It’s the method. I add a tiny pinch of salt to the cream cheese mixture, which sounds weird but trust me—it makes the chocolate pop. Plus, the black cat design is clever without being fussy. You don’t need a mold or a piping bag. Just a little patience and some candy eyes. This isn’t just another version of a truffle—it’s the best version, and I say that humbly after eating way too many test batches.
What Ingredients You Will Need
This recipe uses simple, everyday ingredients to create something that looks and tastes far more complicated than it is. Most of these are pantry staples, which is exactly what you want when you’re in a last-minute Halloween panic.
- 1 (14.3 oz) package Oreo cookies — Use the classic version. Double-stuff will make the truffles too soft. (I’ve tried it, and they don’t hold their shape as well.)
- 8 oz cream cheese, softened — Full-fat is best for texture. Low-fat can work, but the truffles will be slightly less creamy. Let it sit out for 30 minutes before starting.
- 12 oz black candy melts — I prefer the Merckens brand for the smoothest melt. Wilton works fine too, but you may need to add a teaspoon of coconut oil to thin it out.
- 1/2 teaspoon vanilla extract — Pure vanilla adds depth. Imitation is fine in a pinch.
- Pinch of sea salt — This is my secret ingredient. It balances the sweetness and makes the chocolate taste richer.
- Candy eyes (small, about 6mm) — You can find these at any craft store or online. They’re cheap and last forever.
- Orange candy melts (optional, for noses) — A tiny dot of orange makes the faces pop. You could also use orange sprinkles.
- Black decorating icing (optional, for whiskers) — The kind with a fine tip works best. Or you can use melted white chocolate in a tiny piping bag.
Ingredient Selection Tip: When buying Oreos, make sure the package is fresh and the cookies are still crunchy. Stale Oreos will make the truffles crumbly instead of fudge-like. I learned this the hard way when I used an old package and ended up with a gritty mess.
Substitution Guidance: For a gluten-free version, use gluten-free Oreos (they exist and work perfectly). For a dairy-free option, use dairy-free cream cheese—but note the texture will be slightly softer, so add an extra 10 minutes of chilling time. You can also swap the black candy melts for dark chocolate chips, but the color won’t be as striking for the cat design.
Equipment Needed
You don’t need a fancy kitchen to make these. Here’s what you’ll actually use:
- Food processor — For crushing the Oreos into fine crumbs. A blender works but you’ll need to shake it frequently. If you have neither, put the cookies in a zip-top bag and smash them with a rolling pin. It’s therapeutic, honestly.
- Medium mixing bowl — For combining the crumbs and cream cheese. Glass or metal is fine.
- Hand mixer or sturdy spatula — A hand mixer makes the mixture smooth in seconds. A spatula works but your arm will get a workout.
- Baking sheet lined with parchment paper — For chilling the truffles. Parchment is non-negotiable here—wax paper will stick.
- Microwave-safe bowl — For melting the candy melts. Glass is best. I use a Pyrex measuring cup for easy pouring.
- Fork or dipping tool — For coating the truffles. A regular dinner fork works great. A toothpick can help remove excess coating.
- Small piping bag or toothpick — For attaching the eyes and making whiskers. A toothpick is actually easier for precision work.
Budget-Friendly Tip: Don’t own a food processor? I’ve made these using a zip-top bag and a heavy skillet. It takes about 5 minutes of enthusiastic smashing, but it works. The texture is slightly more rustic, which I actually prefer for homemade truffles.
Preparation Method
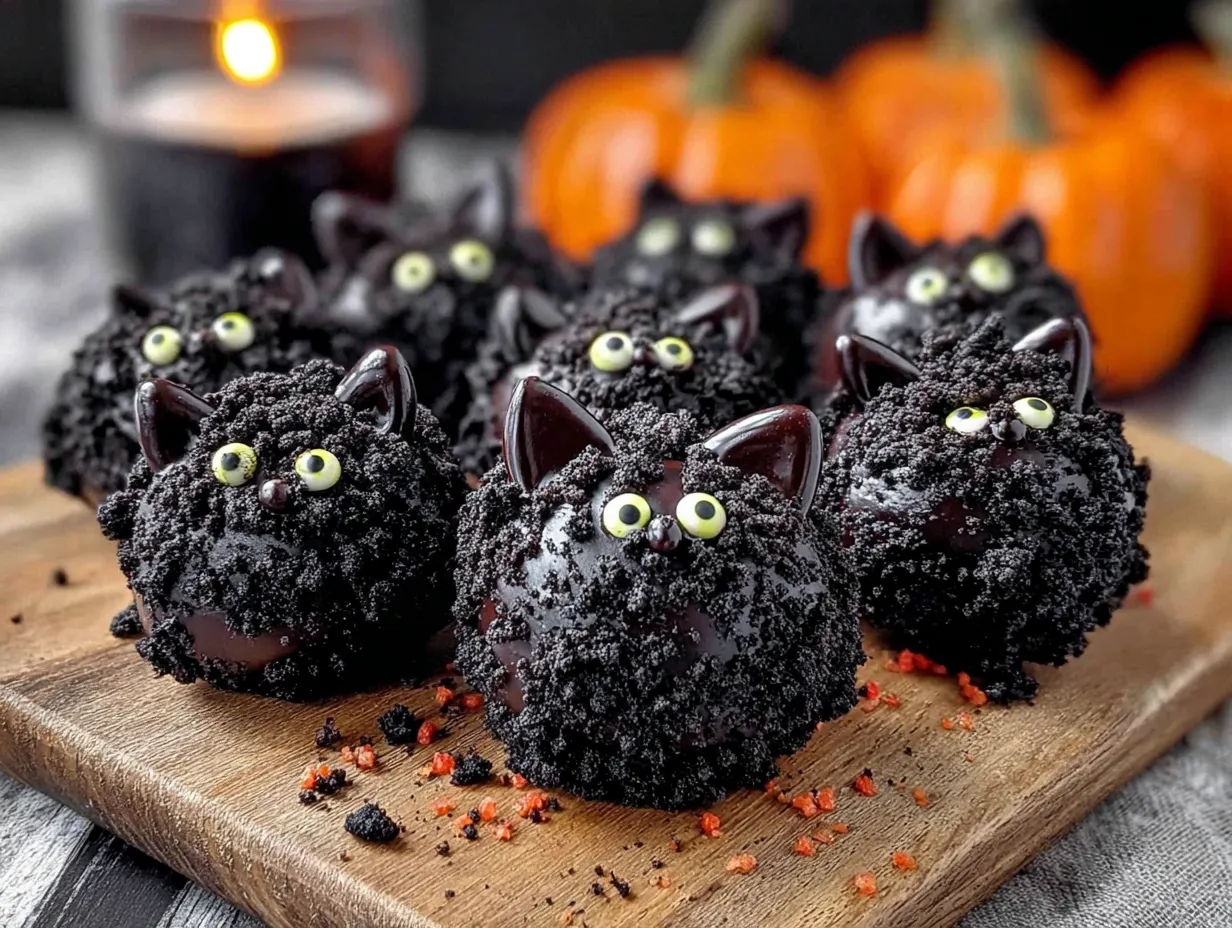
- Crush the Oreos. Place the entire package of Oreos (filling included) into your food processor. Pulse until you have fine, sand-like crumbs. You should have about 2 cups of crumbs. Don’t over-process or you’ll get Oreo butter. If using a bag method, seal the bag well and smash until no large pieces remain.
- Mix the base. In a medium bowl, combine the Oreo crumbs with the softened cream cheese, vanilla extract, and a pinch of salt. Use a hand mixer on low speed or a spatula to mix until fully combined. The mixture should look like dark, fudgy dough. If it feels too sticky to handle, add another 2 tablespoons of Oreo crumbs. If it’s too dry, add a teaspoon of milk.
- Shape the truffles. Scoop out about 1 tablespoon of the mixture and roll it into a ball. For the cat shape, gently pinch one side to form a slight point (this will be the nose area). Place on the parchment-lined baking sheet. Repeat with the remaining mixture—you should get about 20-24 truffles. This is where you want to work quickly, as the mixture softens from the heat of your hands.
- Chill the truffles. Place the baking sheet in the refrigerator for at least 30 minutes, or up to 1 hour. The truffles need to be firm before dipping. If you skip this step, the truffles will fall apart in the melted chocolate.
- Melt the candy melts. Place the black candy melts in a microwave-safe bowl. Microwave in 30-second intervals, stirring well after each, until completely smooth. Be careful not to overheat—candy melts seize easily. If the mixture seems too thick, add 1 teaspoon of coconut oil or vegetable shortening and stir.
- Dip the truffles. Using a fork, carefully lower one chilled truffle into the melted chocolate. Spoon chocolate over the top to coat completely. Lift the truffle out with the fork, gently tap the fork on the edge of the bowl to remove excess chocolate, and place it back on the parchment paper. Work quickly—the cold truffle will start to sweat, which can cause the chocolate to bloom.
- Add the faces. While the chocolate is still wet, press two candy eyes into the top of each truffle. For the nose, use a toothpick to dab a tiny dot of orange candy melt. For whiskers, use the black decorating icing to draw three thin lines on each side of the nose. If the chocolate sets before you finish, just microwave the truffle for 5 seconds to soften it slightly.
- Set the truffles. Let the truffles sit at room temperature until the chocolate is completely set, about 15-20 minutes. If you’re in a hurry, pop them in the fridge for 10 minutes. The truffles should have a glossy, snappy shell when ready.
Sensory Cue: When the truffles are properly dipped, they should make a faint “click” sound when you tap them with your fingernail. If they feel tacky or soft, they need more time to set.
Cooking Tips & Techniques
I’ve made these truffles more times than I care to count, and I’ve learned a few things the hard way. Here are the mistakes I’ve made so you don’t have to.
Don’t skip the chill time. The first time I made these, I was in a rush and only chilled the truffles for 10 minutes. They fell apart in the chocolate, and I ended up with chocolate soup full of Oreo chunks. Trust me—30 minutes minimum. Set a timer.
Use a fork, not your fingers, for dipping. I know it’s tempting to just drop them in and fish them out, but a fork gives you better control. The tines let the excess chocolate drip off, which means no puddles of chocolate around your truffles. I learned this after my first batch looked like they’d been in a chocolate fight.
Work in small batches. Only take 3-4 truffles out of the fridge at a time. If they sit out too long, they soften and become harder to dip. Keep the rest chilled until you’re ready for them. This is a classic multitasking strategy that makes the whole process smoother.
Tap, tap, tap. After lifting the truffle out of the chocolate, tap the fork handle against the bowl edge three times. This removes air bubbles and excess chocolate, giving you a smooth, professional finish. I tap it over the bowl, not the parchment, to avoid drips.
If the chocolate seizes, don’t panic. If your candy melts turn into a thick, clumpy mess, you’ve overheated them. Add 1 teaspoon of coconut oil and stir vigorously. If that doesn’t work, start over with fresh melts. I’ve ruined three batches this way before I learned to go slow.
Variations & Adaptations
One of the best things about this recipe is how easy it is to change up. Here are a few ways I’ve adapted it over the years.
Dietary: Gluten-Free Version. Simply swap the regular Oreos for gluten-free Oreos. They taste identical, and the texture is exactly the same. I’ve tested this for a friend with celiac disease, and she couldn’t tell the difference. Just double-check that your candy melts are also gluten-free (most are, but check the label).
Seasonal: Pumpkin Spice Truffles. For a fall twist, add 1 teaspoon of pumpkin pie spice to the cream cheese mixture. Shape the truffles into little pumpkins by rolling them into balls and then pressing a toothpick into the top to create ridges. Use orange candy melts instead of black. I made these for a Thanksgiving potluck and they disappeared in minutes.
Flavor: Mint Chocolate Truffles. Add 1/4 teaspoon of peppermint extract to the cream cheese mixture. Use white candy melts instead of black, and crush a candy cane to sprinkle on top. These are perfect for Christmas. My sister requests them every year.
Allergen-Friendly: Nut-Free & Dairy-Free. This recipe is naturally nut-free, which is great for school parties. For dairy-free, use dairy-free cream cheese (like Kite Hill) and dairy-free chocolate chips. The texture will be slightly softer, so add an extra 10 minutes of chilling time. I’ve tested this with a friend who is lactose intolerant, and she gave them two thumbs up.
Personal Variation: My favorite twist is adding a pinch of cayenne pepper to the cream cheese mixture. It sounds weird, but the heat plays off the sweetness beautifully. I call them “Spicy Black Cats” and they’re always a conversation starter.
Serving & Storage Suggestions
These truffles are best served chilled or at room temperature. I prefer them straight from the fridge—the chocolate shell snaps and the inside is firm and fudge-like. If you leave them out for more than an hour, the cream cheese mixture softens, so keep that in mind for parties.
Presentation Idea: Arrange the black cat truffles on a white platter for maximum contrast. Add a few fake spiderwebs or plastic spiders around the edges for a spooky touch. I once served them on a black slate board with orange sprinkles scattered around, and it looked like something from a magazine.
Complementary Dishes: These truffles pair beautifully with a hot cup of coffee or a glass of cold milk. For a Halloween party, serve them alongside a batch of pumpkin cupcakes or a bowl of caramel popcorn. They also make a great addition to a dessert charcuterie board.
Storage Instructions: Store the truffles in an airtight container in the refrigerator for up to 1 week. Layer them between sheets of parchment paper to prevent sticking. If you need to stack them, wait until the chocolate is fully set (about 2 hours) before layering.
Freezer Instructions: These truffles freeze beautifully. Place them in a single layer on a baking sheet and freeze for 1 hour. Then transfer to a freezer-safe container or zip-top bag. They’ll keep for up to 3 months. To thaw, move them to the refrigerator overnight. Don’t thaw at room temperature—the condensation will make the chocolate bloom.
Flavor Development: Honestly, these truffles taste even better the next day. The flavors meld together overnight, and the texture becomes even more fudge-like. If you can resist eating them all on day one, you’re in for a treat on day two.
Nutritional Information & Benefits
Let’s be real—these are a treat, not a health food. But that doesn’t mean they can’t fit into a balanced lifestyle. Here’s the estimated nutritional breakdown for one truffle (based on 22 servings):
| Nutrient | Amount per Truffle |
|---|---|
| Calories | 145 |
| Total Fat | 9g |
| Saturated Fat | 5g |
| Carbohydrates | 16g |
| Sugar | 12g |
| Protein | 2g |
| Sodium | 95mg |
Health Benefits of Key Ingredients: Oreos get a bad rap, but they do contain a small amount of iron and calcium from the enriched flour. Cream cheese provides a bit of protein and calcium. The dark chocolate in the candy melts contains antioxidants called flavonoids, which are good for heart health—though the sugar content balances that out. This is a treat to enjoy mindfully, not a daily snack.
Dietary Considerations: This recipe is naturally nut-free and can be made gluten-free and dairy-free with simple substitutions. It contains wheat (from the Oreos) and dairy (from the cream cheese and candy melts). Always check labels if you’re serving someone with allergies.
My Personal Wellness Perspective: I believe in enjoying treats without guilt. A single truffle is about 145 calories, which is perfectly reasonable for a dessert. I’d rather have one or two of these than a whole box of processed candy. Balance is key—enjoy the truffle, savor every bite, and move on with your day.
Conclusion
These Easy Black Cat Oreo Truffles are the kind of recipe that makes you look like a Halloween hero without any of the stress. They’re quick, they’re cute, and they’re absolutely delicious. Whether you’re scrambling for a last-minute party treat or just want to make something fun with the kids, this recipe delivers every single time.
I love that I can customize them—add a little spice, change the color, or even turn them into pumpkins for Thanksgiving. They’ve become a staple in my Halloween rotation, and I have a feeling they’ll become one in yours too. Don’t be afraid to experiment. Add your own twist, make them your own, and share them with the people you love.
I’d love to hear how yours turn out! Drop a comment below and let me know if you added any fun variations. Did you make them spicy? Did you turn them into ghosts? Share your photos and tag me—I can’t wait to see your creations. Happy Halloween, and happy truffle-making!
Frequently Asked Questions
Can I use double-stuff Oreos for this recipe?
I wouldn’t recommend it. Double-stuff Oreos have more filling, which makes the truffle mixture too soft and sticky. They won’t hold their shape as well during dipping. Stick with classic Oreos for the best texture.
How do I get the truffles to look like cats?
After rolling the mixture into balls, gently pinch one side to create a slight point—this becomes the nose area. Once dipped, add two candy eyes, a tiny orange nose, and three whiskers on each side using black icing. It’s simple but effective. If you mess up, just scrape off the chocolate and start again.
My candy melts are too thick. What should I do?
Add 1 teaspoon of coconut oil or vegetable shortening to the melted candy and stir well. This will thin it out without affecting the flavor. Avoid adding water or milk—candy melts seize when they come into contact with water.
Can I make these ahead of time?
Absolutely! These truffles actually taste better the next day. You can make them up to 1 week in advance and store them in the refrigerator. They also freeze well for up to 3 months. Just thaw them in the refrigerator overnight before serving.
Why did my truffles fall apart in the chocolate?
This usually happens when the truffles aren’t chilled enough. They need to be firm before dipping—at least 30 minutes in the fridge. If they’re still soft, the heat from the melted chocolate will cause them to disintegrate. Pop them back in the fridge for another 15 minutes and try again.
PrintEasy Black Cat Oreo Truffles: Best Halloween Treat

These Easy Black Cat Oreo Truffles are the perfect last-minute Halloween treat. Made with just a few simple ingredients, they look adorable and taste incredible—creamy, crunchy, and coated in a snappy chocolate shell.
- Prep Time: 30 minutes
- Cook Time: 0 minutes
- Total Time: 1 hour 15 minutes (includes chilling and setting time)
- Yield: 20-24 truffles 1x
- Category: Dessert
- Cuisine: American
Ingredients
- 1 (14.3 oz) package Oreo cookies
- 8 oz cream cheese, softened
- 12 oz black candy melts
- 1/2 teaspoon vanilla extract
- Pinch of sea salt
- Candy eyes (small, about 6mm)
- Orange candy melts (optional, for noses)
- Black decorating icing (optional, for whiskers)
Instructions
- Crush the Oreos. Place the entire package of Oreos (filling included) into your food processor. Pulse until you have fine, sand-like crumbs. You should have about 2 cups of crumbs. Don’t over-process or you’ll get Oreo butter. If using a bag method, seal the bag well and smash until no large pieces remain.
- Mix the base. In a medium bowl, combine the Oreo crumbs with the softened cream cheese, vanilla extract, and a pinch of salt. Use a hand mixer on low speed or a spatula to mix until fully combined. The mixture should look like dark, fudgy dough. If it feels too sticky to handle, add another 2 tablespoons of Oreo crumbs. If it’s too dry, add a teaspoon of milk.
- Shape the truffles. Scoop out about 1 tablespoon of the mixture and roll it into a ball. For the cat shape, gently pinch one side to form a slight point (this will be the nose area). Place on the parchment-lined baking sheet. Repeat with the remaining mixture—you should get about 20-24 truffles. This is where you want to work quickly, as the mixture softens from the heat of your hands.
- Chill the truffles. Place the baking sheet in the refrigerator for at least 30 minutes, or up to 1 hour. The truffles need to be firm before dipping. If you skip this step, the truffles will fall apart in the melted chocolate.
- Melt the candy melts. Place the black candy melts in a microwave-safe bowl. Microwave in 30-second intervals, stirring well after each, until completely smooth. Be careful not to overheat—candy melts seize easily. If the mixture seems too thick, add 1 teaspoon of coconut oil or vegetable shortening and stir.
- Dip the truffles. Using a fork, carefully lower one chilled truffle into the melted chocolate. Spoon chocolate over the top to coat completely. Lift the truffle out with the fork, gently tap the fork on the edge of the bowl to remove excess chocolate, and place it back on the parchment paper. Work quickly—the cold truffle will start to sweat, which can cause the chocolate to bloom.
- Add the faces. While the chocolate is still wet, press two candy eyes into the top of each truffle. For the nose, use a toothpick to dab a tiny dot of orange candy melt. For whiskers, use the black decorating icing to draw three thin lines on each side of the nose. If the chocolate sets before you finish, just microwave the truffle for 5 seconds to soften it slightly.
- Set the truffles. Let the truffles sit at room temperature until the chocolate is completely set, about 15-20 minutes. If you’re in a hurry, pop them in the fridge for 10 minutes. The truffles should have a glossy, snappy shell when ready.
Notes
Don’t skip the chill time—truffles need to be firm before dipping. Use a fork for dipping to control excess chocolate. Work in small batches, keeping remaining truffles chilled. If chocolate seizes, add 1 teaspoon of coconut oil and stir. These truffles taste even better the next day. Store in an airtight container in the refrigerator for up to 1 week, or freeze for up to 3 months.
Nutrition
- Serving Size: 1 truffle
- Calories: 145
- Sugar: 12
- Sodium: 95
- Fat: 9
- Saturated Fat: 5
- Carbohydrates: 16
- Protein: 2
Keywords: Halloween treats, Oreo truffles, black cat truffles, easy Halloween dessert, no-bake dessert, Oreo balls, candy melts, cream cheese truffles