I was at my accountant’s office last October, waiting to go over my quarterly taxes—honestly, about as far from a fun cooking moment as you can get. Mr. Henderson, a man who wears the same gray cardigan every single day and once told me his favorite meal was a plain baked potato, was shuffling papers. I was mentally composing my grocery list, trying to figure out what to bring to my niece’s Halloween party. I needed something that looked festive but wouldn’t compete with all the candy and cupcakes. I mean, you know that feeling when you want to contribute something healthy but don’t want to be the person who brings a sad, wilted salad?
Mr. Henderson, without looking up from his calculator, mumbled, “My wife makes a pumpkin out of peppers and ranch every year. Kids go crazy for it.” I literally stopped mid-thought. The quiet accountant, the potato-loving, gray-cardigan-wearing accountant, was giving me party advice. I asked him to explain, and he sketched a little pumpkin shape on the corner of my tax form. A bell pepper for the stem, a platter shaped like a pumpkin, all filled with crunchy veggies and dip. It was the last place on earth I expected to find a recipe idea, but there it was. I practically ran to the grocery store after that meeting, and let me tell you, it was the hit of the party. This Halloween Pumpkin Veggie Tray is now my go-to for every fall gathering, and it all started with a tax appointment and a very unexpected source.
Why You’ll Love This Recipe
This isn’t just another veggie platter. This is the veggie tray that steals the show, gets devoured before the candy bowl is even touched, and makes you look like a hosting genius with almost zero effort. I’ve tested this at potlucks, Halloween parties, and family dinners, and it never fails to impress.
- Unbelievably Easy: This comes together in about 15 minutes. Seriously. You’re just arranging store-bought ingredients into a fun shape. No cooking required.
- Crowd-Pleasing Magic: It tricks everyone—even the pickiest eaters—into grabbing a handful of veggies. The fun presentation makes healthy snacking irresistible.
- Perfect for Hosting: This is the ultimate dish for a Halloween party or fall gathering. It’s a conversation starter, a centerpiece, and a snack all in one.
- Totally Customizable: Use any veggies you love or have on hand. Swap the dip for your family’s favorite. It’s foolproof.
- Stress-Free Prep: You can assemble this hours before your guests arrive. It sits beautifully on the table and looks just as good at the end of the night as it did at the start.
What makes this tray different from every other veggie platter? It’s the presentation. That simple pumpkin shape transforms ordinary vegetables into something special. It’s the kind of dish that makes people say, “Wow, who made this?” and you get to smile and say, “I did, and it was so easy.” It’s comfort food for the host—no stress, all payoff.
What Ingredients You Will Need
This recipe uses simple, readily available ingredients. The magic is all in how you arrange them. Here’s what you’ll need to grab from the store.
- For the Pumpkin Shape (The Platter):
- 1 large, round platter or a large cutting board (at least 12 inches across). A white platter really makes the colors pop.
- 1 large orange bell pepper (for the stem). Look for one with a nice, sturdy stem attached.
- For the “Pumpkin Filling” (The Veggies):
- 1 large head of broccoli, cut into small florets (about 3 cups). This creates the base orange color of the pumpkin.
- 1 large head of cauliflower, cut into small florets (about 2 cups). This adds texture and a lighter orange hue.
- 1 cup cherry tomatoes, halved (optional, for extra color and pop).
- 1 cup baby carrots, or regular carrots cut into sticks.
- 1 cup cucumber, cut into sticks or rounds.
- 1 cup snap peas or snow peas.
- For the Dip and Decoration:
- 1 cup of your favorite ranch dip or dressing. I personally love this homemade ranch dip recipe—it’s so much better than store-bought!
- 1/2 cup hummus (optional, for a different flavor profile).
- Fresh parsley or chives, chopped, for garnish (optional).
Ingredient Tips & Swaps: For the best visual effect, try to get broccoli and cauliflower that are vibrant in color. If you can’t find an orange bell pepper, a green one works fine too—it just looks a bit more like a traditional pumpkin stem. Feel free to swap in any veggies your family loves. Bell pepper strips, celery sticks, or even jicama sticks are all fantastic. For the dip, a thick Greek yogurt-based ranch works wonders. If you’re dairy-free, a vegan ranch or a simple balsamic vinaigrette is a great substitute.
Equipment Needed
You don’t need any fancy gadgets for this, which is part of its charm. Here’s what you’ll need.
- Large Platter or Cutting Board: A round or oval platter works best to mimic a pumpkin shape. I use a large wooden cutting board for a rustic look.
- Sharp Knife and Cutting Board: For chopping the veggies into uniform pieces. A good chef’s knife makes this job so much faster.
- Small Bowl or Ramekin: For the dip. A small, round bowl that fits in the center of your platter is perfect.
- Vegetable Peeler (Optional): If you’re using carrots with peels.
If you don’t have a large platter, you can use a baking sheet lined with parchment paper. It’s a little less fancy, but it works perfectly. For the dip bowl, even a small custard cup or a tea light holder (cleaned, of course!) can do the job.
Preparation Method
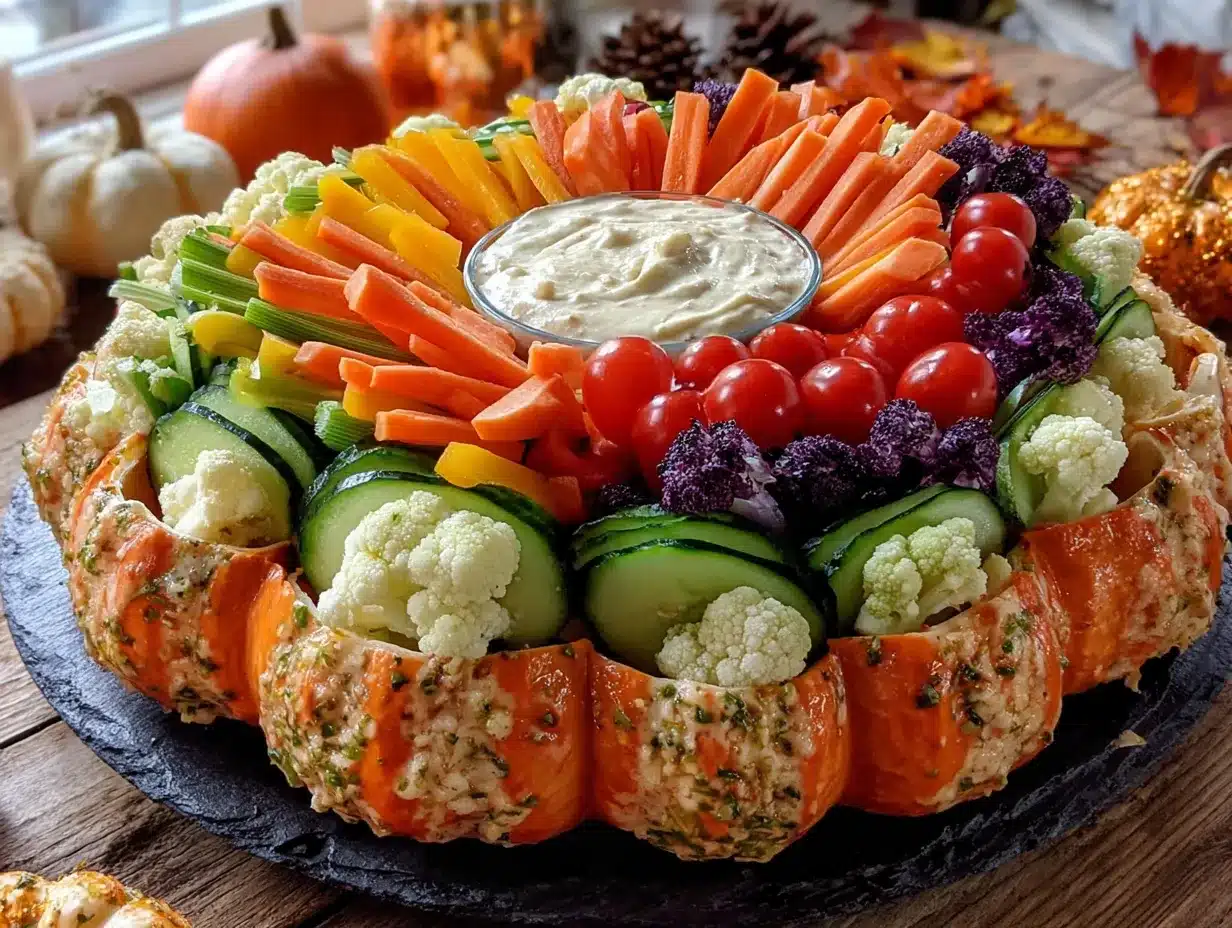
This is where the fun begins! Follow these simple steps to create your crowd-pleasing pumpkin veggie tray. It’s more about art than cooking, honestly.
- Prep Your Platter (5 minutes): Place your small bowl of ranch dip in the center of your large platter. This will be the “core” of your pumpkin. Make sure it’s stable and won’t slide around.
- Create the Pumpkin Base (10 minutes): Start arranging your broccoli florets around the dip bowl, working in a circular pattern. Fill in a thick, even layer to create the main body of the pumpkin. Think of it like you’re building a nest around the bowl. The broccoli should be packed tightly so no platter shows through.
- Add the Cauliflower Highlights (5 minutes): Scatter the cauliflower florets over the broccoli base. Don’t cover it completely—you want a mix of dark and light green to mimic the texture and color variations of a real pumpkin. A few cherry tomato halves tucked in here and there add a wonderful pop of red-orange.
- Build the “Ribs” of the Pumpkin (5 minutes): Use your carrot sticks and cucumber sticks to create the classic pumpkin ridges. Gently press them into the veggie base, radiating outwards from the dip bowl like spokes on a wheel. This gives the tray its iconic pumpkin shape.
- Create the Stem (2 minutes): This is the crowning glory! Take your orange bell pepper and carefully cut off the top, including the stem. You want a nice, thick “cap.” Place this cap right on top of the dip bowl in the center. The stem should point upwards. It looks just like a pumpkin stem!
- Fill in the Gaps (5 minutes): Now, use your remaining veggies—snap peas, extra carrot sticks, cucumber rounds—to fill in any empty spaces around the edges. You want the entire platter to look full and abundant. Don’t be afraid to pile them up a little.
- Final Touches (2 minutes): Sprinkle a little fresh parsley or chives over the top for a “dirt” or “vine” effect, if you like. Check the whole tray from different angles to make sure it looks balanced and beautiful. That’s it! You’re done.
Pro-Tip: If you’re making this ahead of time, cover the entire platter tightly with plastic wrap and store it in the fridge. Add the bell pepper stem just before serving so it stays perky.
Cooking Tips & Techniques
I’ve made this tray about a dozen times now, and I’ve learned a few things the hard way so you don’t have to. Here are my best tips for a perfect pumpkin veggie tray.
- The Dip Bowl is Your Anchor: Make sure the dip bowl is heavy enough or has a wide base. A light, flimsy bowl can tip over when you start piling veggies around it. A small ceramic ramekin works perfectly.
- Dry Your Veggies: This is the most important tip! After washing your broccoli and cauliflower, make sure they are completely dry. Any excess water will make the dip watery and the veggies soggy. I like to lay them out on a clean kitchen towel for 15 minutes before assembling.
- Uniform Cuts Matter: Try to cut your broccoli and cauliflower into similar-sized florets. This makes the pumpkin look more polished and professional. It’s a small detail that makes a huge difference.
- Don’t Overthink the Shape: A real pumpkin isn’t a perfect circle. Don’t stress if your veggie tray isn’t perfectly symmetrical. The slightly organic, hand-made look is part of its charm. It looks more natural and inviting.
- My Biggest Failure: The first time I made this, I used a huge, shallow bowl for the dip. The veggies kept sliding into the dip and it was a mess. A small, deep bowl is the way to go. Learn from my mistake!
Variations & Adaptations
This recipe is incredibly flexible. Here are a few ways to make it your own.
- The Spooky Spider Web Tray: Instead of a pumpkin, arrange the veggies in a circle and create a “spider web” pattern using thin strips of bell pepper or cucumber. Place a few plastic spiders on top for a creepy-cute effect.
- The Jack-O’-Lantern Face: Use black olives, sliced black beans, or pieces of dark bell pepper to create a classic Jack-O’-Lantern face on the top of the veggie mound. A few triangles for eyes and a jagged smile make it instantly recognizable.
- The “Harvest” Platter: Swap the ranch dip for a creamy pumpkin hummus or a roasted red pepper dip. Add some roasted pumpkin seeds (pepitas) on top for a seasonal crunch. This is a great option for a more sophisticated gathering.
- Dietary Adaptations: This is naturally gluten-free and can easily be made vegan by using a plant-based ranch or hummus. For a low-carb option, focus on veggies like cucumber, bell peppers, and celery, and skip the carrots.
Serving & Storage Suggestions
This tray is best served chilled or at room temperature. I like to take it out of the fridge about 15 minutes before guests arrive so it’s not ice-cold.
What to Serve Alongside: This veggie tray is a star on its own, but it pairs beautifully with other Halloween treats. It’s the perfect savory counterpoint to sweet cupcakes and candy. I love serving it alongside a bowl of spicy Halloween popcorn or some mini pumpkin-shaped cheeses.
Storage: If you have leftovers (which is rare!), you can store the veggies in an airtight container in the fridge for up to 2 days. The dip should be stored separately. The assembled tray itself doesn’t store well once it’s been picked at, so it’s best to enjoy it the day you make it.
Pro-Tip for Hosts: You can prep all the veggies the day before and store them in separate bags in the fridge. On the day of your party, it takes less than 15 minutes to assemble. This is a lifesaver when you’re juggling a million other things.
Nutritional Information & Benefits
This is one of the healthiest things you can put on a party table! A serving (about 1 cup of veggies with 2 tablespoons of dip) is packed with fiber, vitamins, and antioxidants.
- Low in Calories: A generous serving is around 100-150 calories, depending on the dip.
- Rich in Vitamin C: Broccoli and bell peppers are loaded with Vitamin C, great for your immune system during cold season.
- Good Source of Fiber: The veggies provide plenty of fiber, which helps you feel full and satisfied.
- Dietary Friendly: This recipe is naturally gluten-free, dairy-free (if you choose a vegan dip), and nut-free.
Honestly, I love that I can offer my guests something this fun and festive that also makes them feel good. It’s a win-win for everyone.
Conclusion
So there you have it—the best easy Halloween Pumpkin Veggie Tray that started with a tax appointment and a quiet accountant’s secret party trick. It’s proof that the best recipes come from the most unexpected places. This tray is more than just a snack; it’s a centerpiece, a conversation starter, and a way to bring a little healthy fun to your Halloween celebration.
I absolutely love how this recipe makes me feel like a hosting superhero with almost zero effort. It’s so simple, yet it gets more compliments than any complicated dish I’ve ever made. I encourage you to make it your own—use your family’s favorite dip, swap in your go-to veggies, and don’t be afraid to get creative with the decoration. Please, let me know in the comments how your pumpkin veggie tray turned out! What variations did you try? I can’t wait to hear about your spooky, healthy creations. Happy Halloween, and happy snacking!
Frequently Asked Questions
Can I make this veggie tray the night before?
Yes, you can! Assemble the entire tray (without the bell pepper stem) and cover it tightly with plastic wrap. Store it in the fridge. Add the stem just before serving to keep it looking fresh and perky.
What if I can’t find an orange bell pepper for the stem?
A green bell pepper works perfectly fine! You can also use a small piece of celery or even a carrot stick standing upright. The stem is more about the shape than the color.
My kids are picky eaters. Will they eat this?
Absolutely! The fun Halloween shape makes veggies way more appealing to kids. Let them help you arrange the veggies on the platter—they are much more likely to eat something they helped create. My nephew, who refuses all green things, will happily eat broccoli florets off this tray.
What other dips work well with this tray?
Besides ranch, hummus is a fantastic option. You can also use a creamy blue cheese dip, a roasted red pepper dip, or even a simple balsamic vinaigrette for a lighter option. A warm cheese dip in a small slow cooker placed next to the tray is also a huge hit.
How long will this veggie tray last at a party?
It will stay fresh for about 2 hours at room temperature. If you are serving it outside or in a warm room, you can place the platter on a bed of ice to keep the veggies crisp for longer. After the party, store any leftovers in an airtight container in the fridge.
PrintBest Easy Halloween Pumpkin Veggie Tray
This isn’t just another veggie platter. This is the veggie tray that steals the show, gets devoured before the candy bowl is even touched, and makes you look like a hosting genius with almost zero effort. It’s a fun, festive, and healthy snack perfect for Halloween parties and fall gatherings.
- Prep Time: 15 minutes
- Cook Time: 0 minutes
- Total Time: 15 minutes
- Yield: 8 servings 1x
- Category: Appetizer
- Cuisine: American
Ingredients
- 1 large orange bell pepper (for the stem)
- 1 large head of broccoli, cut into small florets (about 3 cups)
- 1 large head of cauliflower, cut into small florets (about 2 cups)
- 1 cup cherry tomatoes, halved (optional)
- 1 cup baby carrots, or regular carrots cut into sticks
- 1 cup cucumber, cut into sticks or rounds
- 1 cup snap peas or snow peas
- 1 cup of your favorite ranch dip or dressing
- 1/2 cup hummus (optional)
- Fresh parsley or chives, chopped, for garnish (optional)
Instructions
- Prep Your Platter: Place your small bowl of ranch dip in the center of your large platter. This will be the ‘core’ of your pumpkin. Make sure it’s stable and won’t slide around.
- Create the Pumpkin Base: Start arranging your broccoli florets around the dip bowl, working in a circular pattern. Fill in a thick, even layer to create the main body of the pumpkin. The broccoli should be packed tightly so no platter shows through.
- Add the Cauliflower Highlights: Scatter the cauliflower florets over the broccoli base. Don’t cover it completely—you want a mix of dark and light green to mimic the texture and color variations of a real pumpkin. A few cherry tomato halves tucked in here and there add a wonderful pop of red-orange.
- Build the ‘Ribs’ of the Pumpkin: Use your carrot sticks and cucumber sticks to create the classic pumpkin ridges. Gently press them into the veggie base, radiating outwards from the dip bowl like spokes on a wheel.
- Create the Stem: Take your orange bell pepper and carefully cut off the top, including the stem. You want a nice, thick ‘cap.’ Place this cap right on top of the dip bowl in the center. The stem should point upwards.
- Fill in the Gaps: Use your remaining veggies—snap peas, extra carrot sticks, cucumber rounds—to fill in any empty spaces around the edges. You want the entire platter to look full and abundant.
- Final Touches: Sprinkle a little fresh parsley or chives over the top for a ‘dirt’ or ‘vine’ effect, if you like. Check the whole tray from different angles to make sure it looks balanced and beautiful.
Notes
For the best visual effect, try to get broccoli and cauliflower that are vibrant in color. If you can’t find an orange bell pepper, a green one works fine too. Make sure the dip bowl is heavy enough or has a wide base to prevent tipping. After washing your broccoli and cauliflower, make sure they are completely dry to prevent the dip from becoming watery. If making ahead, assemble the entire tray (without the bell pepper stem) and cover tightly with plastic wrap. Add the stem just before serving.
Nutrition
- Serving Size: 1 cup of veggies wit
- Calories: 125
- Sugar: 5
- Sodium: 280
- Fat: 7
- Saturated Fat: 1
- Carbohydrates: 12
- Fiber: 4
- Protein: 4
Keywords: Halloween, veggie tray, pumpkin, healthy snack, party appetizer, fall, easy, no-cook