Last October, I was at the farmers’ market trying to decide between two types of kale—which, honestly, is not my most exciting moment—when the woman next to me, a retired art teacher named Carol, looked at my basket and laughed. “You’re planning a party, aren’t you?” she said, nodding at the eggs, the jar of pickles, and the random bag of black olives I’d grabbed. I admitted I was attempting a Halloween gathering but felt stuck on appetizers. She leaned in, lowered her voice like she was sharing a secret, and said, “Let me tell you about what my granddaughter calls the creepy-crawly eggs.”
That conversation changed my entire menu. Carol didn’t hand me a recipe card or a printed page. She just talked me through it, using her hands to show how the olives get sliced into spindly little legs, how the yolk filling needs to be extra creamy so it holds its shape, how the paprika on top gives them that “just crawled out of the dirt” look. She made it sound so simple, so doable, that I went home and made a test batch that very afternoon. I mean, I definitely got yolk all over my counter and accidentally ate three before anyone else could try them—but that’s part of the process, right?
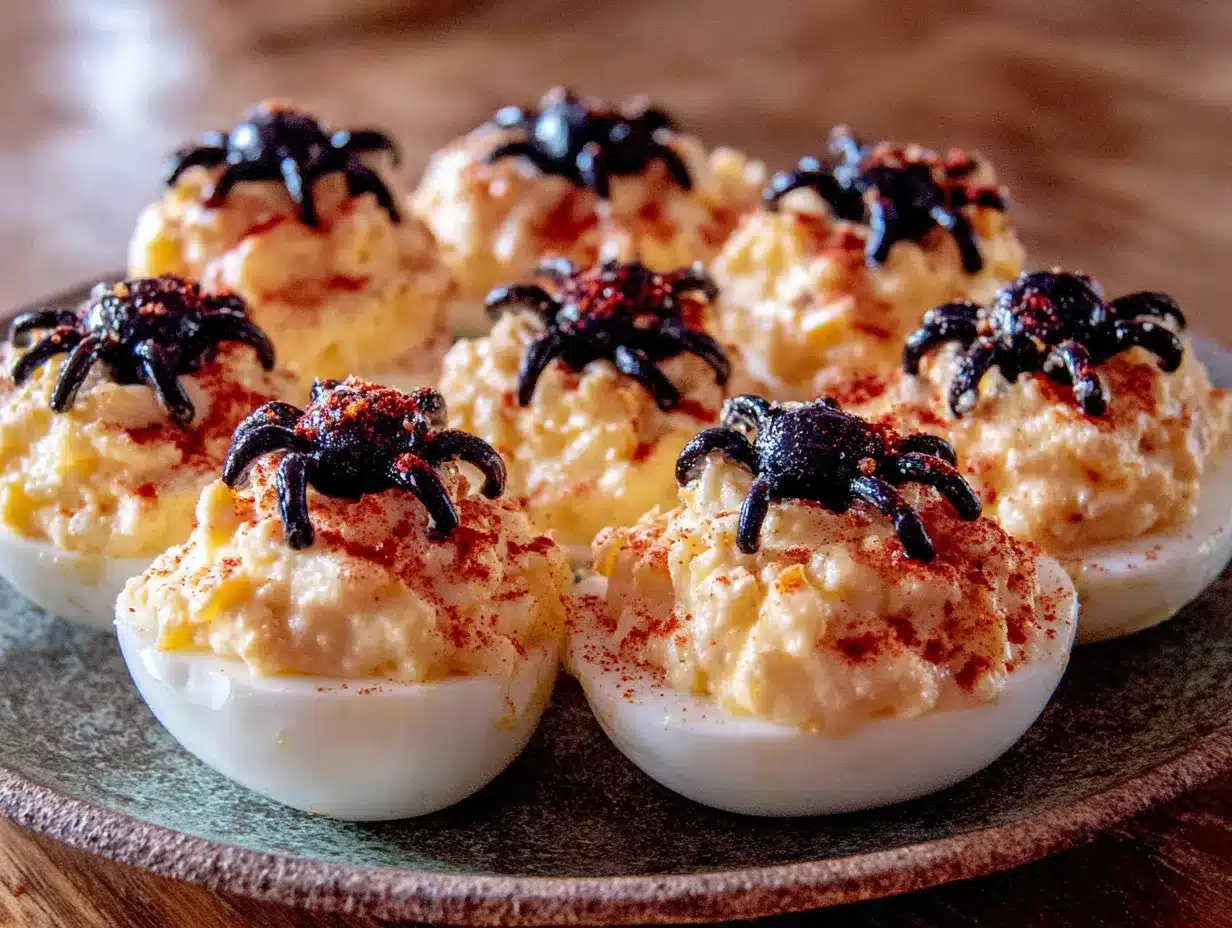
These cozy spooky spider deviled eggs with black olive legs have become my signature Halloween dish ever since. They’re the kind of appetizer that makes people stop mid-conversation and point. Kids love them because they look like actual spiders. Adults love them because, let’s face it, they taste amazing. And you know that feeling when you bring something to a party and everyone asks for the recipe? That’s what these do. Maybe you’ve been looking for a Halloween dish that’s creepy but still feels like comfort food—something that doesn’t rely on fake blood or sugar overload. These eggs are it. They’re cozy, they’re spooky, and they’re honestly the easiest way to win a Halloween potluck without breaking a sweat.
Why You’ll Love This Recipe
I’ve tested this recipe about seven times now, and let me tell you—each batch taught me something. The first time, my spiders looked more like sad blobs. The second time, I learned the hard way that over-boiled eggs make for crumbly filling that won’t pipe nicely. By batch three, I had it down, and I’ve been tweaking ever since. Here’s why these eggs deserve a spot on your Halloween table:
- Quick & Easy: From start to finish, you’re looking at about 35 minutes. That’s boiling, cooling, mixing, and assembling. Perfect for a busy weeknight when you’re also trying to carve a pumpkin or hang fake cobwebs.
- Simple Ingredients: You need eggs, mayonnaise, mustard, vinegar, salt, pepper, paprika, and a can of black olives. That’s it. No weird specialty items, no trips to three different stores.
- Perfect for Halloween Gatherings: Whether it’s a kid-friendly party, a grown-up costume dinner, or just a cozy night watching horror movies, these fit right in. They’re creepy but not gross—spooky but still appetizing.
- Crowd-Pleaser: I’ve brought these to four different Halloween events now, and they disappear every single time. Kids think they’re hilarious. Adults appreciate the classic deviled egg flavor with a fun twist.
- Unbelievably Delicious: The texture is ultra-creamy thanks to the right mayo-to-yolk ratio, and the black olive legs add a salty, briny pop that balances the richness. It’s comfort food with a side of theatrics.
What makes this version different from the other spider deviled eggs you’ve seen online? It’s the little things. I blend the filling until it’s silky smooth—no lumps allowed. I use a piping bag (or a zip-top bag with the corner snipped) so the filling looks polished, not messy. And I arrange the olive legs so they actually look like they’re crawling. These details matter. This isn’t just another Halloween appetizer—it’s the one that makes people say, “Wait, you made these?”
Honestly, this recipe is comfort food reimagined. It’s the same creamy, tangy deviled egg you grew up loving at family picnics, but now it’s wearing a tiny costume. It’s wholesome, it’s fun, and it’s the kind of dish that makes a simple evening feel special.
What Ingredients You Will Need
This recipe uses simple, wholesome ingredients to deliver bold flavor and satisfying texture without the fuss. Most of these are pantry staples, so you likely already have everything on hand. Here’s what you’ll need and why each one matters:
- 6 large eggs – Look for eggs that are at least a week old if possible. Fresh eggs are harder to peel after boiling. I prefer pasture-raised eggs for their richer yolk color and better flavor. Let them sit at room temperature for about 10 minutes before boiling to reduce cracking.
- 3 tablespoons mayonnaise – This is the backbone of your creamy filling. I recommend Duke’s or Hellmann’s for their tangy, stable texture. Avoid low-fat mayo here—it makes the filling runny and less flavorful.
- 1 teaspoon yellow mustard – Adds that classic deviled egg tang and a subtle golden hue. If you’re out of yellow mustard, Dijon works too, but use half the amount since it’s stronger.
- 1 teaspoon white vinegar – Brightens the filling and cuts through the richness of the yolks. Apple cider vinegar works as a substitute if that’s what you have.
- ¼ teaspoon salt – Essential for bringing out all the flavors. I use fine sea salt because it dissolves evenly into the yolk mixture.
- ⅛ teaspoon black pepper – Freshly ground is best for that slight warmth. Pre-ground works fine but use a little less since it’s more concentrated.
- Paprika for garnish – Smoked paprika adds a deeper, earthier flavor that pairs beautifully with the olives. Regular sweet paprika works too and gives that classic deviled egg look. I’ve also used a pinch of cayenne for heat lovers.
- 1 can (6 ounces) large black olives – This is where the magic happens. You need whole, pitted black olives—not sliced. I’ve tried several brands, and Lindsay or Pearls work best because they’re firm enough to slice neatly without falling apart. Drain them well and pat them dry with a paper towel before slicing.
Ingredient Selection Tips: For the best texture, make sure your eggs are hard-boiled properly—not overcooked, which creates a green ring around the yolk and a rubbery white. I’ll cover timing in the preparation section. For the olives, look for ones that are uniformly dark and firm. Avoid the canned sliced olives—they won’t give you the leg shape you need.
Substitution Guidance: Need a dairy-free option? Use vegan mayonnaise—just check that it’s thick enough to hold the filling together. For a lower-fat version, swap half the mayo with plain Greek yogurt, though the texture will be slightly less rich. If you’re avoiding nightshades, skip the paprika and use a pinch of turmeric for color instead.
Equipment Needed
You don’t need fancy gadgets for these spiders, but having the right tools makes the process smoother. Here’s what I use:
- Saucepan with lid – A medium-sized pot works best. You want enough room for the eggs to sit in a single layer without crowding.
- Mixing bowls – One small bowl for the yolks, one medium bowl for the filling mixture.
- Fork or potato masher – For breaking up the cooked yolks. A fork works fine, but a potato masher makes it even faster.
- Piping bag or zip-top bag – For filling the egg whites neatly. I use a disposable piping bag with a star tip for that classic rosette look, but a zip-top bag with the corner snipped off works perfectly too.
- Sharp paring knife – For slicing the olives into legs and bodies. A dull knife will squish them.
- Cutting board – Preferably small and stable. I use a wooden board because it doesn’t slide around.
- Serving platter – Something dark-colored makes the spiders pop. A black or slate platter is ideal, but a white plate works too.
Budget-Friendly Options: If you don’t have a piping bag, honestly, a spoon works. You’ll just get a more rustic look. And if you don’t have a star tip, snip the corner of the bag slightly larger and you’ll still get a nice swirl. I’ve done both methods, and while the piped version looks fancier, the spooned version has its own charm.
Maintenance Tip: After working with olives, rinse your knife immediately to prevent staining. Olive juice can leave dark marks on light-colored cutting boards if left to sit.
Preparation Method
Let me walk you through this step by step. I’ve made these enough times to know exactly where things can go wrong, so I’ll share those pitfalls too. Take your time with the first batch—speed comes with practice.
- Boil the eggs (15 minutes total). Place your eggs in a single layer in a saucepan and cover them with cold water by about an inch. Bring the water to a rolling boil over high heat. Once it’s boiling, cover the pot, turn off the heat, and let the eggs sit in the hot water for exactly 12 minutes. This method gives you perfectly cooked yolks without the green ring. While they’re sitting, fill a large bowl with ice water.
- Cool and peel the eggs (10 minutes). Transfer the eggs to the ice water bath and let them cool for at least 5 minutes. This stops the cooking and makes peeling easier. Gently tap each egg on the counter to crack the shell, then roll it between your palms to loosen the shell. Start peeling from the wider end where the air pocket is—it’s usually easier. Rinse the peeled eggs under cool water to remove any tiny shell fragments.
- Slice the eggs in half (2 minutes). Using a sharp knife, cut each egg lengthwise. Wipe the knife clean between cuts for neat edges. Gently pop out the yolks into a small bowl. Arrange the whites on your serving platter, cut-side up.
- Make the filling (5 minutes). Mash the yolks with a fork until they’re crumbly with no large chunks. Add the mayonnaise, mustard, vinegar, salt, and pepper. Stir until the mixture is completely smooth and creamy. Taste it—does it need more salt? More tang? Adjust now. If the filling seems too thick, add a tiny splash of vinegar or water. If it’s too thin, add another yolk if you have one, or just chill it for 10 minutes to firm up.
- Prepare the olive spiders (10 minutes). Drain the olives and pat them dry. For each spider, you’ll need one whole olive for the body and one olive sliced into legs. To slice the legs: cut the second olive lengthwise into 4 thin slices, then cut each slice in half crosswise to get 8 small leg pieces. You can also slice them into thin rounds and then cut each round into a half-moon shape—whatever gives you eight leg-like pieces per spider. Set the bodies aside.
- Fill the egg whites (5 minutes). Transfer the yolk mixture to a piping bag fitted with a star tip, or to a zip-top bag with one corner snipped off. Pipe the filling into each egg white, mounding it slightly above the edge. You want enough height so the spider body sits nicely on top without sinking.
- Assemble the spiders (5 minutes). Place one whole olive (the body) on top of each filled egg, pressing it gently into the yolk mixture. Arrange 8 leg pieces around each body—four on each side, angled slightly outward so they look like a spider crawling. I like to place them so the legs curve naturally, as if the spider is in motion.
- Garnish and serve (2 minutes). Lightly dust the eggs with paprika, focusing on the yolk filling rather than the olives. The paprika adds a bit of “dirt” texture that makes the spiders look more realistic. Serve immediately or refrigerate until ready to serve.
Sensory Cues: When you mash the yolks, they should break apart easily without resistance—if they feel rubbery, they’re slightly overcooked. The filling should be thick enough to hold its shape when piped but soft enough to spread smoothly. The olives should feel firm, not mushy. When you arrange the legs, they should look like they’re reaching out, not just stuck on randomly.
Common Issue: If your filling is too runny, it won’t hold the spider body in place. This usually happens from too much mayo or mustard. Fix it by adding another mashed yolk if you have one, or by chilling the filling for 15 minutes before piping. I learned this the hard way during a Halloween party prep—my spiders kept sliding off!
Cooking Tips & Techniques
After making these eggs more times than I care to count, I’ve picked up a few tricks that make the process smoother and the results more impressive. Here’s what I wish someone had told me the first time:
The Perfect Boiled Egg, Every Time: The biggest mistake people make is boiling eggs too aggressively. High heat makes the proteins tighten too fast, resulting in rubbery whites and chalky yolks. The covered pot method I described above—boil, cover, turn off heat, wait 12 minutes—is foolproof. I’ve tested it with eggs straight from the fridge and room-temperature eggs, and it works both ways. Just adjust the ice bath time if you start with cold eggs—give them an extra minute or two.
Olive Slicing Strategy: Black olives are slippery little things. To keep them steady while slicing, place them on a paper towel to absorb excess moisture. Then hold them flat against the cutting board with your fingertips curled under (the claw grip). Slice slowly and deliberately. If you rush, you’ll end up with mangled leg pieces. I ruined an entire can of olives my first time because I was trying to go fast. Slow down. It’s worth it.
Piping Like a Pro: If you’re using a zip-top bag, fill it no more than halfway to avoid blowouts. Twist the top of the bag closed and hold it like a cone. Apply steady, even pressure from the top, not the middle. Practice one swirl on a plate before piping into the eggs—it helps you get a feel for the pressure needed.
Timing and Multitasking: While the eggs are boiling, prep your olives. While the eggs are cooling, make the filling. While the filling chills, arrange your serving platter. This way, everything comes together in about 30 minutes of active time. I’ve done this while also making a batch of popcorn balls and hanging decorations—it’s totally doable.
Consistency Tip: If you’re making these for a party, prepare the eggs and filling the day before, but assemble them the morning of or just before serving. The filling stays fresh in the fridge for up to 24 hours in a piping bag, and the egg whites keep well in a covered container. But once assembled, the olives can dry out after a few hours. Assemble as close to serving time as possible for the best look.
Variations & Adaptations
One of the best things about this recipe is how easy it is to adapt. I’ve played around with several versions, and here are my favorites:
Spicy Spider Eggs: Add ½ teaspoon of sriracha or hot sauce to the yolk mixture along with a pinch of cayenne pepper. The heat cuts through the richness beautifully and gives the spiders a little “bite.” I made these for a friend’s Halloween party and they were gone in 10 minutes. Just be careful not to overdo it—you want a subtle warmth, not a fire alarm.
Herby Garden Spiders: Fold 1 tablespoon of finely chopped fresh dill or chives into the yolk mixture. The herbs add a fresh, bright flavor that contrasts with the briny olives. This version feels lighter and more elegant—perfect for a grown-up gathering where you want the spooky theme without the cartoonish vibe.
Bacon-Wrapped Bodies: For extra indulgence, wrap each olive body with a small strip of cooked bacon before placing it on the egg. Secure it with a toothpick if needed. The smoky, salty bacon pairs perfectly with the creamy filling. I tried this on a whim one night and it was ridiculous—in the best way possible. Just know that these won’t last long on the platter.
Avocado Filling: Replace half the mayonnaise with mashed ripe avocado. The filling turns a lovely pale green and gets a buttery, fresh flavor. This version is dairy-free and adds healthy fats. It’s also great if you’re trying to sneak more veggies into your appetizers. Just be aware that the filling will brown faster, so assemble these closer to serving time.
Gluten-Free and Keto-Friendly: This recipe is naturally gluten-free and low-carb, making it perfect for guests with dietary restrictions. The eggs provide protein and healthy fats, while the olives add more good fats. For a keto version, use full-fat mayonnaise and skip any sweet add-ins. I’ve served these at gatherings where half the guests were keto, and they were thrilled to have a satisfying, festive option.
Serving & Storage Suggestions
These spider deviled eggs are best served chilled or at room temperature—I prefer them straight from the fridge because the filling holds its shape better. Arrange them on a dark platter or a bed of fresh arugula to make the spiders pop visually. The dark background creates a dramatic contrast that really sells the spooky effect.
Complementary Dishes: These pair beautifully with other Halloween finger foods. I love serving them alongside pumpkin soup shooters, mummy hot dogs (pigs in a blanket with mustard eyes), and a bowl of candy corn for sweetness. For drinks, a dry apple cider or a dark stout beer complements the richness of the eggs. If you’re hosting a kids’ party, stick with apple juice or sparkling water with a splash of pomegranate juice for a “blood” effect.
Storage Instructions: Store any leftover eggs in an airtight container in the refrigerator for up to 2 days. Do not freeze them—the texture of the egg whites becomes watery and unappealing after thawing. If you have leftover filling, it keeps in the fridge for 3 days and can be used as a sandwich spread or dip for vegetables.
Reheating Notes: These are served cold, so no reheating needed. However, if you’ve stored them and the filling seems a bit firm, let them sit at room temperature for 10 minutes before serving to soften slightly. The flavor actually improves after a few hours in the fridge as the ingredients meld together. I’ve found that day-old spider eggs taste even better than freshly made ones—the mustard and vinegar have time to mellow into the yolks.
Flavor Development: If you’re making these ahead, prepare the filling and egg whites separately and store them in the fridge. Assemble them no more than 4 hours before serving for the best visual impact. The olives can dry out and shrink slightly if left exposed too long, and the paprika can bleed into the filling, creating a less crisp look.
Nutritional Information & Benefits
Here’s the estimated nutritional breakdown for one spider deviled egg (filling plus olive body and legs):
- Calories: 85-95
- Protein: 6g
- Fat: 7g (mostly healthy fats from eggs and olive oil in mayo)
- Carbohydrates: 1g
- Fiber: 0.5g
- Sugar: 0.2g
- Sodium: 180-200mg
Health Benefits: Eggs are a fantastic source of high-quality protein, choline (important for brain health), and lutein and zeaxanthin, which support eye health. Black olives provide healthy monounsaturated fats and are rich in iron and vitamin E. This snack is naturally low in carbohydrates and fits well into low-carb, keto, and gluten-free diets.
Dietary Considerations: This recipe contains eggs and may contain traces of mustard. It is naturally gluten-free, nut-free, and dairy-free. If you have an egg allergy, unfortunately this recipe can’t be adapted—but you might enjoy a similar presentation with stuffed mini bell peppers or cucumber rounds instead.
Personal Wellness Perspective: I love that these spider eggs let me enjoy a classic comfort food while keeping things light and nutritious. They’re a great option for Halloween parties where most other snacks are loaded with sugar and artificial ingredients. You can indulge in a few without guilt, and they actually provide some nutritional value. That’s a win in my book.
Conclusion
These cozy spooky spider deviled eggs with black olive legs are more than just a Halloween appetizer—they’re a conversation starter, a memory-maker, and honestly, just a really good deviled egg. The creamy filling, the salty olive crunch, the playful presentation—it all comes together in a dish that feels both nostalgic and fresh. Whether you’re hosting a costume party, bringing a dish to a potluck, or just wanting to surprise your family on a chilly October evening, these spiders deliver.
I encourage you to make this recipe your own. Add a little extra mustard if you like things tangy. Swap in smoked paprika for a deeper flavor. Use quail eggs for mini spiders. The beauty of this dish is that it’s forgiving—even if your spiders look a little lopsided, they’ll still taste amazing. And isn’t that what cooking is all about? Imperfect, delicious, made-with-love food that brings people together.
I’d love to hear how yours turn out. Did you try a fun variation? Did your kids help assemble the legs? Drop a comment below and share your spider egg stories. And if you’re looking for more cozy Halloween recipes, check out my pumpkin soup shooters or mummy hot dogs for a full spooky spread. Happy haunting, and happy cooking!
Frequently Asked Questions
Can I make these spider deviled eggs ahead of time?
Yes, absolutely. You can boil and peel the eggs up to 2 days in advance and store the whites and yolks separately in the fridge. Make the filling up to 24 hours ahead and keep it in a piping bag. Assemble the spiders no more than 4 hours before serving for the best appearance.
How do I keep the olive legs from falling off?
Make sure your filling is thick enough to hold the legs in place. If it’s too runny, chill it for 15 minutes before piping. Press the leg pieces gently into the filling so they’re partially embedded. You can also use a tiny dab of the filling as “glue” to hold the legs against the olive body.
Can I use different types of olives for the legs?
Large black olives work best because they’re firm and slice neatly. Kalamata olives are too soft and will fall apart. Green olives can work but they’re smaller and more acidic in flavor, which changes the taste. Stick with canned whole black olives for the best results.
My deviled eggs always have that green ring around the yolk. What am I doing wrong?
That green ring happens when eggs are overcooked or cooled too slowly. Use the method I described: bring to a boil, cover, turn off heat, and let sit for exactly 12 minutes. Then immediately transfer to an ice water bath to stop the cooking. This should eliminate that green ring completely.
Can I make these spider eggs without mayonnaise?
Yes! Substitute the mayonnaise with mashed avocado, plain Greek yogurt, or a dairy-free mayonnaise alternative. Each option will change the flavor and texture slightly—avocado makes it richer, yogurt makes it tangier—but all work well. Just adjust the seasoning to taste after mixing.
Pin This Recipe!
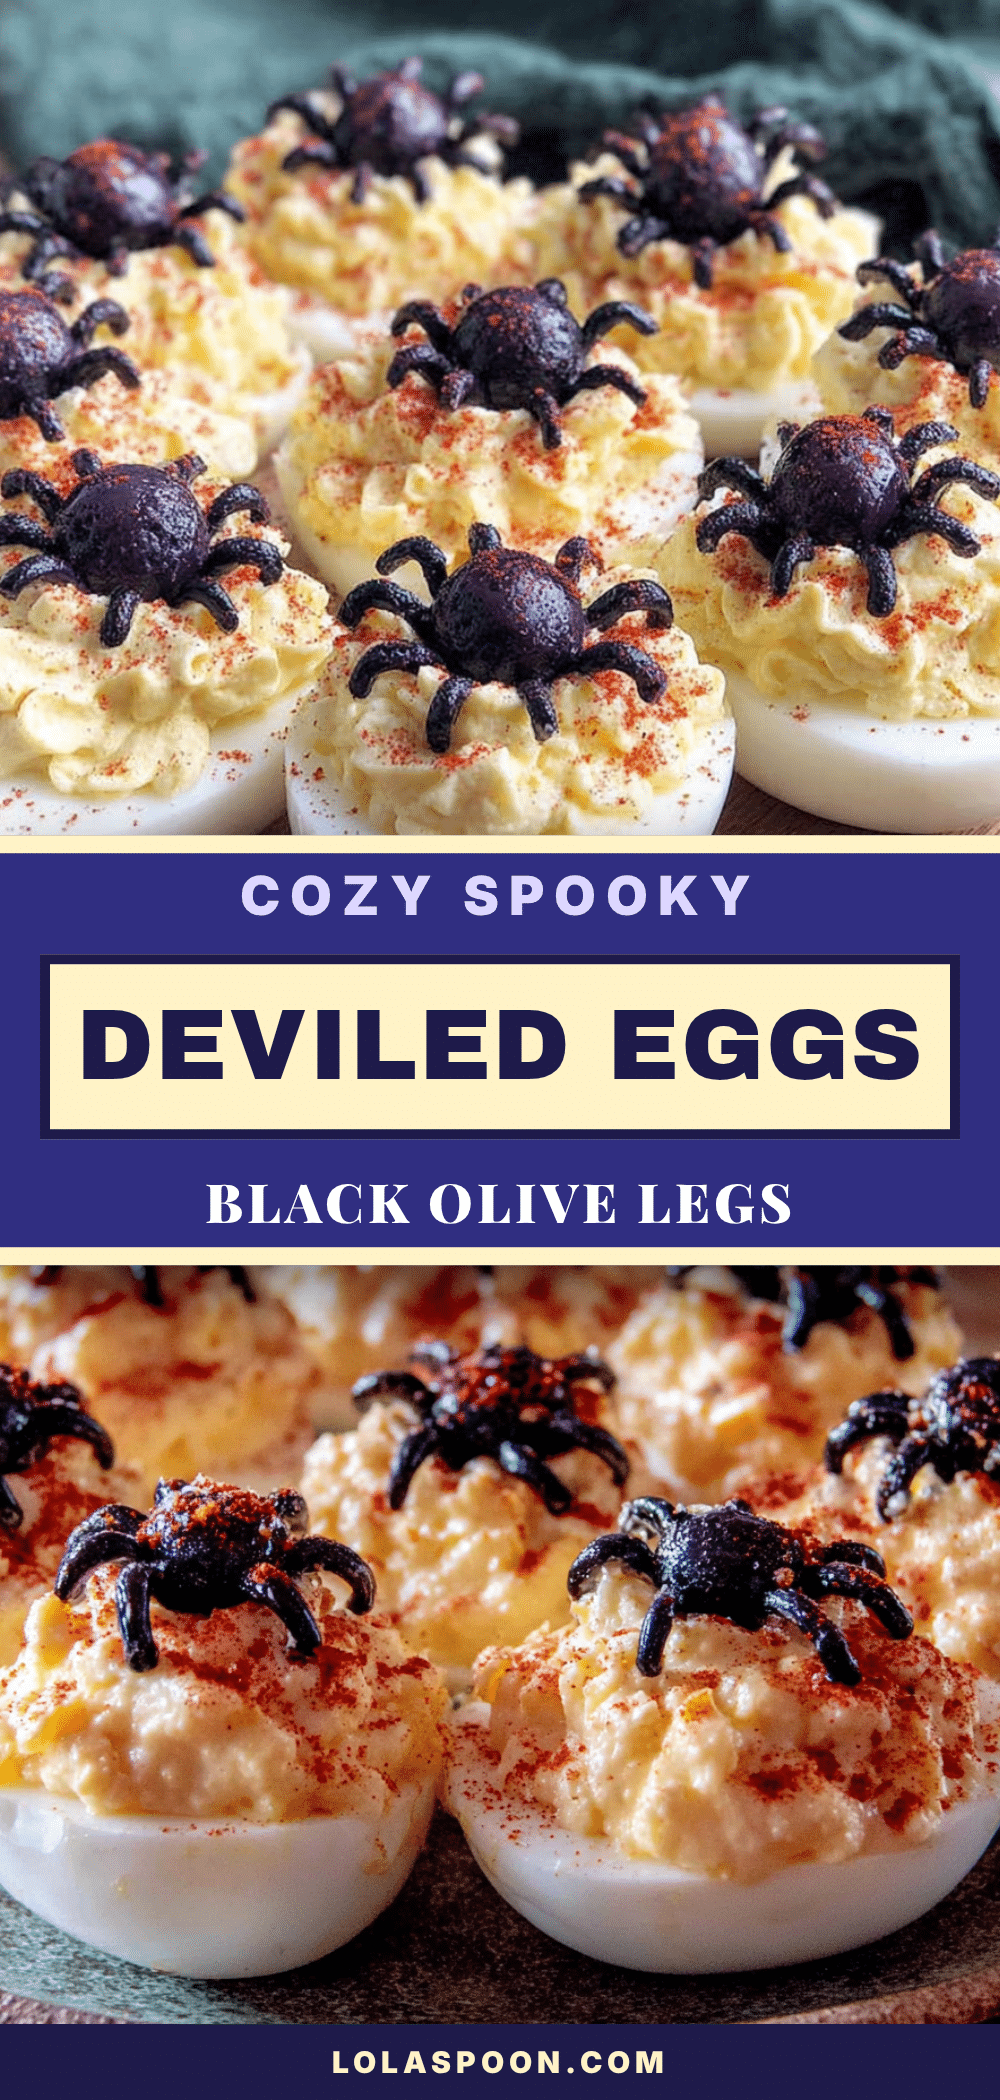
Cozy Spooky Spider Deviled Eggs with Black Olive Legs

These creepy-crawly spider deviled eggs are the perfect Halloween appetizer—creamy, tangy, and topped with black olive legs for a spooky yet delicious presentation. Quick to make and sure to be a crowd-pleaser at any Halloween gathering.
- Prep Time: 20 minutes
- Cook Time: 15 minutes
- Total Time: 35 minutes
- Yield: 12 servings 1x
- Category: Appetizer
- Cuisine: American
Ingredients
- 6 large eggs
- 3 tablespoons mayonnaise
- 1 teaspoon yellow mustard
- 1 teaspoon white vinegar
- ¼ teaspoon salt
- ⅛ teaspoon black pepper
- Paprika for garnish
- 1 can (6 ounces) large black olives
Instructions
- Place eggs in a single layer in a saucepan and cover with cold water by about an inch. Bring to a rolling boil over high heat, then cover, turn off heat, and let sit for exactly 12 minutes.
- Transfer eggs to an ice water bath and cool for at least 5 minutes. Peel eggs under cool running water.
- Slice each egg in half lengthwise. Remove yolks to a small bowl and arrange whites on a serving platter.
- Mash yolks with a fork until crumbly. Add mayonnaise, mustard, vinegar, salt, and pepper. Stir until smooth and creamy.
- Drain olives and pat dry. For each spider, use one whole olive for the body. Slice a second olive lengthwise into 4 thin slices, then cut each slice in half crosswise to make 8 leg pieces.
- Transfer yolk mixture to a piping bag or zip-top bag with corner snipped. Pipe filling into each egg white, mounding slightly above the edge.
- Place one whole olive on each filled egg for the body. Arrange 8 leg pieces around each body, four on each side, angled outward.
- Lightly dust with paprika. Serve immediately or refrigerate until ready to serve.
Notes
For best results, use eggs that are at least a week old for easier peeling. The filling can be made up to 24 hours ahead and stored in a piping bag. Assemble spiders no more than 4 hours before serving to prevent olives from drying out. If filling is too runny, chill for 15 minutes before piping.
Nutrition
- Serving Size: 1 spider deviled egg
- Calories: 90
- Sugar: 0.2
- Sodium: 190
- Fat: 7
- Saturated Fat: 2
- Carbohydrates: 1
- Fiber: 0.5
- Protein: 6
Keywords: Halloween, deviled eggs, spider, appetizer, party, spooky, black olives, easy