I was sitting on a wobbly stool at my accountant’s kitchen island—tax season, if you must know—when he casually mentioned he’d just pulled molten chocolate lava cakes out of the oven. My accountant. The man who files spreadsheets alphabetically and once asked me to initial every single page of my tax return. And there he was, in a flour-dusted apron, sliding two perfect little ramekins toward me like it was the most normal thing in the world. The tops were cracked just slightly, and a trickle of dark chocolate oozed out like it was trying to escape. I took one bite and honestly, I forgot about my tax bill for a solid five minutes. That’s the kind of power we’re talking about here.
Now, I’d always thought lava cakes were one of those restaurant-only things. You know, the kind of dessert you order on a birthday or anniversary and then try to recreate at home only to end up with dry chocolate muffins and a sink full of dishes. But my accountant—let’s call him Steve—swore it was the easiest thing he made all week. He scribbled the recipe on the back of a grocery receipt, and I stuffed it in my purse next to a half-eaten granola bar. It took me three tries to get it right, but once I did, I understood why Steve was so smug about it. These little cakes are practically foolproof, and they look like you spent hours in the kitchen.
Maybe you’ve been there—wanting to make something special for date night but not wanting to deal with a complicated recipe that leaves you stressed and the kitchen a disaster zone. That’s exactly where these lava cakes come in. They’re ridiculously easy, use ingredients you probably already have, and they make you look like a rockstar. Plus, they’re scaled for two, so no leftovers tempting you at midnight. I’ve been making these for years now, and they never fail to impress. Honestly, they’ve saved more date nights than I can count.
Why You’ll Love This Recipe
Let me tell you why these lava cakes have become my go-to for pretty much every special occasion. Actually, forget special occasions—I’ve made them on random Tuesdays just because I had a chocolate craving and a half-stick of butter sitting in the fridge. They’re that easy and that good.
- Quick & Easy: From start to finish, these come together in about 20 minutes. No stand mixer, no complicated techniques, no tempering chocolate. Just melt, mix, pour, and bake. Perfect for those last-minute “let’s make tonight special” moments.
- Simple Ingredients: You probably have most of this stuff in your pantry right now. Butter, eggs, sugar, flour, and chocolate chips. That’s it. No fancy extracts, no obscure baking chocolate, no trip to a specialty store. I mean, who wants to run out for one ingredient when you’re in the mood for chocolate?
- Perfect for Date Night: These are designed for two people. No math, no scaling down, no weird half-egg situations. Just two perfectly portioned cakes that feel incredibly indulgent without being overwhelming.
- Crowd-Pleaser: I’ve served these to my picky-eater nephew, my mother-in-law who “doesn’t really do dessert,” and my neighbor who’s a trained pastry chef. Every single person went quiet after the first bite. That’s the kind of reaction you want.
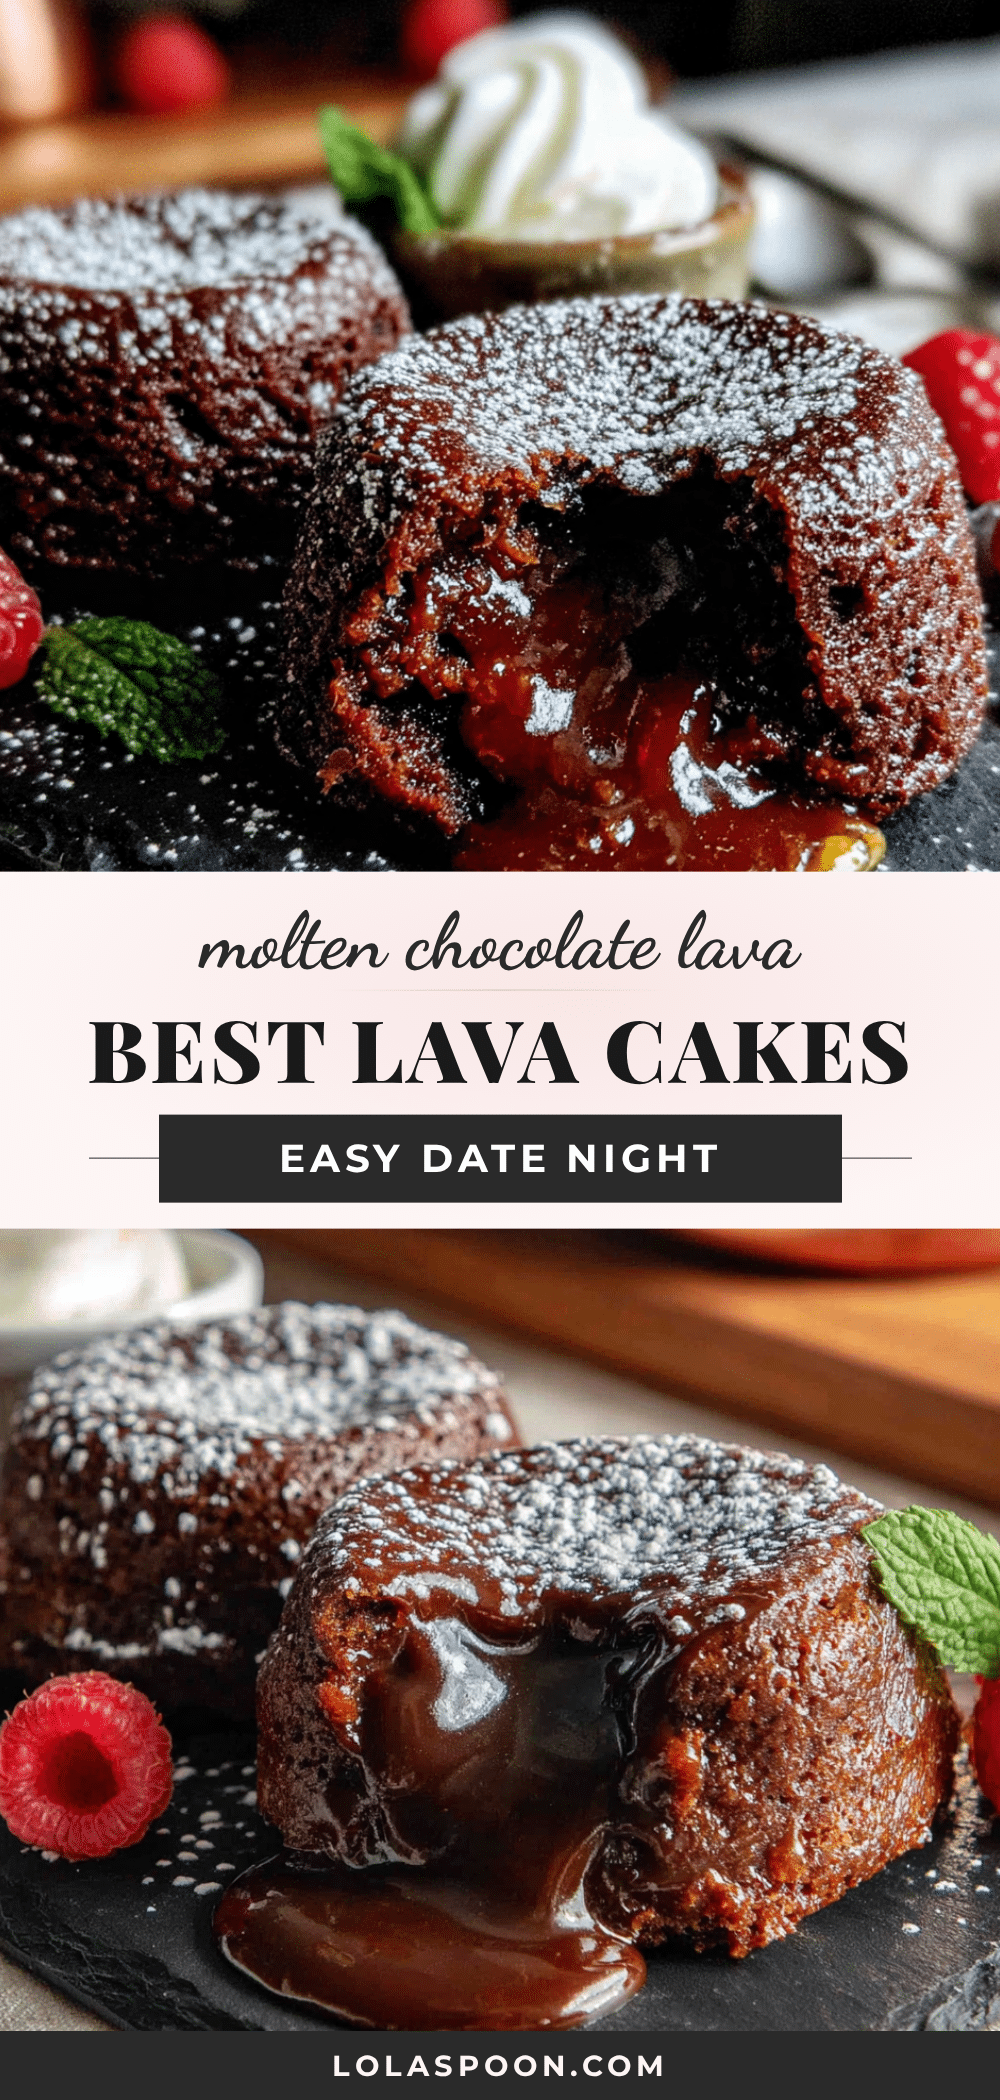
- Unbelievably Delicious: The contrast between the tender, cakey exterior and the warm, molten center is pure magic. It’s comfort food at its finest—rich, chocolatey, and deeply satisfying without being overly sweet.
What makes these different from all the other lava cake recipes out there? It’s the ratio. I’ve tested this about a dozen times (someone had to do it), and the balance of butter to chocolate to egg is just right. The cakes hold their shape beautifully but still have that liquid center that pools out when you break into them. No dry cakes here, no undercooked centers that collapse into a puddle. Just that perfect, restaurant-quality texture every single time.
These cakes are the kind of dessert that makes you close your eyes after the first bite. It’s comfort food reimagined—faster, simpler, but with the same soul-soothing satisfaction. Perfect for impressing someone special without any stress, or turning an ordinary evening into something memorable.
What Ingredients You Will Need
This recipe uses simple, everyday ingredients that come together to create something truly special. No weird stuff here—just pantry staples that work their magic together.
For the Lava Cakes
- 4 ounces (113g) semi-sweet chocolate chips or chopped chocolate – I prefer Ghirardelli or Guittard for consistent melting and rich flavor. Don’t use milk chocolate here; it’s too sweet and won’t set up properly. Semi-sweet gives you that perfect balance of richness without being cloying.
- ½ cup (113g or 1 stick) unsalted butter – Cut into cubes for even melting. Salted butter works in a pinch, but reduce any added salt in the recipe. The butter is what gives these cakes their tender, melt-in-your-mouth texture, so use good quality stuff.
- 2 large eggs – At room temperature if possible. Cold eggs can seize the chocolate mixture and make it grainy. If you forgot to take them out ahead of time, just place them in a bowl of warm water for 5 minutes.
- 2 large egg yolks – This is the secret to the molten center. The extra yolks add richness and help create that gooey texture without making the cakes too heavy.
- ¼ cup (50g) granulated sugar – Regular white sugar works perfectly. No need for superfine or anything fancy.
- 2 tablespoons (16g) all-purpose flour – Just enough to give the cakes structure. You can substitute with almond flour for a gluten-free version, though the texture will be slightly denser.
- ¼ teaspoon vanilla extract – Pure vanilla is best, but imitation works fine. It rounds out the chocolate flavor beautifully.
- Pinch of salt – Enhances the chocolate flavor and balances the sweetness. Don’t skip it, even if you’re using salted butter.
For Serving (Optional but Highly Recommended)
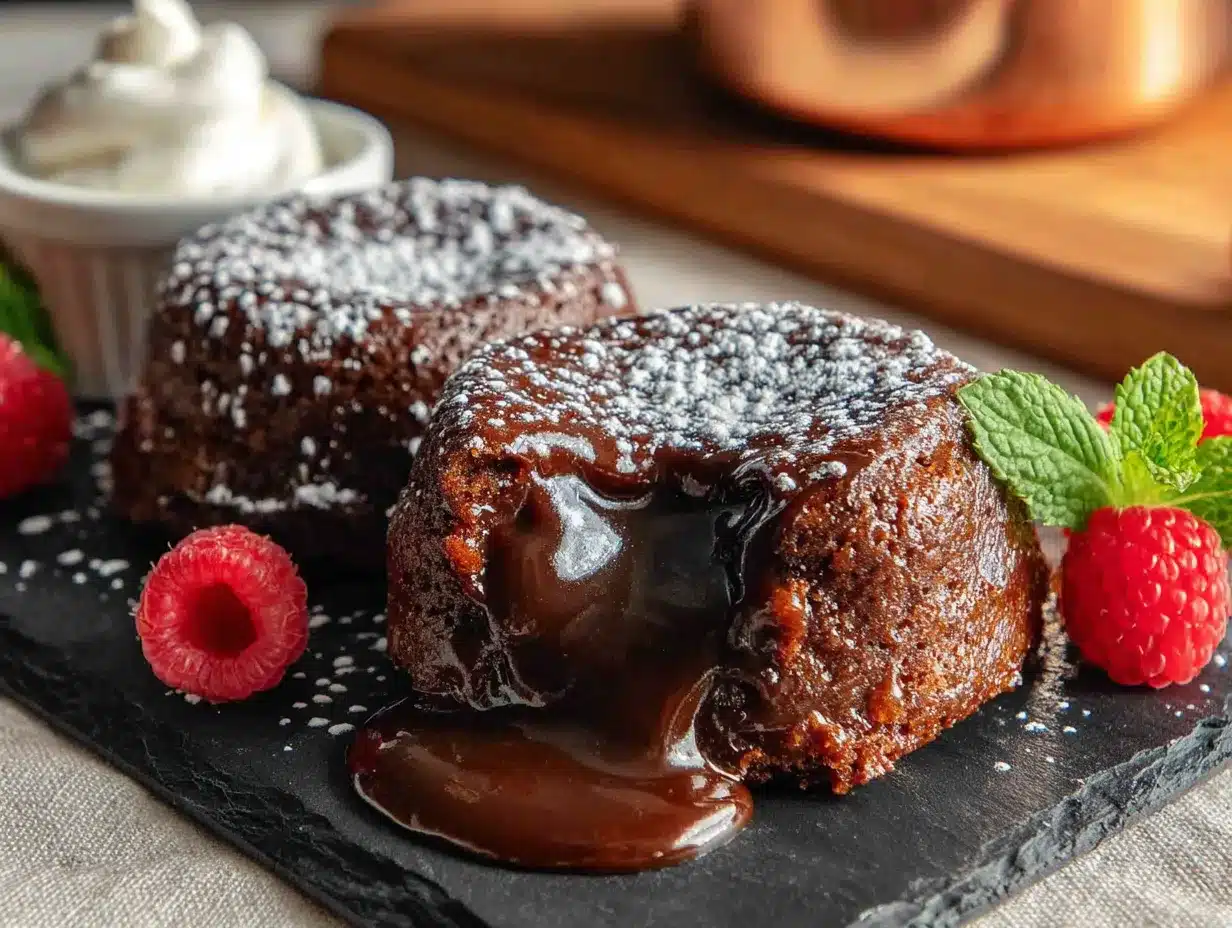
- Powdered sugar – For dusting. It makes them look fancy with zero effort.
- Fresh raspberries or strawberries – The tartness cuts through the richness perfectly.
- Vanilla ice cream or whipped cream – Because warm chocolate and cold cream is a match made in heaven.
- Mint sprigs – For that restaurant presentation vibe.
Ingredient Selection Tips: For the best results, use a chocolate you actually enjoy eating. Since it’s the star of the show, cheap chocolate will give you cheap-tasting cakes. I’ve tested this with store-brand chocolate chips and it works, but the flavor isn’t nearly as deep. Also, make sure your eggs are fresh—older eggs don’t whip up as well and can affect the texture.
Substitution Guidance: If you’re dairy-free, use a high-quality dairy-free butter stick (not the spreadable kind in a tub) and dairy-free chocolate chips. For a gluten-free option, swap the all-purpose flour for almond flour or a gluten-free baking blend. The texture will be slightly different, but the molten center will still work its magic.
Equipment Needed
You don’t need much for this recipe, which is part of why I love it so much. Here’s what you’ll need:
- Two 6-ounce (180ml) ramekins – These are the standard size for individual lava cakes. You can find them at most grocery stores or online for cheap. I’ve had my set for years and they cost about $8.
- Mixing bowls – One medium for the chocolate mixture and one small for the eggs. Glass or stainless steel works best.
- Whisk – For beating the eggs and sugar. A hand whisk is fine, but an electric mixer makes it faster.
- Rubber spatula – For scraping every last bit of chocolate into the ramekins. Don’t waste a drop.
- Baking sheet – To catch any overflow and make transferring in and out of the oven easier.
- Small saucepan or microwave-safe bowl – For melting the chocolate and butter together.
- Pastry brush or paper towel – For greasing the ramekins with butter or cocoa powder.
Budget-Friendly Alternatives: No ramekins? No problem. You can use oven-safe custard cups, small mason jars (the wide-mouth ones work best), or even a muffin tin. If using a muffin tin, the baking time will be slightly shorter, so start checking at 10 minutes. I’ve also used small ceramic bowls from my regular dinner set—they just need to be oven-safe and roughly the same size.
Personal Experience: I learned the hard way that greasing the ramekins properly is non-negotiable. The first time I made these, I was in a hurry and just gave them a quick spray of cooking oil. Big mistake. The cakes stuck like glue and I ended up scooping them out with a spoon. Now I always butter them generously and dust with cocoa powder. It takes an extra minute but saves so much frustration.
Preparation Method
Alright, let’s get to the fun part. Here’s how to make these lava cakes step by step. Trust me, it’s easier than you think.
- Preheat your oven to 425°F (220°C). Position the rack in the center. Getting the oven hot is crucial for that quick bake that gives you a cakey exterior and a molten center.
- Prepare your ramekins. Generously butter the inside of two 6-ounce ramekins, making sure to get every nook and cranny. Then dust them with cocoa powder (or flour if you don’t have cocoa), tapping out the excess. This step is your insurance policy against stuck cakes. Place the ramekins on a small baking sheet for easy handling.
- Melt the chocolate and butter together. Combine the chocolate chips and cubed butter in a medium microwave-safe bowl. Microwave in 30-second intervals, stirring after each, until completely smooth. This usually takes about 1-2 minutes total. Alternatively, you can melt them together in a small saucepan over low heat, stirring constantly. Be careful not to overheat—chocolate seizes up if it gets too hot. The mixture should be glossy and smooth.
- While the chocolate cools slightly, whisk the eggs and sugar. In a separate bowl, combine the 2 whole eggs, 2 egg yolks, and granulated sugar. Whisk vigorously for about 2 minutes until the mixture is pale, thick, and doubled in volume. You’re looking for a ribbon stage—when you lift the whisk, the batter should fall back in a thick ribbon that holds its shape for a few seconds. This incorporates air into the cakes, giving them that light, tender texture.
- Combine the mixtures. Slowly pour the slightly cooled chocolate mixture into the egg mixture, stirring gently with a rubber spatula. Fold until just combined—overmixing can deflate the eggs and make the cakes dense. The batter will be thick and glossy at this point.
- Add the flour and vanilla. Sprinkle the flour and salt over the batter, then add the vanilla. Fold gently until no streaks of flour remain. The batter should be smooth and thick, like a brownie batter. Don’t overmix or you’ll develop gluten and end up with tough cakes.
- Divide the batter between the ramekins. Pour the batter evenly into the prepared ramekins, filling them about three-quarters full. The batter will be thick, so use the spatula to scrape every last bit. You can smooth the tops gently if you want them to be even.
- Bake immediately. Place the baking sheet with the ramekins in the preheated oven. Bake for exactly 12-14 minutes. The cakes are done when the edges are set and slightly pulling away from the sides, but the center still jiggles when you gently shake the ramekin. The top should look slightly puffed and cracked in places. Don’t overbake or you’ll lose the molten center!
- Let them rest for 1 minute. Remove from the oven and let the ramekins sit on a wire rack for exactly 60 seconds. This allows the cakes to firm up just enough to hold their shape when inverted.
- Unmold and serve. Run a thin knife around the edge of each ramekin to loosen the cake. Place a small plate upside down on top of the ramekin, then carefully invert. Give the ramekin a gentle shake, then lift it off. The cake should release cleanly onto the plate. If it sticks, you didn’t butter it enough—just scoop it out and serve it in the ramekin. No one will care, trust me.
- Garnish and serve immediately. Dust with powdered sugar, add a scoop of vanilla ice cream, and scatter some fresh berries on the side. Serve warm, and warn everyone that the center is hot!
Sensory Cues: When you pull the cakes out of the oven, you should see the tops are slightly domed and cracked, with the edges looking firm and set. If you gently press the center, it should feel soft and give slightly, like a pillow. When you break into it with a spoon, the molten center should flow out slowly, like warm honey. If it’s too runny, you underbaked it. If it’s too thick, you overbaked it. Perfect is that glorious moment when it pools on the plate but still has some body.
Troubleshooting Tip: If you’re nervous about the timing, make the batter ahead of time and refrigerate it in the ramekins. Add 2-3 minutes to the baking time if starting from cold. This is actually a great way to prep for a date night—make the batter, pop it in the fridge, then bake when you’re ready for dessert.
Cooking Tips & Techniques
After making these cakes more times than I care to admit (and messing up plenty of them), here are my best tips for getting it right every time.
Master the timing. The biggest mistake people make is overbaking. Those 12-14 minutes are crucial. I set a timer for 11 minutes and start checking. The cakes are done when the edges are set but the center still wobbles. If you’re unsure, it’s better to underbake slightly than overbake. You can always pop them back in for a minute, but you can’t undo a dry cake.
Room temperature eggs matter. I know, I know, nobody plans ahead. But cold eggs can cause the chocolate mixture to seize up and become grainy. If you forgot to take them out, place the eggs in a bowl of warm water for 5 minutes. It’s a game-changer.
Don’t skip the resting time. That one-minute rest after baking is crucial. It allows the cakes to set up just enough to hold their shape when you unmold them. If you try to invert them immediately, they’ll collapse into a puddle. Wait too long, and the center will set completely. One minute is the sweet spot.
Grease like you mean it. I cannot stress this enough. Use softened butter and get into every corner of the ramekin. Then dust with cocoa powder. I learned this the hard way when my first attempt ended up as chocolate scrambled eggs on a plate. Now I’m religious about it.
Use a cookie scoop for even portions. If you want perfectly even cakes, use a small cookie scoop to divide the batter. It’s not necessary, but it makes the process cleaner and ensures both cakes bake evenly.
My biggest failure: The time I tried to double the recipe and bake it in one large dish. It was a disaster. The edges burnt while the center stayed raw. Trust me, this recipe is designed for individual portions for a reason. Don’t mess with the geometry.
Variations & Adaptations
Once you’ve mastered the basic recipe, here are some fun ways to make it your own. I’ve tried most of these and they’re all delicious.
1. Peanut Butter Lava Cakes: Before pouring the batter into the ramekins, drop a tablespoon of peanut butter into the center of each. Push it down slightly so it’s surrounded by batter. When you bake it, the peanut butter melts into the chocolate center for a Reese’s-style experience. I tried this on a whim one night and it’s now my husband’s favorite version.
2. Gluten-Free Version: Swap the all-purpose flour for almond flour or a gluten-free baking blend. The texture will be slightly denser and nuttier, but the molten center still works beautifully. I’ve served this to gluten-sensitive friends and they couldn’t tell the difference.
3. Dark Chocolate Intense: Use 70% dark chocolate instead of semi-sweet for a deeper, less sweet version. Reduce the sugar to 3 tablespoons since dark chocolate is more bitter. This is my personal favorite for adult gatherings—it feels sophisticated without being fussy.
4. Mint Chocolate Chip: Add ¼ teaspoon peppermint extract to the batter along with the vanilla. Sprinkle a few mini chocolate chips on top before baking for a crunchy contrast. Perfect for the holidays or when you want something refreshing.
5. Dairy-Free Adaptation: Use a high-quality vegan butter stick and dairy-free chocolate chips. I’ve tested this with Miyoko’s butter and Enjoy Life chocolate chips, and it works perfectly. Just make sure your vegan butter has a high fat content—the spreadable kind in a tub won’t work.
6. Espresso Kick: Add ½ teaspoon instant espresso powder to the chocolate mixture before adding the eggs. It doesn’t make the cakes taste like coffee—it just enhances the chocolate flavor and adds depth. Trust me on this one.
Serving & Storage Suggestions
These cakes are best served warm, straight from the oven. That’s when the molten center is at its most dramatic and delicious. But here’s how to handle them if you need to prep ahead or have leftovers (unlikely, but possible).
Serving Temperature: Serve immediately after baking, while the center is still warm and flowing. The contrast between the warm cake and cold ice cream is absolutely perfect. I like to place the ramekin on a small plate with a side of fresh berries and a dusting of powdered sugar. It looks like something from a fancy restaurant, but it took me five minutes of effort.
What to Serve With: Vanilla bean ice cream is the classic pairing, and for good reason—the cold creaminess balances the warm richness. Fresh raspberries or strawberries add a tart contrast that cuts through the chocolate. A dollop of whipped cream works too, especially if you add a tiny pinch of cinnamon to it. For drinks, a strong cup of coffee or a glass of red wine (something fruity like a Zinfandel) complements the chocolate beautifully.
Storage Instructions: These cakes are really best eaten fresh, but if you have leftovers (seriously, how?), you can store the baked cakes in the refrigerator for up to 2 days. Let them cool completely, then cover the ramekins with plastic wrap. To reheat, place them in a 350°F oven for 5-7 minutes, or until warmed through. The center won’t be as molten as fresh, but it’ll still be delicious.
Make-Ahead Option: You can prepare the batter up to 24 hours in advance. Divide it into the greased ramekins, cover with plastic wrap, and refrigerate. When you’re ready to bake, add 2-3 minutes to the baking time since the batter is cold. This is a lifesaver for entertaining—you can have dessert ready to go while you enjoy dinner.
Freezing: Unbaked batter can be frozen in the ramekins for up to 1 month. Wrap each ramekin tightly in plastic wrap and then foil. To bake from frozen, remove the wrapping and bake at 425°F for 15-17 minutes. The center will still be molten, I promise.
Nutritional Information & Benefits
Let’s be real—these are a treat, not a health food. But here’s what you’re working with, and a few reasons to feel a little less guilty about indulging.
Estimated Nutritional Values (per serving, without toppings):
- Calories: 520-580
- Total Fat: 38g
- Saturated Fat: 22g
- Cholesterol: 245mg
- Sodium: 180mg
- Total Carbohydrates: 44g
- Dietary Fiber: 3g
- Sugars: 36g
- Protein: 9g
Health Benefits of Key Ingredients: Dark chocolate (especially if you use 70% or higher) is rich in antioxidants called flavonoids, which can help improve heart health and reduce inflammation. Eggs provide high-quality protein and essential vitamins like B12 and D. The butter, while indulgent, contains fat-soluble vitamins A, E, and K2. So yes, there are some redeeming qualities here!
Dietary Considerations: This recipe contains gluten (unless you use the almond flour variation), dairy, and eggs. It’s not suitable for vegans, but the dairy-free adaptation works well. If you’re watching sugar intake, you can reduce the sugar to 3 tablespoons without affecting the texture too much—the cakes will just be less sweet.
Personal Wellness Perspective: I believe in balance. These lava cakes are a special occasion dessert, not an everyday thing. But when you do indulge, make it worth it. Use good ingredients, take your time, and savor every bite. Life is too short for mediocre chocolate.
Conclusion
So there you have it—the easiest, most impressive dessert you can make for two people. These molten chocolate lava cakes have saved my date nights, impressed my in-laws, and made me look like a hero on more occasions than I can count. They’re proof that you don’t need fancy techniques or expensive equipment to create something truly special.
What I love most about this recipe is how forgiving it is. Mess up the timing? You still have chocolate cake. Forget to grease the ramekins? Scoop it out and call it a chocolate pudding. There’s no stress here, just deliciousness. And honestly, isn’t that what cooking should be about?
I’d love to hear how these turn out for you. Did you try any of the variations? Did you serve them with something unexpected? Drop a comment below and let me know—I read every single one and I love seeing your creations. And if you know someone who thinks they can’t bake, send them this recipe. I promise it’ll change their mind.
Now go make some chocolate magic. You’ve got this!
Frequently Asked Questions
Can I make these lava cakes without ramekins?
Absolutely! You can use oven-safe custard cups, wide-mouth mason jars, or even a standard muffin tin. If using a muffin tin, reduce the baking time by about 2-3 minutes since the batter will be spread thinner. Just make sure whatever you use is oven-safe and greased well.
Why did my lava cakes come out fully cooked with no molten center?
This usually happens when they’re overbaked. The key is to pull them out when the edges are set but the center still jiggles. I recommend setting your timer for 11 minutes and checking from there. Every oven runs a little different, so you might need to adjust by a minute or two.
Can I use milk chocolate instead of semi-sweet?
I wouldn’t recommend it. Milk chocolate has a higher sugar content and lower cocoa butter content, which affects the texture and sweetness. The cakes might not set up properly, and they’ll be cloyingly sweet. Stick with semi-sweet or dark chocolate for the best results.
How do I know when the lava cakes are done without cutting into them?
Gently shake the ramekin—the center should jiggle like Jell-O while the edges look firm and slightly pulling away from the sides. The top will look slightly puffed and cracked. You can also insert a toothpick about ½ inch from the edge; it should come out with a few moist crumbs, but the center should still be soft.
Can I double this recipe for more servings?
Yes, but don’t try to bake them in one large dish. The timing and texture won’t work. Instead, simply double all the ingredients and divide the batter among four ramekins. The baking time stays the same—just make sure your ramekins are all the same size for even baking.
Pin This Recipe!
Easy Molten Chocolate Lava Cakes for Two
Rich, decadent molten chocolate lava cakes made for two. This foolproof recipe delivers a tender cake with a warm, gooey center in just 20 minutes using simple pantry ingredients.
- Prep Time: 10 minutes
- Cook Time: 12-14 minutes
- Total Time: 22-24 minutes
- Yield: 2 servings 1x
- Category: Dessert
- Cuisine: American
Ingredients
- 4 ounces (113g) semi-sweet chocolate chips or chopped chocolate
- ½ cup (113g or 1 stick) unsalted butter, cut into cubes
- 2 large eggs, at room temperature
- 2 large egg yolks
- ¼ cup (50g) granulated sugar
- 2 tablespoons (16g) all-purpose flour
- ¼ teaspoon vanilla extract
- Pinch of salt
- Powdered sugar, for dusting (optional)
- Fresh raspberries or strawberries (optional)
- Vanilla ice cream or whipped cream (optional)
- Mint sprigs (optional)
Instructions
- Preheat your oven to 425°F (220°C). Position the rack in the center.
- Generously butter the inside of two 6-ounce ramekins, then dust with cocoa powder (or flour), tapping out the excess. Place the ramekins on a small baking sheet.
- Combine the chocolate chips and cubed butter in a medium microwave-safe bowl. Microwave in 30-second intervals, stirring after each, until completely smooth (about 1-2 minutes total). Alternatively, melt together in a small saucepan over low heat, stirring constantly.
- In a separate bowl, whisk together the 2 whole eggs, 2 egg yolks, and granulated sugar vigorously for about 2 minutes until pale, thick, and doubled in volume (ribbon stage).
- Slowly pour the slightly cooled chocolate mixture into the egg mixture, folding gently with a rubber spatula until just combined.
- Sprinkle the flour and salt over the batter, add the vanilla, and fold gently until no streaks of flour remain.
- Divide the batter evenly between the prepared ramekins, filling them about three-quarters full.
- Bake immediately for exactly 12-14 minutes. The cakes are done when the edges are set and slightly pulling away from the sides, but the center still jiggles when gently shaken.
- Remove from the oven and let the ramekins rest on a wire rack for exactly 60 seconds.
- Run a thin knife around the edge of each ramekin to loosen the cake. Place a small plate upside down on top of the ramekin, then carefully invert. Give the ramekin a gentle shake, then lift it off.
- Garnish with powdered sugar, a scoop of vanilla ice cream, and fresh berries. Serve immediately.
Notes
For best results, use room temperature eggs to prevent the chocolate from seizing. Grease ramekins generously to prevent sticking. Do not overbake; the center should jiggle when done. Let rest exactly 1 minute before unmolding. Batter can be made up to 24 hours ahead and refrigerated; add 2-3 minutes to baking time if starting from cold.
Nutrition
- Serving Size: 1 lava cake
- Calories: 520580
- Sugar: 36
- Sodium: 180
- Fat: 38
- Saturated Fat: 22
- Carbohydrates: 44
- Fiber: 3
- Protein: 9
Keywords: molten chocolate lava cake, lava cake for two, easy lava cake, chocolate dessert, date night dessert, quick dessert, chocolate lava cake recipe