I was standing in the checkout line at the grocery store last December, staring at the price of baking chocolate like it had personally offended me. My four-year-old was trying to climb out of the cart, and my oldest kept asking if we could make Christmas cookies. Again. The total on the register just kept climbing, and I felt that familiar knot in my stomach—the one that says you want to give your kids a magical holiday but your wallet is screaming no.
My neighbor, an older woman named Ruth who gardens in the most organized way you’ve ever seen, saw me in line. She didn’t say anything at first. Then she reached into her cart, pulled out a package of Oreos, and held it up with a wink. “You don’t need all that fancy stuff,” she said. “Trust me.” I laughed, thinking she was joking. But she wasn’t. She told me about these no-bake Oreo balls her kids used to beg for every Christmas—how they cost pennies to make and somehow disappeared faster than anything else on the cookie tray. Honestly, I was skeptical. I mean, Oreos and cream cheese? That’s it?
I made them that weekend, and let me tell you—I have never felt so humbled by a recipe. The kids decorated them while sitting on the kitchen floor because we ran out of counter space. There was sprinkles everywhere, a few that looked more like monsters than snowmen, and one that my youngest licked and put back. But they were so proud. And the best part? The whole batch cost less than a single trip to the bakery. Maybe you’ve been there—wanting that holiday magic without the holiday price tag. These Oreo balls are the answer you didn’t know you needed.
Why You’ll Love This Recipe
I’ve tested this recipe more times than I care to admit, and I can tell you with total confidence—it works every single time. No baking, no stress, no fancy equipment. Just pure, crowd-pleasing deliciousness that makes you look like a holiday hero.
- Budget-Friendly: You need exactly four main ingredients, and chances are you already have three of them in your pantry. This is the kind of recipe that saves Christmas when money is tight.
- Kid-Approved: My kids fight over who gets to crush the Oreos. It’s messy, it’s loud, and honestly, it’s the best kind of kitchen chaos. Plus, no oven means zero risk of little fingers getting burned.
- No-Bake Simplicity: No waiting for dough to chill. No watching the oven like a hawk. Just mix, roll, dip, and done. Perfect for those days when you have twenty other things to do.
- Perfect for Gifting: These little bites look like you spent hours in the kitchen. Pack them in a cute tin, and suddenly you’re the person who brings the best holiday treats.
- Totally Customizable: White chocolate, dark chocolate, sprinkles, crushed candy canes—you can make them your own without any extra effort.
What makes this recipe different from all the other Oreo ball recipes out there? It’s the ratio. I’ve tweaked it over dozens of batches until the texture was absolutely perfect—creamy on the inside, firm enough to dip, and not overly sweet. This isn’t just another version. It’s the one you’ll come back to year after year.
What Ingredients You Will Need
This recipe uses simple, everyday ingredients to create something that feels special. No hunting down obscure items or spending a fortune. Here’s what you’ll need:
For the Oreo Balls
- 1 package (14.3 oz) regular Oreo cookies – Don’t use the double-stuf ones for this. The regular ratio of cookie to cream is what gives the perfect texture. I’ve tried both, and regular Oreos win every time.
- 8 oz cream cheese, softened to room temperature – This is crucial. Cold cream cheese will leave you with lumpy balls that don’t hold together well. Let it sit out for at least 30 minutes before you start.
- 1 teaspoon vanilla extract – Pure vanilla is best, but imitation works fine if that’s what you have. It adds a warmth that balances the sweetness.
- Pinch of salt – Trust me on this one. A tiny pinch cuts through the sweetness and makes the chocolate flavor pop.
For the Coating
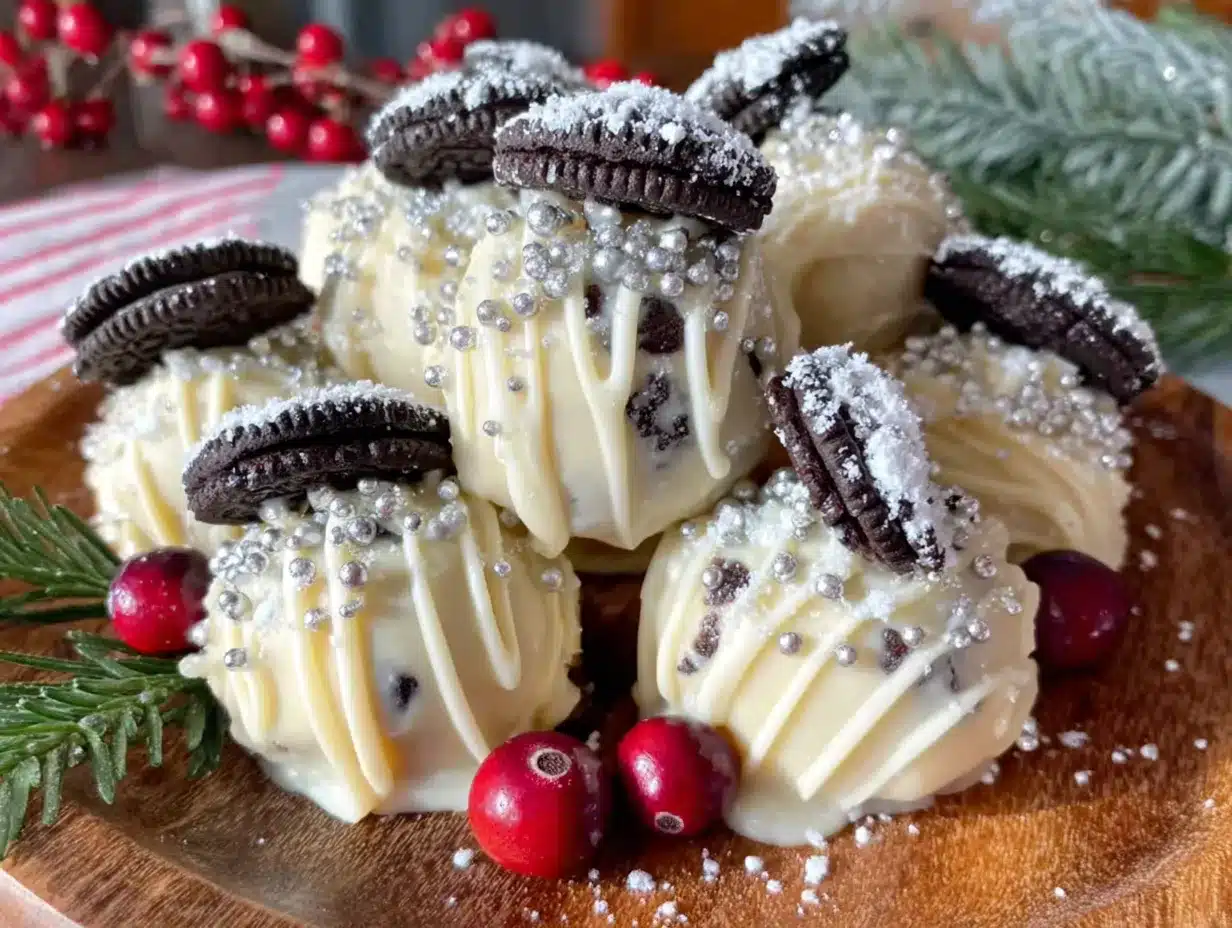
- 12 oz melting chocolate or almond bark – I prefer Ghirardelli melting wafers because they melt smoothly and set with a nice shine. But any brand of white or dark melting chocolate works. Avoid regular chocolate chips—they don’t melt as smoothly and can seize up.
- 1 tablespoon coconut oil or shortening (optional) – Adding this to your melted chocolate helps it thin out for easier dipping and gives a glossier finish. Not required, but highly recommended.
For Decoration
- Christmas sprinkles, crushed candy canes, or festive sanding sugar – Whatever you have on hand. My kids love the little snowflake sprinkles from the dollar store.
Ingredient Selection Tips: Look for Oreos that are fresh—check the expiration date. Stale Oreos will make the balls crumbly. For the cream cheese, Philadelphia is my go-to because it has the right consistency. Store brands can be a bit softer and may make the mixture too sticky. And if you’re using almond bark, you can find it in the baking aisle near the chocolate chips—it’s usually cheaper than name-brand melting wafers.
Substitution Guidance: Need a dairy-free option? Use dairy-free cream cheese and dairy-free chocolate. The texture will be slightly different, but still delicious. For a gluten-free version, use gluten-free Oreos. They work exactly the same way.
Equipment Needed
You don’t need a professional kitchen to make these. Here’s what I use:
- Food processor – This is the easiest way to crush Oreos into fine crumbs. If you don’t have one, no worries. Place the cookies in a zip-top bag and crush them with a rolling pin. It’s a great way to let kids help—just be prepared for a few flying crumbs.
- Large mixing bowl – Any bowl will do, but a wide one makes mixing easier.
- Hand mixer or sturdy spatula – A hand mixer makes combining the cream cheese and Oreo crumbs effortless. But honestly, a good spatula and some elbow grease works just fine.
- Small cookie scoop or tablespoon – For uniform balls. I use a 1-tablespoon scoop, and it gives me about 36 perfectly sized bites.
- Baking sheet lined with parchment paper – To hold the balls while they set. Parchment is non-stick and makes cleanup a breeze.
- Microwave-safe bowl or double boiler – For melting the chocolate. I use the microwave in 30-second bursts, stirring in between. It’s faster and less fussy.
- Fork or dipping tool – To dip the balls in chocolate. A regular dinner fork works perfectly.
Budget-Friendly Tip: Don’t have a food processor? A rolling pin and a sturdy bag work just as well. I actually prefer the bag method when I’m making these with my kids—it keeps them busy and gives them a sense of ownership over the recipe.
Preparation Method
Follow these steps, and you’ll have perfect Oreo balls every time. I’ve included all the little details that make the difference between good and great.
Step 1: Crush the Oreos
Place the entire package of Oreos—filling and all—into your food processor. Pulse until you have fine crumbs. No large chunks should remain. If you’re using the bag method, place the cookies in a large zip-top bag, squeeze out the air, and crush them with a rolling pin. This takes about 5 minutes of solid crushing. Let the kids take turns—it’s a great energy burner.
Step 2: Mix the Base
In a large mixing bowl, beat the softened cream cheese with a hand mixer until smooth and fluffy, about 1 minute. Add the vanilla extract and salt, and mix until combined. Pour in the Oreo crumbs and mix on low speed until everything comes together. The mixture should look like a thick, dark dough. If it seems too dry, add a teaspoon of milk. If it’s too sticky, add a few more crushed Oreos.
Sensory Cue: The dough should hold together when pressed between your fingers. It shouldn’t feel greasy or crumbly. If it crumbles, you need more cream cheese. If it’s greasy, you used too much.
Step 3: Roll into Balls
Using a small cookie scoop or a tablespoon, portion out the mixture and roll it between your palms into smooth balls. Place them on the parchment-lined baking sheet. You should get about 36 balls, depending on size. Don’t worry if they’re not perfectly round—the chocolate coating will hide small imperfections.
Pro Tip: Wash your hands halfway through if the mixture starts sticking. The heat from your hands can make the cream cheese soften too much.
Step 4: Chill the Balls
Place the baking sheet in the refrigerator for at least 30 minutes. This step is non-negotiable. Chilled balls hold their shape much better when you dip them in warm chocolate. If you skip this, you’ll end up with Oreo crumbs floating in your melted chocolate. Ask me how I know.
Step 5: Melt the Chocolate
While the balls are chilling, melt your chocolate. Place the melting wafers in a microwave-safe bowl and microwave in 30-second intervals, stirring well after each. Stop when the chocolate is mostly melted with a few small lumps—the residual heat will finish the job. If using, stir in the coconut oil or shortening until smooth.
Warning: Do not overheat the chocolate. If it gets too hot, it will seize up and become grainy. If that happens, you can try stirring in a teaspoon of vegetable oil, but honestly, it’s better to start fresh.
Step 6: Dip the Balls
Remove the chilled balls from the fridge. Using a fork, lower one ball into the melted chocolate. Roll it around to coat completely, then lift it out, letting the excess chocolate drip off. Gently tap the fork on the edge of the bowl to help it along. Place the coated ball back on the parchment paper.
Quick Tip: Work quickly. If the balls warm up too much, they’ll start to soften and may fall apart in the chocolate. Do this in batches if needed—keep the uncoated balls in the fridge while you work.
Step 7: Decorate
While the chocolate is still wet, sprinkle your decorations on top. If you wait too long, the chocolate will set and the sprinkles won’t stick. Work in small batches—decorate 4-5 balls at a time before moving on.
Step 8: Set and Serve
Return the baking sheet to the refrigerator for another 15-20 minutes, or until the chocolate is completely firm. Once set, transfer the Oreo balls to an airtight container. They’re ready to eat immediately, but they taste even better after a few hours in the fridge.
Cooking Tips & Techniques
I’ve made these Oreo balls more times than I can count, and I’ve learned a few things the hard way. Here’s what I wish someone had told me:
Keep Everything Cold. This is the single most important tip. Cold cream cheese mixture rolls better. Cold balls dip better. Cold finished balls set faster. If at any point your mixture starts feeling too soft or sticky, pop it in the fridge for 10 minutes.
Don’t Skip the Chill. The first time I made these, I was in a hurry and only chilled the balls for 10 minutes. Big mistake. They fell apart in the chocolate, and I ended up with a bowl of chocolate soup with Oreo chunks. Learn from my failure.
Use a Deep Bowl for Dipping. A shallow bowl makes it hard to coat the balls evenly. Use a deep, narrow bowl so you can submerge the ball completely with minimal effort.
Work in Batches. Don’t try to dip all 36 balls at once. Keep the uncoated balls in the fridge, and take out only 6-8 at a time. This prevents them from warming up and getting soft.
Fix Seized Chocolate. If your chocolate gets too thick or starts to seize, stir in a teaspoon of coconut oil or vegetable shortening. It won’t fix completely seized chocolate, but it can save you from starting over.
Let Kids Decorate Freely. The best part of this recipe is the decorating. Let the kids go wild. Some of my favorite memories are of my daughter carefully placing a single sprinkle on each ball, one by one, with the focus of a surgeon. It’s messy, it’s imperfect, and it’s absolutely wonderful.
Variations & Adaptations
This recipe is incredibly forgiving, which is one of the reasons I love it. Here are some ways to make it your own:
Flavor Variations
- Mint Chocolate: Add 1/2 teaspoon peppermint extract to the Oreo mixture. Dip in dark chocolate and top with crushed candy canes. Tastes just like a Thin Mint.
- Peanut Butter: Swap 2 oz of the cream cheese for creamy peanut butter. The peanut butter adds a savory note that balances the sweetness beautifully.
- Cookies and Cream: Reserve a few Oreo crumbs and sprinkle them on top of the white chocolate coating. Double the Oreo flavor.
Dietary Adaptations
- Gluten-Free: Use gluten-free Oreos. Everything else stays the same.
- Dairy-Free: Use dairy-free cream cheese and dairy-free chocolate. The texture will be slightly softer, so chill them well before dipping.
- Lower Sugar: Use reduced-fat Oreos and sugar-free chocolate. The taste is slightly different, but still satisfying.
Seasonal Twists
- Halloween: Use orange and black sprinkles. Dip in orange-colored white chocolate.
- Easter: Pastel sprinkles and pastel-colored chocolate. Add a drop of food coloring to white chocolate for a custom color.
- Valentine’s Day: Red and pink sprinkles. Dip in dark chocolate for a sophisticated touch.
Personal Variation: My favorite version is the one where I crush up a few candy canes and mix them into the Oreo mixture before rolling. The tiny bits of peppermint add a nice crunch and a festive flavor that screams Christmas.
Serving & Storage Suggestions
These Oreo balls are best served cold, straight from the fridge. The chocolate stays firm, and the inside is creamy and delicious. Here’s how to serve and store them:
Serving Temperature: Serve chilled or at room temperature. If you’re serving them at a party, take them out of the fridge about 10 minutes before guests arrive. This takes the chill off without making them soft.
Presentation Ideas: Arrange them on a festive platter or in a decorative tin. For a cookie exchange, pack them in a clear cellophane bag tied with a ribbon. They look beautiful and make excellent homemade gifts.
Complementary Dishes: These pair wonderfully with a cup of hot cocoa, coffee, or a glass of cold milk. They also work great on a dessert board alongside brownies, fudge, and fresh fruit.
Storage Instructions: Store in an airtight container in the refrigerator for up to 2 weeks. They actually get better after a day or two as the flavors meld together. For longer storage, you can freeze them for up to 3 months.
Freezing Method: Place the finished Oreo balls in a single layer on a baking sheet and freeze until solid, about 1 hour. Transfer to a freezer-safe container or zip-top bag, separating layers with parchment paper. To thaw, move them to the refrigerator overnight.
Reheating Note: You don’t need to reheat these. Just eat them cold or let them sit at room temperature for a few minutes. The texture changes slightly as they warm up—some people prefer them this way.
Flavor Development: If you can resist eating them right away, let them sit in the fridge for 24 hours. The Oreo crumbs absorb moisture from the cream cheese, and the texture becomes even creamier. It’s worth the wait.
Nutritional Information & Benefits
Let’s be honest—these are a treat, not a health food. But that doesn’t mean they can’t fit into a balanced lifestyle. Here’s the approximate nutritional breakdown for one Oreo ball (based on 36 servings):
- Calories: 120-140
- Fat: 7-9g
- Carbohydrates: 14-16g
- Protein: 1-2g
- Sugar: 10-12g
Health Benefits of Key Ingredients: Oreos get a bad rap, but they do contain a small amount of iron and calcium from the enriched flour. Cream cheese provides a bit of protein and calcium. And dark chocolate, if you choose it, is rich in antioxidants. Is it a superfood? No. But it’s a treat made with love, and that counts for something.
Dietary Considerations: This recipe is not gluten-free, dairy-free, or vegan unless you make substitutions. It does contain wheat, dairy, and soy. If you have allergies, be sure to check the labels on your ingredients.
Personal Wellness Perspective: I believe in balance. We eat healthy meals most of the time, and we enjoy treats like these during the holidays. There’s no guilt here—just joy. Making these with my kids is one of my favorite December traditions, and I wouldn’t trade it for anything.
Conclusion
These no-bake Christmas Oreo balls are more than just a recipe. They’re a reminder that the best holiday moments don’t come from fancy ingredients or complicated techniques. They come from the time we spend together, the messes we make, and the laughter we share.
I love this recipe because it’s forgiving. It doesn’t care if your kitchen is a disaster or if your kids are bouncing off the walls. It just works. Every single time. And when you bite into one of these creamy, chocolatey little bites, you’ll understand why Ruth winked at me in that grocery store line.
So go ahead—make a batch with your kids. Let them crush the Oreos. Let them go wild with the sprinkles. And when you’re done, share a few with someone you love. That’s what the holidays are really about.
Have you tried this recipe? I’d love to hear how it turned out! Drop a comment below and tell me about your decorating adventures. And if you have a favorite variation, please share it—I’m always looking for new ideas. Happy holidays, and happy snacking!
Frequently Asked Questions
Can I use double-stuf Oreos for this recipe?
I’ve tried it, and honestly, regular Oreos work better. Double-stuf has more filling, which makes the mixture too soft and sticky. Stick with the classic version for the best texture.
Why did my Oreo balls fall apart in the chocolate?
This usually happens when the balls aren’t chilled enough. Make sure they’ve been in the fridge for at least 30 minutes before dipping. If they still fall apart, try adding a little more cream cheese to the mixture next time.
Can I freeze these Oreo balls?
Absolutely! Freeze them in a single layer on a baking sheet, then transfer to a freezer-safe container. They’ll keep for up to 3 months. Thaw in the refrigerator overnight before serving.
How do I make the chocolate coating smooth and shiny?
Add a tablespoon of coconut oil or shortening to the melted chocolate. This thins it out and gives it a beautiful glossy finish. Also, make sure your chocolate isn’t overheated—that can cause it to look dull.
Can I make these ahead of time for a party?
Yes! These are actually better when made a day or two in advance. The flavors meld together, and the texture becomes even creamier. Store them in an airtight container in the fridge until you’re ready to serve.
Pin This Recipe!

Easy No-Bake Christmas Oreo Balls Recipe

These no-bake Oreo balls are a budget-friendly, kid-approved holiday treat made with just four main ingredients. Perfect for gifting or enjoying with family, they’re creamy, chocolatey, and endlessly customizable.
- Prep Time: 20 minutes
- Cook Time: 0 minutes
- Total Time: 1 hour 10 minutes (including chilling)
- Yield: 36 servings 1x
- Category: Dessert
- Cuisine: American
Ingredients
- 1 package (14.3 oz) regular Oreo cookies
- 8 oz cream cheese, softened to room temperature
- 1 teaspoon vanilla extract
- Pinch of salt
- 12 oz melting chocolate or almond bark
- 1 tablespoon coconut oil or shortening (optional)
- Christmas sprinkles, crushed candy canes, or festive sanding sugar (for decoration)
Instructions
- Crush the Oreos: Place the entire package of Oreos (filling and all) into a food processor. Pulse until you have fine crumbs. Alternatively, place cookies in a zip-top bag and crush with a rolling pin.
- Mix the base: In a large mixing bowl, beat the softened cream cheese with a hand mixer until smooth and fluffy, about 1 minute. Add vanilla extract and salt, mix until combined. Pour in Oreo crumbs and mix on low speed until a thick, dark dough forms. If too dry, add a teaspoon of milk; if too sticky, add more crushed Oreos.
- Roll into balls: Using a small cookie scoop or tablespoon, portion out the mixture and roll into smooth balls. Place on a parchment-lined baking sheet. You should get about 36 balls.
- Chill the balls: Refrigerate the baking sheet for at least 30 minutes. This is essential for easy dipping.
- Melt the chocolate: Place melting wafers in a microwave-safe bowl and microwave in 30-second intervals, stirring well after each, until mostly melted. Stir in coconut oil or shortening if using.
- Dip the balls: Remove chilled balls from the fridge. Using a fork, lower one ball into melted chocolate, roll to coat completely, lift out, and let excess drip off. Place back on parchment paper. Work in batches, keeping uncoated balls chilled.
- Decorate: While chocolate is still wet, sprinkle decorations on top. Work in small batches.
- Set and serve: Return baking sheet to the refrigerator for 15-20 minutes until chocolate is firm. Transfer to an airtight container. Serve immediately or after a few hours in the fridge.
Notes
Keep everything cold for best results. Chill balls at least 30 minutes before dipping. Work in batches to prevent warming. For seized chocolate, stir in a teaspoon of coconut oil. Let kids decorate freely for fun memories.
Nutrition
- Serving Size: 1 Oreo ball
- Calories: 130
- Sugar: 11
- Sodium: 85
- Fat: 8
- Saturated Fat: 4
- Carbohydrates: 15
- Protein: 1.5
Keywords: no-bake, Oreo balls, Christmas, holiday, easy, kid-friendly, budget-friendly, chocolate, cream cheese


