I was standing in the baking aisle at Target last October, staring at a bag of candy eyes, when the smell hit me. It wasn’t the candy — it was some kid walking past with a peanut butter sandwich, and suddenly I was eight years old at my Aunt Lois’s kitchen table. Her house had this weird shag carpet that always smelled like dust, but her kitchen smelled like brownies and peanut butter, and she’d let me lick the spatula while she told me stories about the neighbor’s cat. She passed away a few years back, and I honestly hadn’t thought about those afternoons in forever. But there I was, holding a bag of candy eyes, trying not to tear up in the middle of Target. That’s when I knew I had to figure out how to make those brownies myself. You know that feeling when a memory just grabs you by the collar? Yeah, it was like that.
So I went home and started testing. I mean, I couldn’t just call Aunt Lois and ask — she didn’t leave a recipe. She was one of those cooks who just… did things. A handful of this, a splash of that. It took me five tries to get the brownie base right. The first batch was too cakey. The second was burnt on the edges but raw in the middle. The third — well, let’s just say I learned that peanut butter and chocolate don’t always play nice if you rush them. But that fourth batch? That was the one. The peanut butter swirl sat right on top, and when I dragged a knife through it, those spider web lines came out perfect. I may have squealed a little.
These Easy Peanut Butter Spider Web Brownies aren’t just a Halloween treat. They’re my way of bringing Aunt Lois back to life, one chocolatey bite at a time. And honestly? They’re the easiest thing you’ll make all spooky season. No fancy piping bags, no complicated techniques — just a box of brownie mix, some peanut butter, and maybe a little patience. Maybe you’ve been there too, trying to recreate something from your past and getting it just right. That’s what this recipe is for.
Why You’ll Love This Recipe
Let me tell you why these brownies are about to become your go-to Halloween dessert. I’ve tested this recipe more times than I care to admit, and it’s finally perfect — the kind of perfect where you take a bite and just close your eyes for a second.
- Quick & Easy: These come together in about 35 minutes, including baking time. No complicated steps, no fancy equipment. You can literally make these after work on a Tuesday night.
- Simple Ingredients: You probably already have everything in your pantry right now. I’m serious — check. Brownie mix, peanut butter, butter, powdered sugar, and a little cream. That’s it.
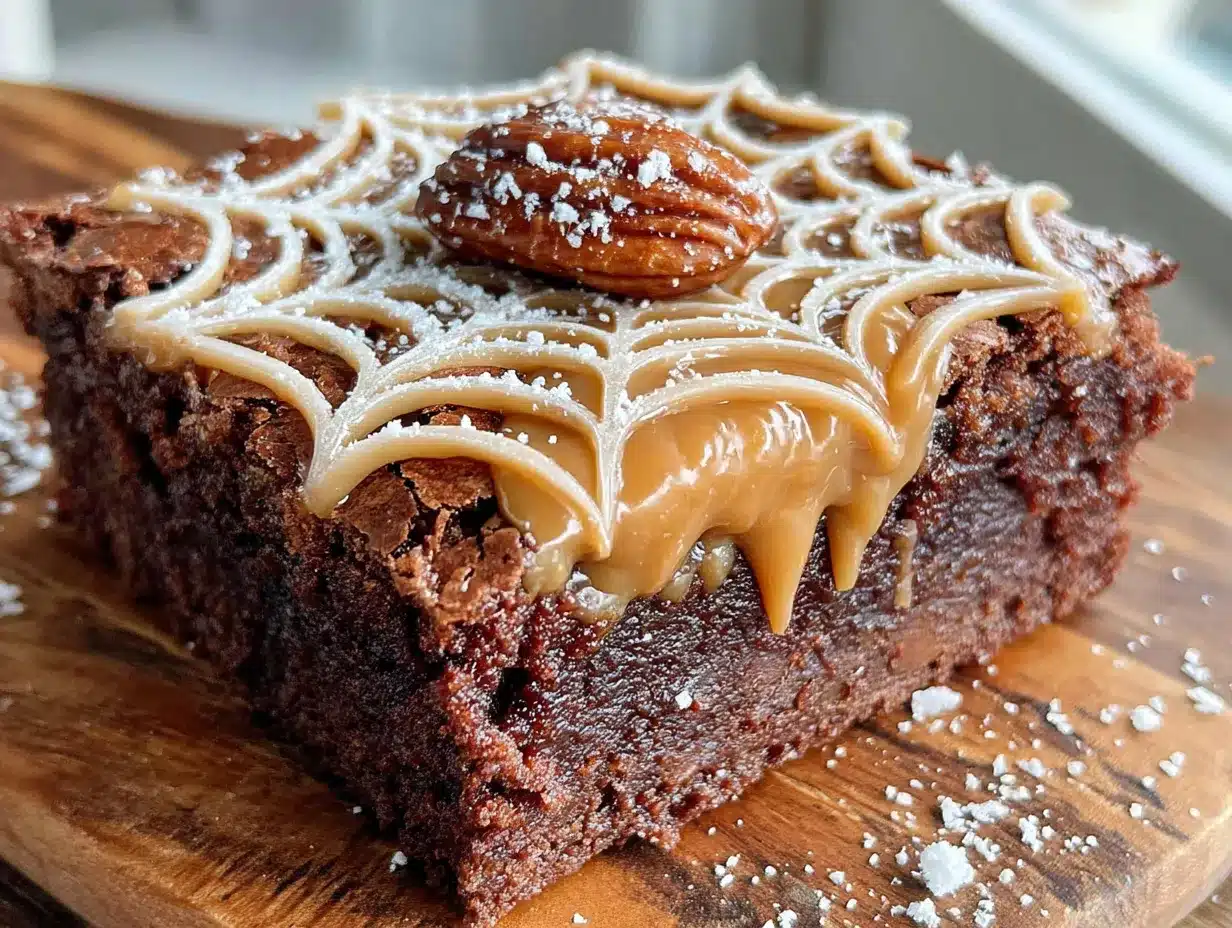
- Perfect for Halloween Parties: These look like you spent hours on them, but you didn’t. The spider web design is deceptively simple and always gets a reaction. Kids love them, adults love them, everyone wins.
- Crowd-Pleaser: I brought these to my neighbor’s Halloween potluck last year, and they were gone in 20 minutes. A guy named Steve asked me for the recipe three times.
- Unbelievably Delicious: The fudgy brownie base with that creamy peanut butter swirl? It’s the kind of combo that makes you wonder why you don’t eat peanut butter and chocolate together every single day.
What makes these different from every other spider web brownie recipe out there? It’s the technique. I figured out that you need to chill the peanut butter mixture slightly before piping it, and you need to use a toothpick — not a knife — for the web lines. Small details, huge difference. The peanut butter sets up just right, so it doesn’t melt into the brownie and disappear. You get that beautiful web pattern every single time.
These aren’t just good for a Halloween recipe. They’re good, period. The kind of brownies that make you forget it’s October and just enjoy the moment.
What Ingredients You Will Need
This recipe uses simple, pantry-friendly ingredients to create something that looks way more complicated than it actually is. Here’s what you’ll need, broken down by component.
For the Brownie Base
- 1 box (18 oz) brownie mix — I recommend Ghirardelli or Duncan Hines for the fudgiest results. Avoid “cake-like” mixes for this one.
- Eggs, oil, and water — Whatever the box calls for. Usually 2 eggs, 1/3 cup oil, and 1/4 cup water.
- 1 teaspoon vanilla extract (optional but recommended) — Adds warmth and depth to the chocolate flavor.
For the Peanut Butter Spider Web
- 1/2 cup creamy peanut butter — Use the standard processed kind like Jif or Skippy. Natural peanut butter separates too much and won’t pipe smoothly. Trust me on this one — I learned the hard way.
- 3 tablespoons unsalted butter, softened — This helps the peanut butter mixture stay spreadable. Let it sit out for 20 minutes before starting.
- 1/2 cup powdered sugar — Sifted if you have the patience, but honestly, I don’t always sift and it’s fine.
- 2-3 tablespoons heavy cream or milk — Heavy cream gives a richer texture, but milk works in a pinch. Add slowly until you get the right consistency.
- 1/2 teaspoon vanilla extract — Because vanilla makes everything better.
- Pinch of salt — Balances the sweetness and makes the peanut butter pop.
For Decoration (Optional but Fun)
- Candy spiders or plastic spider rings — For that extra Halloween touch. I found some at the dollar store last year.
- 1-2 tablespoons melted chocolate — For drizzling or drawing tiny spider legs.
A quick note on ingredient selection: Don’t skip the salt in the peanut butter mixture. I know it seems weird, but it makes a huge difference. Also, if you’re using a gluten-free brownie mix, this recipe adapts perfectly — just follow the box instructions for the base.
Equipment Needed
You don’t need much for these, which is part of the beauty. Here’s what I used:
- 8×8 inch baking pan — Glass or metal, both work fine. Line it with parchment paper for easy removal. I’ve had brownies stick to a metal pan before, and it’s heartbreaking.
- Mixing bowls — One large for the brownie batter, one medium for the peanut butter mixture.
- Whisk or electric mixer — A hand mixer makes the peanut butter filling smoother, but a whisk works if you have some elbow grease.
- Spatula — For spreading the brownie batter evenly.
- Piping bag or zip-top bag — For the peanut butter spider web. A zip-top bag with the corner snipped off works perfectly. I’ve used both, and honestly, the zip-top bag is easier to clean.
- Toothpick or skewer — For creating the web pattern. A toothpick gives you finer lines.
- Cooling rack — So the brownies cool evenly. If you don’t have one, just use a cutting board.
- Sharp knife — For cutting clean slices. Run it under hot water between cuts for perfect edges.
If you don’t have a piping bag, don’t stress. I’ve made these with a sandwich bag and it worked great. Just don’t cut the hole too big — start small and snip more if needed.
Preparation Method
Alright, let’s make some spider web brownies. I’ll walk you through every step so you don’t end up with a mess like I did on my first try.
- Preheat your oven to 350°F (175°C). Line your 8×8 pan with parchment paper, leaving some overhang on two sides. This makes lifting the brownies out so much easier. Spray the parchment lightly with non-stick spray if you’re paranoid like me.
- Make the brownie batter. In a large bowl, combine your brownie mix with the eggs, oil, and water called for on the box. Add that optional teaspoon of vanilla if you’re using it. Stir until just combined — about 40 strokes. Don’t overmix, or your brownies will be cakey instead of fudgy. You want that thick, glossy batter.
- Pour the batter into the prepared pan. Use your spatula to spread it evenly into the corners. Give the pan a couple of gentle taps on the counter to release any air bubbles. Set it aside while you make the peanut butter mixture.
- Make the peanut butter spider web mixture. In a medium bowl, combine the softened butter and peanut butter. Beat them together until smooth and creamy — about 2 minutes with a hand mixer. Add the sifted powdered sugar, vanilla, and salt. Beat again until combined. Add the heavy cream one tablespoon at a time, mixing after each, until the mixture is smooth but still thick enough to hold its shape. It should be pipable but not runny. If it’s too thick, add another splash of cream. If it’s too thin, add a little more powdered sugar.
- Chill the peanut butter mixture. Pop it in the fridge for 10-15 minutes. This step is important — it helps the mixture hold its shape when you pipe it onto the brownies. I skipped this once, and my web turned into a peanut butter puddle. Still tasted good, but not pretty.
- Transfer the peanut butter mixture to a piping bag or zip-top bag. Snip off a small corner — about 1/4 inch wide. Don’t cut too much, or you’ll have trouble controlling the lines.
- Pipe the spider web. Starting from the center of the brownie batter, pipe a spiral of peanut butter going outward. Don’t worry about being perfect — the web pattern will hide small imperfections. Space the spiral lines about an inch apart.
- Create the web pattern. Here’s the fun part. Take a toothpick and gently drag it from the center of the brownie outward through the peanut butter spiral, like you’re drawing spokes on a wheel. Space these lines about 1-1.5 inches apart. Wipe the toothpick clean between each line. Then, drag the toothpick in a circular motion between the spokes to create the web effect. It sounds complicated, but it’s actually very forgiving. I messed up the first one and just smoothed it out and started over.
- Bake the brownies. Place the pan in the preheated oven and bake for 25-30 minutes. The edges should look set, and the center should be slightly puffed but still a little jiggly. A toothpick inserted into the center should come out with a few moist crumbs — not wet batter. Every oven is different, so start checking at 22 minutes.
- Cool completely. This is the hardest part. Let the brownies cool in the pan on a wire rack for at least 30 minutes. Then refrigerate for another 30 minutes before cutting. Chilling makes the peanut butter web firm up and gives you cleaner cuts. I know you want to eat them now, but trust me — waiting is worth it.
- Cut and serve. Use the parchment paper to lift the brownies out of the pan. Run a sharp knife under hot water, dry it, and cut into squares. Wipe the knife between cuts for clean edges. Top with candy spiders if you’re feeling festive.
Cooking Tips & Techniques
After making these about a dozen times, I’ve picked up a few tricks that make a real difference. Let me share them so you don’t make the same mistakes I did.
Don’t overbake. This is the number one mistake people make with brownies. The toothpick test should show moist crumbs, not clean. If you wait until the toothpick comes out clean, your brownies will be dry. I’ve done this more times than I want to admit. Set a timer for 22 minutes and check from there.
Chill the peanut butter mixture. I mentioned this before, but it’s worth repeating. A warm, soft peanut butter mixture will sink into the brownie batter and disappear. You want it firm enough to sit on top. Ten minutes in the fridge makes all the difference.
Use a light hand with the toothpick. You’re not trying to carve a masterpiece. Gentle, confident strokes work best. If you press too hard, you’ll mix the peanut butter into the brownie batter and lose the contrast. Think of it like drawing on the surface, not digging into it.
Let them cool completely. I know, I know. But warm brownies are soft, and the peanut butter web will smear if you cut too soon. I once cut into a pan after only 15 minutes, and it looked like a peanut butter explosion. Still delicious, but not Instagram-worthy.
Use a glass pan if you have one. Glass heats more evenly than metal, which means your brownies will bake more consistently. If you use metal, consider reducing the oven temperature by 25°F and baking a few minutes longer.
Double the recipe for a crowd. This recipe fits an 8×8 pan, which gives you 9 large or 16 small brownies. For a 9×13 pan, double everything and bake for 30-35 minutes. I’ve done this for parties, and it works great.
Variations & Adaptations
One of the best things about this recipe is how easy it is to adapt. Here are some variations I’ve tried and loved.
Gluten-Free Version: Use your favorite gluten-free brownie mix for the base. Everything else in the recipe is naturally gluten-free. I’ve used King Arthur’s gluten-free mix, and it turned out perfectly. Just make sure your peanut butter is certified gluten-free if that’s a concern.
Vegan Adaptation: Use a vegan brownie mix and substitute the eggs with flax eggs (1 tablespoon ground flaxseed + 3 tablespoons water per egg). For the peanut butter web, use vegan butter or coconut oil instead of butter, and use plant-based milk instead of heavy cream. It works, though the texture is slightly different. I tried this for a friend’s Halloween party, and honestly, no one could tell the difference.
Chocolate Peanut Butter Swirl: If you want even more chocolate, melt 1/4 cup of chocolate chips and drizzle it over the peanut butter web before baking. The chocolate sets up and adds another layer of flavor. I did this for Thanksgiving one year, and it was a hit.
Nut-Free Option: Substitute the peanut butter with sunflower seed butter or WowButter. The flavor changes, but the texture works the same way. Just make sure to use a brand that doesn’t separate. I tested this with sunflower seed butter, and the web pattern came out beautifully.
Extra Spooky Version: Add a few drops of orange or green food coloring to the peanut butter mixture for a Halloween twist. I did orange last year, and it looked amazing against the dark brownie. Just don’t overdo it — a little goes a long way.
S’mores Spider Web Brownies: Sprinkle mini marshmallows and crushed graham crackers over the peanut butter web before baking. The marshmallows toast up, and you get that campfire flavor. This is my personal favorite variation — it’s like two desserts in one.
Serving & Storage Suggestions
These brownies are best served at room temperature or slightly chilled. The peanut butter web firms up nicely when cold, making for cleaner slices. If you’re serving them at a party, arrange them on a platter with some candy spiders scattered around for effect.
For a really dramatic presentation, serve them on a black or orange plate. The contrast makes the spider web pattern pop. I also like to dust them with a little powdered sugar right before serving — it looks like a light frost and adds a touch of sweetness.
Storage: Store leftover brownies in an airtight container at room temperature for up to 3 days. If your kitchen is warm, refrigerate them to keep the peanut butter web from softening. Layer them with wax paper between each layer to prevent sticking.
Freezing: These freeze beautifully. Wrap individual brownies in plastic wrap, then place them in a freezer-safe bag. They’ll keep for up to 3 months. To thaw, let them sit at room temperature for about 30 minutes. I usually make a double batch and freeze half for later — they’re perfect for last-minute Halloween guests.
Reheating: If you prefer warm brownies, microwave individual pieces for 10-15 seconds. Just be careful — the peanut butter web can get melty if you overheat them. I like mine at room temperature, but my husband microwaves his every time. To each their own.
One thing I’ve noticed: the flavors actually get better after a day. The peanut butter and chocolate meld together overnight, and the brownies get even fudgier. So if you can wait a day, do it. But I won’t judge you if you can’t.
Nutritional Information & Benefits
Let’s be real — these are a treat, not a health food. But here’s what you’re looking at per brownie (based on 9 servings):
| Nutrient | Amount per Brownie |
|---|---|
| Calories | ~320 |
| Total Fat | 18g |
| Saturated Fat | 6g |
| Carbohydrates | 38g |
| Sugar | 26g |
| Protein | 5g |
| Fiber | 1g |
On the plus side, peanut butter does provide some protein and healthy fats. It also contains vitamin E, magnesium, and potassium. So there’s that. But honestly, these are about happiness, not health. They’re the kind of treat that makes a Tuesday night feel special or turns a Halloween party into a memory.
If you have peanut allergies, obviously skip this one or use the nut-free variation I mentioned earlier. These also contain dairy and gluten, so keep that in mind if you’re serving a crowd with dietary restrictions.
I’m not a nutritionist, just someone who loves brownies. But I do believe in balance — enjoy the treat, don’t stress about the numbers, and maybe have an apple tomorrow.
Conclusion
These Easy Peanut Butter Spider Web Brownies are more than just a Halloween dessert. They’re a way to bring a little magic into your kitchen, even on a busy weeknight. The peanut butter web looks impressive, but it’s so simple that anyone can do it. That’s the kind of recipe I love — one that makes you look like a pro without all the stress.
I’ve made these for Halloween parties, potlucks, and even just for myself on a random Tuesday. They never disappoint. And every time I take that first bite, I think of Aunt Lois and her dusty kitchen and her stories about the neighbor’s cat. It’s funny how food can do that — connect us to people and moments we thought we’d forgotten.
So go ahead and give these a try. Customize them however you want — add candy spiders, switch up the nut butter, make them gluten-free. The recipe is forgiving, and the result is always delicious. I’d love to hear how yours turn out. Drop a comment below and let me know if you tried any fun variations. Happy Halloween, and happy baking!
Frequently Asked Questions
Can I use homemade brownie batter instead of a box mix?
Absolutely! If you have a favorite homemade brownie recipe, use it. Just make sure it’s a fudgy recipe, not a cakey one. The peanut butter web works best on a denser brownie base. I’ve used my aunt’s from-scratch recipe before, and it turned out beautifully.
Why did my peanut butter web sink into the brownies?
This usually happens if the peanut butter mixture is too warm or too thin. Make sure you chill it for at least 10 minutes before piping. Also, don’t add too much cream — you want it thick enough to hold its shape on top of the batter. If it’s still sinking, try adding a little more powdered sugar to thicken it up.
Can I make these ahead of time?
Yes! These are actually better the next day. Bake them, cool them completely, and store them in an airtight container at room temperature for up to 3 days. You can also freeze them for up to 3 months. Just wrap them well and thaw at room temperature before serving.
How do I get clean cuts without smearing the web?
Use a sharp knife and run it under hot water between each cut. Dry the knife before slicing. This helps the knife glide through without dragging the peanut butter. Chilling the brownies for 30 minutes before cutting also helps a lot.
Can I use crunchy peanut butter instead of creamy?
You can, but the texture will be different. The crunchy bits might make it harder to pipe smooth lines, and the web pattern won’t be as clean. If you only have crunchy, try blending it in a food processor first to break down the chunks. But honestly, creamy works best for this recipe.
Pin This Recipe!

Easy Peanut Butter Spider Web Brownies
These fudgy brownies topped with a creamy peanut butter spider web are the perfect Halloween treat. Quick, easy, and made with simple ingredients, they’re sure to impress at any spooky gathering.
- Prep Time: 15 minutes
- Cook Time: 25-30 minutes
- Total Time: 35 minutes (plus cooling and chilling time)
- Yield: 9 large or 16 small brownies 1x
- Category: Dessert
- Cuisine: American
Ingredients
- 1 box (18 oz) brownie mix (e.g., Ghirardelli or Duncan Hines)
- Eggs, oil, and water as called for on the brownie mix box (typically 2 eggs, 1/3 cup oil, 1/4 cup water)
- 1 teaspoon vanilla extract (optional)
- 1/2 cup creamy peanut butter (e.g., Jif or Skippy)
- 3 tablespoons unsalted butter, softened
- 1/2 cup powdered sugar, sifted (optional)
- 2–3 tablespoons heavy cream or milk
- 1/2 teaspoon vanilla extract
- Pinch of salt
- Candy spiders or plastic spider rings (optional, for decoration)
- 1–2 tablespoons melted chocolate (optional, for decoration)
Instructions
- Preheat oven to 350°F (175°C). Line an 8×8 inch baking pan with parchment paper, leaving overhang on two sides. Lightly spray with non-stick spray.
- In a large bowl, combine brownie mix with eggs, oil, and water as directed on the box. Add vanilla extract if using. Stir until just combined (about 40 strokes). Do not overmix.
- Pour batter into prepared pan and spread evenly. Tap pan gently on counter to release air bubbles.
- In a medium bowl, beat softened butter and peanut butter together until smooth and creamy (about 2 minutes with a hand mixer). Add powdered sugar, vanilla, and salt; beat until combined. Add heavy cream one tablespoon at a time, mixing after each, until mixture is smooth and thick but pipable.
- Chill peanut butter mixture in the refrigerator for 10-15 minutes.
- Transfer peanut butter mixture to a piping bag or zip-top bag. Snip off a small corner (about 1/4 inch wide).
- Pipe a spiral of peanut butter onto the brownie batter, starting from the center and working outward, spacing lines about 1 inch apart.
- Using a toothpick, gently drag from the center outward through the peanut butter spiral to create spokes (about 1-1.5 inches apart). Wipe toothpick clean between lines. Then drag toothpick in a circular motion between spokes to create web effect.
- Bake for 25-30 minutes, until edges are set and center is slightly puffed but still jiggly. A toothpick inserted in center should come out with moist crumbs.
- Cool brownies in pan on a wire rack for at least 30 minutes, then refrigerate for 30 minutes before cutting.
- Lift brownies out using parchment paper. Run a sharp knife under hot water, dry it, and cut into squares. Wipe knife between cuts. Top with candy spiders if desired.
Notes
Chill the peanut butter mixture for at least 10 minutes before piping to prevent it from sinking into the brownie batter. Use a toothpick for finer web lines. For clean cuts, chill brownies for 30 minutes before slicing and run knife under hot water between cuts. Brownies can be stored at room temperature for up to 3 days or frozen for up to 3 months.
Nutrition
- Serving Size: 1 brownie (based on
- Calories: 320
- Sugar: 26
- Fat: 18
- Saturated Fat: 6
- Carbohydrates: 38
- Fiber: 1
- Protein: 5
Keywords: Halloween brownies, peanut butter spider web, easy brownies, fudgy brownies, spider web brownies, Halloween dessert