My brother-in-law Mark swore he hated deviled eggs for thirty-seven years. Thirty-seven years. That’s longer than I’ve been alive, honestly. Then last Thanksgiving, I found him standing alone in the kitchen corner, three empty egg-white boats on his plate, trying to look casual about the whole thing. “These are different,” he muttered when he caught me watching. “These have bacon.”
Let me tell you, I didn’t even plan to make them that year. We were all stretched thin—holidays on a budget, you know how it goes. I had a dozen eggs about to turn, some bacon ends I’d grabbed on markdown, and the usual pantry staples. The deviled eggs were supposed to be an afterthought, something to keep the kids from picking at the fancy appetizers my sister-in-law spent forty dollars on. Instead, they were the first empty platter on the table.
Maybe you’ve been there—that moment when the simplest, cheapest thing you threw together becomes the star of the show. That’s exactly what happened here. These budget-friendly Thanksgiving deviled eggs with crispy bacon bits don’t just save you money; they make you look like you planned the whole thing. The filling is creamy without being heavy, the bacon adds that salty crunch everyone craves, and the whole thing comes together with ingredients you probably already have in your fridge.
I keep making them because they prove something I’ve always believed: you don’t need expensive ingredients or complicated techniques to feed people well. Sometimes the best dishes come from working with what you’ve got and trusting the process. Plus, watching Mark go back for seconds of something he’d avoided for nearly four decades? That never gets old.
Why You’ll Love This Recipe
These aren’t your grandma’s deviled eggs—though honestly, she’d probably approve. I’ve tested this recipe about six times now, tweaking the filling ratio and bacon timing until everything hit just right. Here’s why I think you’ll feel the same way:
- Budget-Friendly Hero : A dozen eggs costs around two dollars. Add some bacon ends or cheaper cuts, mayo, mustard, and a little paprika, and you’ve got a platter that looks like you spent real money. Perfect for feeding a crowd without the guilt.
- Make-Ahead Magic : You can prep these the night before and just add the bacon right before serving. That means one less thing to worry about on Thanksgiving morning when the turkey is stressing you out.
- Picky Eater Approved : My nephew won’t touch green bean casserole, but he’ll eat four of these. Something about the creamy filling and crunchy bacon just works for even the fussiest eaters.
- Actually Simple : Hard-boil eggs, mix the filling, crisp some bacon. That’s it. No special equipment, no fancy techniques, no trips to three different grocery stores.
- Always the First to Go : I’m not kidding. Every holiday gathering I’ve brought these to, the platter empties before the cheese plate even gets touched. There’s something about deviled eggs that people just gravitate toward.
What makes these different from other deviled egg recipes is the bacon-to-filling ratio. Most recipes treat bacon like a garnish—a sad little crumble on top. Here, we mix some into the filling itself and reserve the rest for topping. That way, every single bite has that smoky, salty flavor running through it. It’s a small change, but it makes a huge difference.
This recipe isn’t just good—it’s the kind that makes you close your eyes after the first bite. Comfort food that costs next to nothing, feeds a crowd, and makes everyone think you worked way harder than you did. That’s my favorite kind of cooking.
What Ingredients You Will Need
This recipe uses simple, everyday ingredients to create something that feels special. Most of these are probably in your kitchen right now, which is exactly the point.
- 12 large eggs (look for the freshest eggs you can find—older eggs are actually easier to peel after boiling, so if yours have been in the fridge a week, even better)
- 6 slices bacon (I use Wright Brand bacon when I can find it on sale, but any thick-cut bacon works. For budget-friendly options, check the bacon ends and pieces section—they’re usually half the price and work perfectly)
- 1/3 cup mayonnaise (Duke’s is my go-to for its tangy flavor, but Hellmann’s works great too. Avoid miracle whip unless you’re specifically going for a sweeter filling)
- 1 teaspoon yellow mustard (adds that classic deviled egg zing without overwhelming the other flavors)
- 1/2 teaspoon white vinegar (a little acidity brightens everything up and balances the richness of the yolks and bacon)
- 1/4 teaspoon salt (adjust based on how salty your bacon is—you might need less)
- 1/8 teaspoon black pepper (freshly ground if you’ve got it)
- 1/4 teaspoon smoked paprika (for color and a subtle smoky depth that complements the bacon beautifully)
- Fresh chives or parsley (optional, for garnish—adds a pop of green and makes them look fancy)
Ingredient Selection Tips:
- For the eggs, I’ve found that buying the store brand large eggs works just fine. You don’t need fancy pasture-raised eggs for deviled eggs—the filling covers any subtle flavor differences.
- If you’re watching your budget, look for bacon in the “ends and pieces” section. It’s usually much cheaper and you’re chopping it up anyway, so the irregular shapes don’t matter.
- The smoked paprika is worth seeking out—regular paprika works in a pinch, but smoked adds that extra layer of flavor that makes people ask what your secret is.
Substitution Guidance:
- For a lighter version, swap half the mayo with plain Greek yogurt. The texture changes slightly, but it’s still creamy and delicious.
- No yellow mustard? Use Dijon for a sharper flavor or skip it entirely—the vinegar and paprika will still carry the filling.
- Turkey bacon works if you’re avoiding pork, but the flavor won’t be as rich. Add a pinch of liquid smoke to the filling to make up for it.
- For a vegetarian version, skip the bacon and add a teaspoon of smoked paprika and a dash of soy sauce to the filling for that umami kick.
Equipment Needed
Nothing fancy here—that’s the beauty of this recipe. Here’s what you’ll need:
- Medium saucepan (for boiling the eggs—any pot works, just make sure it’s big enough to hold the eggs in a single layer)
- Large skillet (for crisping the bacon. Cast iron is my favorite for even browning, but nonstick works perfectly too)
- Mixing bowl (medium-sized, for combining the filling ingredients)
- Fork or potato masher (for mashing the yolks. I’ve used the back of a fork for years—works every time)
- Sharp knife and cutting board (for halving the eggs and chopping the bacon)
- Piping bag or zip-top bag (for filling the eggs neatly. A zip-top bag with the corner snipped off works just as well as a fancy piping tip)
- Serving platter (something with a rim to keep the eggs from sliding around)
- Paper towels (for draining the bacon and blotting the eggs dry)
If you don’t have a piping bag, honestly, just use a teaspoon. It takes a little longer, but the eggs taste the same. I’ve done it both ways, and nobody has ever complained about the presentation.
Preparation Method
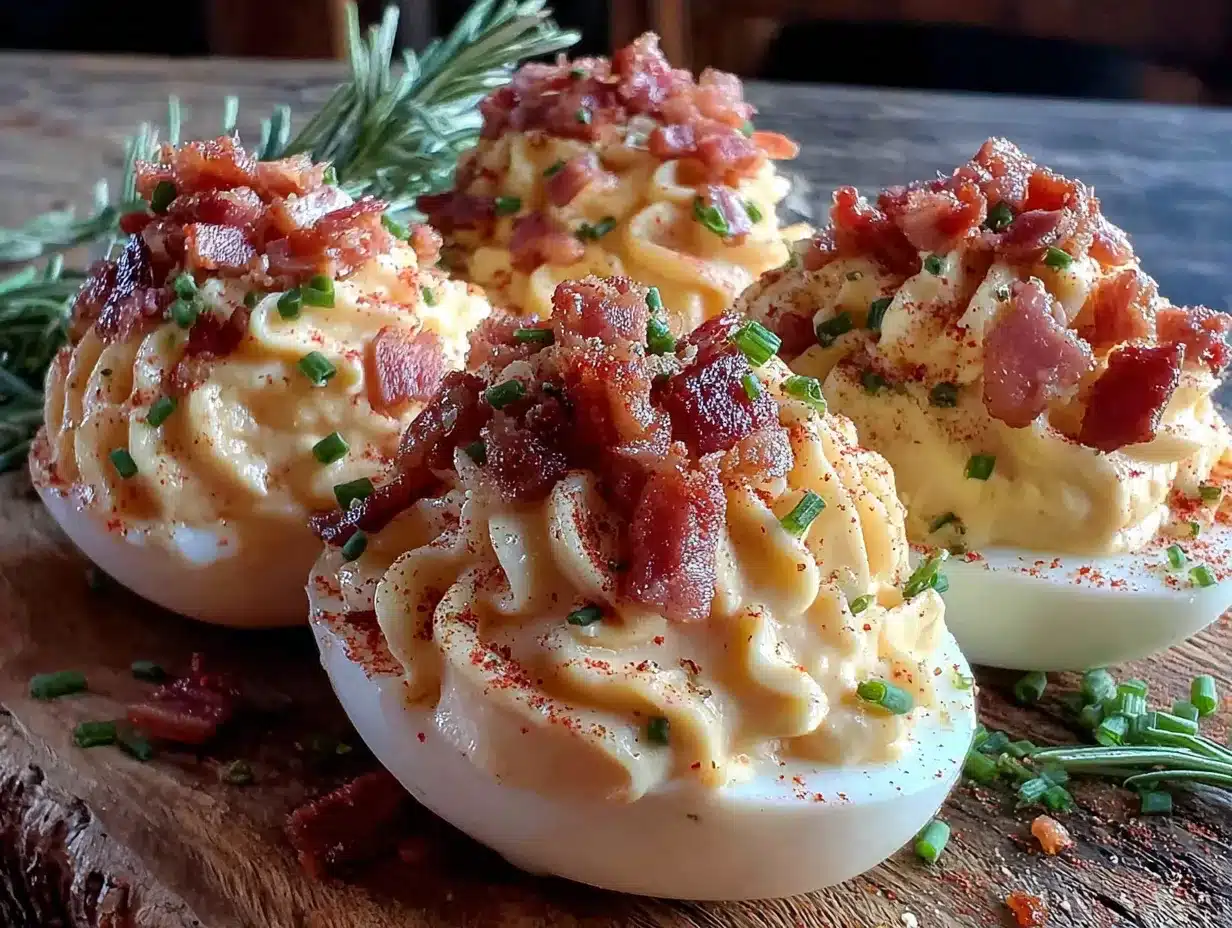
Let’s walk through this step by step. I’ve learned a few tricks the hard way, so I’ll share those as we go.
Step 1: Hard-Boil the Eggs
Place your 12 eggs in a single layer in your saucepan. Cover them with cold water by about an inch. Bring the water to a full rolling boil over high heat—this usually takes about 8-10 minutes. Once it’s boiling hard, turn off the heat, cover the pot, and let it sit for exactly 12 minutes. While you wait, fill a large bowl with ice water.
Here’s the trick I learned after ruining about three dozen eggs: after 12 minutes, transfer the eggs immediately to the ice water bath. Let them sit for at least 5 minutes. This stops the cooking and makes peeling way easier. Older eggs peel better than fresh ones, so if your eggs have been in the fridge a week, you’re golden.
Step 2: Cook the Bacon
While the eggs are cooling, cook your bacon. Place the 6 slices in a cold skillet—don’t preheat it. Turn the heat to medium and cook, flipping occasionally, until the bacon is deep golden brown and crispy, about 8-10 minutes. I like mine extra crispy here because it’ll soften slightly when mixed with the filling.
Transfer the cooked bacon to a paper-towel-lined plate to drain and cool. Once it’s cool enough to handle, chop it into small pieces. You want them about the size of a pea—big enough to taste, small enough to distribute evenly. Set aside about 2 tablespoons for topping.
Step 3: Peel and Halve the Eggs
Gently tap each egg on your counter to crack the shell all over, then peel under running cold water. The water helps separate the shell from the egg white. Pat the peeled eggs dry with paper towels—this helps the filling stick later.
Using a sharp knife, slice each egg in half lengthwise. Carefully pop the yolks out into your mixing bowl. Arrange the white halves on your serving platter, cut side up.
Step 4: Make the Filling
Add the 1/3 cup mayonnaise, 1 teaspoon yellow mustard, 1/2 teaspoon white vinegar, 1/4 teaspoon salt, 1/8 teaspoon black pepper, and 1/4 teaspoon smoked paprika to the bowl with the yolks. Mash everything together with a fork until it’s completely smooth. I spend about 2 minutes on this—you don’t want any lumps.
Fold in most of the chopped bacon, reserving that 2 tablespoons for garnish. Taste the filling and adjust seasoning—maybe a pinch more salt or an extra dash of paprika. Remember, the bacon adds saltiness, so don’t overdo it.
Step 5: Fill the Eggs
Spoon the filling into your piping bag or zip-top bag. If using a zip-top bag, snip about 1/2 inch off one corner. Pipe the filling into each egg white half, mounding it slightly. You should get enough filling for all 24 halves, with maybe a little extra for a taste test.
Step 6: Garnish and Serve
Sprinkle the reserved bacon bits over the filled eggs. Dust lightly with extra smoked paprika for color. If you’re using fresh chives or parsley, snip a little over the top—it adds a lovely fresh contrast to the rich filling.
Serve immediately, or refrigerate for up to 4 hours before serving. If you’re making them ahead, leave the bacon and paprika off until just before serving to keep everything crisp and pretty.
Cooking Tips & Techniques
I’ve made these budget-friendly Thanksgiving deviled eggs more times than I can count, and I’ve definitely made every mistake along the way. Here’s what I’ve learned:
Perfect Hard-Boiled Eggs Every Time: The 12-minute rest method I mentioned is non-negotiable. I tried boiling for 10 minutes straight once and got those ugly gray rings around the yolks. The residual heat method gives you perfectly cooked yolks without the discoloration.
Peeling Without the Pain: If you’re struggling with peeling, try adding a teaspoon of baking soda to the boiling water. It raises the pH and helps the shells slide off. Also, starting with slightly older eggs makes a huge difference—fresh eggs are a nightmare to peel.
Bacon Timing: Cook the bacon while the eggs are cooling. This way, everything finishes around the same time. Don’t rush the bacon—low and slow gives you even crispiness without burning. And save that bacon grease for something else! It’s amazing for roasting vegetables or frying potatoes.
Filling Consistency: If your filling seems too thick, add a teaspoon of pickle juice or a splash of milk. Too thin? Add another yolk or a tablespoon of breadcrumbs. The perfect filling should hold its shape when piped but still feel creamy in your mouth.
Make-Ahead Strategy: You can boil and peel the eggs up to 2 days ahead. Store them in a covered container in the fridge. Make the filling a day ahead too, but keep it separate from the whites. Assemble a few hours before serving for the best texture.
Common Mistake to Avoid: Don’t overmix the filling. I did this once and it turned gummy. Just mash until smooth and stop. Overworking the yolks releases too much fat and changes the texture.
Variations & Adaptations
One of the best things about this recipe is how easy it is to switch up. Here are some variations I’ve tried and loved:
Spicy Southwest Version: Add 1/4 teaspoon cumin and a pinch of cayenne to the filling. Top with pickled jalapeños instead of bacon for a vegetarian option. I made this for a potluck once and it disappeared faster than the regular ones.
Herby Spring Version: Mix 2 tablespoons of finely chopped fresh dill and chives into the filling. Skip the bacon entirely and top with microgreens or edible flowers. This is perfect for Easter or spring brunches when you want something lighter.
Loaded Baked Potato Style: Add 2 tablespoons of finely shredded cheddar cheese and 1 tablespoon of sour cream to the filling. Top with the bacon, a sprinkle of extra cheese, and some chopped green onions. It tastes exactly like a loaded baked potato in egg form.
Dairy-Free Adaptation: Use vegan mayonnaise and skip the bacon—use coconut bacon or smoked mushrooms instead. The texture stays creamy, and the smoky flavor still comes through from the paprika.
Low-Carb/Keto Friendly: These are already low-carb, but if you want extra fat for keto, add an extra tablespoon of mayonnaise and top with full-fat sour cream and extra bacon. My keto friends request these specifically now.
My Personal Favorite Variation: I once added a teaspoon of sriracha and a splash of lime juice to the filling for a spicy, tangy kick. Topped it with crumbled bacon and a tiny cilantro leaf. I called them “Thanksgiving with a Twist” and they were a hit.
Serving & Storage Suggestions
These deviled eggs are best served cold or at room temperature. If you’re bringing them to a Thanksgiving gathering, I recommend keeping them chilled until about 20 minutes before serving. Letting them sit out for a bit takes the chill off and lets the flavors shine.
Presentation Ideas: Arrange the eggs on a large platter in concentric circles or rows. Sprinkle the bacon and paprika over the top right before serving so everything stays crisp. Garnish with fresh herbs for a pop of color—chives, parsley, or even dill work beautifully.
What to Serve With Them: These eggs pair perfectly with other Thanksgiving appetizers like a veggie tray, cheese and crackers, or a simple spinach dip. For drinks, they go great with a crisp white wine like Sauvignon Blanc or a cold beer. If you’re feeling fancy, a bloody mary bar alongside is always a hit.
Storage Instructions: Store leftover deviled eggs in an airtight container in the refrigerator for up to 2 days. Place them in a single layer with a paper towel on top to absorb any excess moisture. Don’t freeze them—the texture will be ruined.
Reheating: Honestly, deviled eggs are best cold. But if you absolutely must reheat them, pop them in a 300°F oven for 5 minutes just to take the chill off. The bacon will soften, but the flavor is still good.
How Flavors Develop: These actually taste better after sitting in the fridge for a few hours. The flavors meld together and the filling becomes even creamier. Just add the bacon right before serving to keep it crunchy.
Nutritional Information & Benefits
Here’s a rough breakdown per deviled egg half (based on 24 servings):
- Calories: 85
- Protein: 6g
- Fat: 6g
- Carbohydrates: 1g
- Fiber: 0g
- Sugar: 0g
- Sodium: 180mg
Health Benefits: Eggs are packed with high-quality protein and essential nutrients like vitamin B12, riboflavin, and selenium. The yolks contain choline, which supports brain health. Bacon adds protein and B vitamins, though it’s higher in sodium and saturated fat—so enjoy in moderation.
Dietary Considerations: This recipe is naturally gluten-free, low-carb, and keto-friendly. It’s not dairy-free unless you use vegan mayo. The main allergens are eggs and pork (from the bacon). For a nut-free option, you’re already good—no nuts here.
My Wellness Perspective: I love that these deviled eggs are a satisfying, protein-rich appetizer that doesn’t leave you feeling heavy. They’re perfect for balancing out all the carb-heavy dishes at Thanksgiving. Plus, portion control is built in—one or two is satisfying without overdoing it.
Conclusion
These budget-friendly Thanksgiving deviled eggs with crispy bacon bits are proof that you don’t need to spend a lot to impress. Simple ingredients, a little patience with the eggs, and that irresistible bacon crunch—that’s all it takes to create something people will remember.
I love this recipe because it feels like a secret weapon. When you’re stressed about the turkey, the sides, and everything else, having an appetizer that comes together in under an hour with ingredients you already have is a real lifesaver. And watching someone who “doesn’t like deviled eggs” go back for seconds? That’s the kind of Thanksgiving magic I live for.
I’d love to hear how these turn out for you! Leave a comment below and let me know if your family loved them as much as mine did. Did you try any fun variations? Did someone in your house get caught sneaking one before dinner? Share your story—I read every single comment.
Happy Thanksgiving, friends. Here’s to good food, good company, and empty platters.
Frequently Asked Questions
Can I make these deviled eggs a day ahead?
Yes, absolutely. Boil and peel the eggs up to 2 days ahead. Make the filling up to 1 day ahead and store it in a piping bag in the fridge. Assemble the eggs a few hours before serving, but add the bacon garnish right before you serve them to keep it crispy.
Why are my hard-boiled eggs hard to peel?
Fresh eggs are notoriously difficult to peel. Use eggs that have been in your fridge for at least a week. Also, adding a teaspoon of baking soda to the boiling water helps loosen the shells. The ice bath method is crucial too—it shocks the eggs and makes peeling much easier.
Can I use turkey bacon instead of regular bacon?
You can, but the flavor won’t be as rich. Turkey bacon is leaner and won’t crisp up the same way. To boost the smoky flavor, add a pinch of liquid smoke to the filling or use smoked paprika generously. You could also try vegetarian bacon alternatives like coconut bacon for a similar crunch.
How do I keep the deviled eggs from sliding around on the platter?
Place a thin layer of lettuce leaves, fresh herbs, or even a damp paper towel on the platter before arranging the eggs. This creates friction and keeps them in place. You can also use a deviled egg carrier if you’re transporting them—they’re cheap and worth the investment.
Can I freeze deviled eggs?
I don’t recommend freezing deviled eggs. The texture of both the egg whites and the filling changes dramatically when thawed—the whites become watery and rubbery, and the filling separates. These are best made fresh or up to 2 days ahead and stored in the refrigerator.
Pin This Recipe!

Budget-Friendly Thanksgiving Deviled Eggs with Crispy Bacon Bits

These budget-friendly Thanksgiving deviled eggs with crispy bacon bits don’t just save you money; they make you look like you planned the whole thing. The filling is creamy without being heavy, the bacon adds that salty crunch everyone craves, and the whole thing comes together with ingredients you probably already have in your fridge.
- Prep Time: 20 minutes
- Cook Time: 20 minutes
- Total Time: 40 minutes
- Yield: 24 deviled egg halves (12 servings of 2 halves each) 1x
- Category: Appetizer
- Cuisine: American
Ingredients
- 12 large eggs
- 6 slices bacon (thick-cut, or bacon ends and pieces)
- 1/3 cup mayonnaise (Duke’s or Hellmann’s recommended)
- 1 teaspoon yellow mustard
- 1/2 teaspoon white vinegar
- 1/4 teaspoon salt (adjust based on bacon saltiness)
- 1/8 teaspoon black pepper (freshly ground preferred)
- 1/4 teaspoon smoked paprika (plus extra for garnish)
- Fresh chives or parsley (optional, for garnish)
Instructions
- Hard-Boil the Eggs: Place 12 eggs in a single layer in a saucepan. Cover with cold water by about 1 inch. Bring to a full rolling boil over high heat (8-10 minutes). Turn off heat, cover, and let sit for exactly 12 minutes. Meanwhile, prepare a large bowl of ice water. Transfer eggs immediately to ice water bath and let sit for at least 5 minutes.
- Cook the Bacon: Place 6 slices bacon in a cold skillet. Turn heat to medium and cook, flipping occasionally, until deep golden brown and crispy (8-10 minutes). Transfer to a paper-towel-lined plate to drain and cool. Once cool, chop into pea-sized pieces. Reserve about 2 tablespoons for topping.
- Peel and Halve the Eggs: Gently tap each egg on the counter to crack the shell all over, then peel under running cold water. Pat dry with paper towels. Slice each egg in half lengthwise. Pop yolks into a mixing bowl. Arrange white halves on a serving platter, cut side up.
- Make the Filling: Add 1/3 cup mayonnaise, 1 teaspoon yellow mustard, 1/2 teaspoon white vinegar, 1/4 teaspoon salt, 1/8 teaspoon black pepper, and 1/4 teaspoon smoked paprika to the bowl with yolks. Mash together with a fork until completely smooth (about 2 minutes). Fold in most of the chopped bacon, reserving 2 tablespoons for garnish. Taste and adjust seasoning.
- Fill the Eggs: Spoon filling into a piping bag or zip-top bag. If using a zip-top bag, snip about 1/2 inch off one corner. Pipe filling into each egg white half, mounding slightly. Should fill all 24 halves.
- Garnish and Serve: Sprinkle reserved bacon bits over filled eggs. Dust lightly with extra smoked paprika. Garnish with fresh chives or parsley if desired. Serve immediately or refrigerate for up to 4 hours. If making ahead, add bacon and paprika just before serving.
Notes
For perfect hard-boiled eggs, use eggs that are at least a week old for easier peeling. Add a teaspoon of baking soda to the boiling water to help loosen shells. Don’t overmix the filling to avoid a gummy texture. For make-ahead, boil and peel eggs up to 2 days ahead, make filling up to 1 day ahead, and assemble a few hours before serving. Add bacon garnish just before serving to keep it crispy. For a lighter version, swap half the mayo with plain Greek yogurt. For a vegetarian version, skip bacon and add 1 teaspoon smoked paprika and a dash of soy sauce to the filling.
Nutrition
- Serving Size: 2 deviled egg halves
- Calories: 170
- Sodium: 360
- Fat: 12
- Saturated Fat: 3.5
- Carbohydrates: 2
- Protein: 12
Keywords: deviled eggs, bacon deviled eggs, Thanksgiving appetizer, budget-friendly appetizer, easy deviled eggs, holiday appetizer, bacon, eggs, party food