The woman at the community garden plot next to mine watched me staring at a pile of pumpkin guts one October afternoon. I had just hacked open my first sugar pumpkin—a gorgeous little thing I’d grown from seed back in June—and honestly, I had no idea what to do with all the slimy seeds. She didn’t say anything at first. She just reached over, scooped a handful of the wet seeds from my newspaper, and said, “You’re overthinking it. Rinse them, dry them, and let the sugar do the work.” Her name was Rosa, and she’d been gardening that plot for thirty-seven years.
That conversation changed how I looked at pumpkin seeds forever. I mean, I’d always thought of them as something you roasted with salt and maybe some chili powder if you were feeling adventurous. But Rosa’s approach was different. She talked about them like they were a blank canvas for whatever cozy flavor you were craving. That day, she showed me her trick for coaxing out their natural sweetness—a light toss in cinnamon sugar before they hit the oven. The result was this warm, crunchy, almost caramelized snack that made my whole kitchen smell like a bakery in November. I scribbled her method on a napkin, stained with pumpkin juice, and I’ve been making them ever since.
These cozy cinnamon sugar pumpkin seeds have become my go-to fall ritual. Maybe you’ve been there—standing over a pile of pumpkin innards, wondering if there’s a better way to use those seeds than just tossing them with salt. Let me tell you, this recipe is that better way. It’s the kind of snack that makes you close your eyes after the first bite, the kind that disappears before you’ve even finished carving your jack-o’-lantern. Every time I make them, I think of Rosa and her no-nonsense wisdom. And every time, I’m grateful she didn’t let me overthink it.
Why You’ll Love This Recipe
These cozy cinnamon sugar pumpkin seeds aren’t just another snack—they’re the snack you’ll crave all autumn long. I’ve tested this recipe at least a dozen times, tweaking the sugar ratio, the bake time, and even the cinnamon variety (trust me, Vietnamese cinnamon makes a difference). Here’s why I keep coming back to this version:
- Quick & Easy: From pumpkin to plate in under 30 minutes. Seriously, the hardest part is waiting for them to cool.
- Simple Ingredients: You probably have everything in your pantry right now—pumpkin seeds, sugar, cinnamon, butter, and a pinch of salt. No fancy grocery trips needed.
- Perfect for Cozy Nights: These are tailor-made for a slow evening at home, a chilly afternoon by the fire, or that moment when you need something sweet but not over-the-top.
- Crowd-Pleaser: I’ve brought these to potlucks, movie nights, and even Thanksgiving dinner. Kids and adults alike gobble them up before the main event.
- Unbelievably Delicious: The texture is what gets me every time—crunchy on the outside, with a caramelized cinnamon coating that shatters when you bite down. It’s next-level comfort food.
What makes this recipe different from the rest? It’s the technique. Most recipes tell you to toss seeds in sugar and bake, but they end up either burnt or soggy. My method—developed through trial and error (and a few smoky kitchen mishaps)—involves par-boiling the seeds first to remove that bitter outer layer, then coating them in a butter-cinnamon-sugar mixture that clings perfectly. The result is a snack that’s evenly sweet, deeply crunchy, and never clumpy. It’s comfort food reimagined—healthier, faster, but with the same soul-soothing satisfaction as a warm cinnamon roll.
What Ingredients You Will Need
This recipe uses simple, wholesome ingredients to deliver bold flavor and satisfying texture without the fuss. Most of these are pantry staples, which is part of what makes this recipe so approachable on a lazy Sunday.
- Fresh pumpkin seeds: About 1 cup, scooped straight from a sugar pumpkin or even a carving pumpkin. If you’re using store-bought raw pumpkin seeds (pepitas), look for the green, hulled variety—they’re smaller but work beautifully. I prefer fresh seeds from a sugar pumpkin because they’re plumper and have a milder flavor.
- Granulated sugar: 2 tablespoons. This creates that crackly, caramelized coating. You can use coconut sugar for a deeper, less sweet flavor, but the texture won’t be quite as crunchy.
- Ground cinnamon: 1 teaspoon. I recommend Saigon or Vietnamese cinnamon for its bold, spicy warmth. Regular cinnamon works too, but you might want to add an extra ¼ teaspoon.
- Unsalted butter: 1 tablespoon, melted. This helps the sugar mixture stick and adds a rich, toasted flavor. For a dairy-free version, use coconut oil or vegan butter—just make sure it’s melted.
- Salt: A pinch of flaky sea salt, like Maldon. It balances the sweetness and makes the cinnamon pop. Don’t skip it, even if you’re not a salt-with-sweets person.
- Vanilla extract: ½ teaspoon (optional but recommended). It rounds out the flavors and adds a subtle warmth that complements the cinnamon beautifully.
Ingredient selection tip: If you’re using seeds from a fresh pumpkin, don’t worry about getting every bit of pumpkin flesh off. A little bit of stringy pulp adds flavor and helps the sugar mixture stick. Just rinse them well and pat them dry. For store-bought pepitas, look for brands that are raw and unsalted—I like the ones from Bob’s Red Mill for consistent quality.
Substitution guidance: If you’re out of butter, try ghee for a nuttier flavor. For a sugar-free version, use monk fruit sweetener or erythritol, but note that the texture will be slightly less crispy. And if you don’t have vanilla extract, a pinch of nutmeg or allspice makes a lovely alternative.
Equipment Needed
You don’t need much to make these cozy cinnamon sugar pumpkin seeds, which is part of their charm. Here’s what I use:
- Baking sheet: A rimmed baking sheet works best to catch any stray sugar. I use a half-sheet pan (18×13 inches) for even roasting. If you only have a smaller pan, just spread the seeds in a single layer and watch them closely—they’ll cook faster.
- Parchment paper or silicone baking mat: This prevents sticking and makes cleanup a breeze. I’ve forgotten parchment before and spent ten minutes scraping caramelized sugar off the pan. Learn from my mistakes.
- Medium saucepan: For par-boiling the seeds. Any pot will do, but a wide one helps the seeds cook evenly.
- Colander: For draining the seeds after boiling. A fine-mesh strainer works too.
- Mixing bowl: A medium bowl for tossing the seeds with butter and sugar. Glass or stainless steel is fine—plastic can absorb odors over time.
- Spatula or wooden spoon: For stirring the seeds on the baking sheet halfway through. I prefer a silicone spatula because it doesn’t scratch the pan.
- Kitchen towel or paper towels: For drying the seeds after boiling. You want them as dry as possible before coating.
Budget-friendly option: If you don’t have a silicone baking mat, just use parchment paper—it’s cheap and works perfectly. And if you don’t have a rimmed baking sheet, a regular cookie sheet will do, just be careful not to let the sugar spill over the edges.
Preparation Method
Let’s get cooking! This method is straightforward, but I’ve included all the little details I’ve learned from making these seeds more times than I can count.
- Preheat your oven to 350°F (175°C). Line a rimmed baking sheet with parchment paper or a silicone mat. Trust me, this step is non-negotiable unless you enjoy scrubbing burnt sugar off metal.
- Prepare the pumpkin seeds. If you’re using fresh seeds, separate them from the pumpkin guts as best you can. Don’t stress about getting every string—a little pulp adds flavor. Rinse the seeds in a colander under cold water, picking out any big chunks of flesh. You should have about 1 cup of seeds.
- Par-boil the seeds. Bring a medium saucepan of water to a boil. Add the seeds and let them boil for exactly 5 minutes. This step removes the bitter outer coating and helps the seeds roast evenly. You’ll notice the water turn slightly cloudy—that’s the bitterness leaving. Drain the seeds in a colander and rinse them with cold water to stop the cooking.
- Dry the seeds thoroughly. Spread the drained seeds on a clean kitchen towel or a few layers of paper towels. Pat them dry as much as you can—wet seeds will steam instead of roast, and you won’t get that crunchy texture. Let them sit for 5 minutes to air-dry while you prepare the coating.
- Make the cinnamon sugar coating. In a medium mixing bowl, whisk together 2 tablespoons granulated sugar, 1 teaspoon ground cinnamon, and a pinch of flaky sea salt. If you’re using vanilla extract, add it to the melted butter in the next step.
- Coat the seeds. Drizzle 1 tablespoon of melted unsalted butter over the dried seeds. Toss them with a spatula until every seed is glistening. Then sprinkle the cinnamon sugar mixture over the seeds and toss again until they’re evenly coated. You want every seed to have a little sugary armor.
- Spread the seeds on the baking sheet. Pour the coated seeds onto the prepared baking sheet and spread them in a single, even layer. Don’t overcrowd—if seeds overlap, they’ll steam instead of roast. If you have more than will fit, use a second baking sheet.
- Bake for 12-15 minutes. Place the baking sheet in the preheated oven and bake for 6 minutes. Then, remove the sheet and give the seeds a good stir with a spatula. This ensures even roasting. Return to the oven for another 6-9 minutes. The seeds are done when they’re golden brown and smell intensely toasty. Watch them closely in the last 2 minutes—sugar can burn fast.
- Cool completely. Remove the baking sheet from the oven and let the seeds cool right on the pan. They’ll crisp up as they cool, so don’t touch them for at least 10 minutes. I know it’s tempting, but patience pays off here.
- Break apart any clusters. Once cooled, use your fingers to gently break apart any seeds that stuck together. They should come apart easily. If they don’t, they might need a few more minutes of cooling.
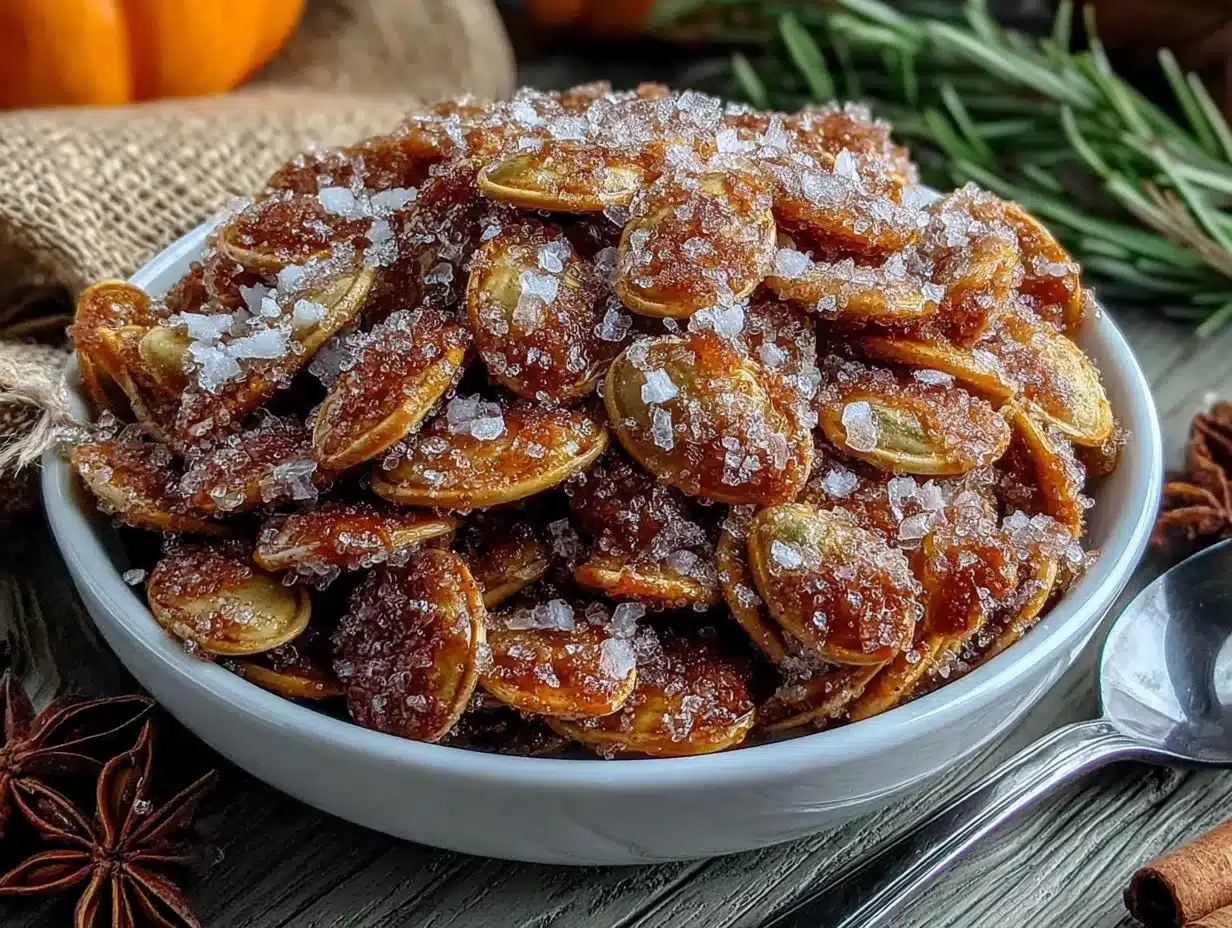
Sensory cue: At the 10-minute mark, your kitchen should smell like a cinnamon-spiced bakery. The seeds will look glossy and slightly caramelized, with tiny sugar crystals catching the light. When you bite into one, it should shatter with a clean crunch—not chewy, not hard, just perfect.
Cooking Tips & Techniques
After multiple batches (and a few that ended up in the compost), here’s what I’ve learned about making these seeds just right.
The par-boil is non-negotiable. I know it’s an extra step, but it makes a huge difference. Boiling the seeds for 5 minutes removes that bitter, tannic flavor that raw pumpkin seeds can have. It also hydrates them slightly, which helps them roast evenly instead of burning on the outside while staying raw inside. I skipped this step once out of laziness, and the seeds were edible but had an unpleasant aftertaste. Never again.
Dry the seeds really, really well. This is where most people mess up. If your seeds are even slightly damp after boiling, the sugar coating will turn into a sticky mess instead of a crisp shell. I pat them dry with a towel, then let them sit for 5 minutes on the counter. If I’m in a hurry, I’ll spread them on a baking sheet and pop them in the 350°F oven for 2 minutes before coating—just enough to evaporate surface moisture.
Watch the sugar like a hawk. Sugar goes from golden to burnt in seconds. Set a timer for 6 minutes, stir, then set another timer for 4 minutes and start checking every minute after that. Your oven might run hot or cold, so trust your nose more than the timer. The seeds are done when they smell deeply toasty and look a shade darker than when they went in.
Let them cool completely before storing. I made the mistake of putting warm seeds in a jar once. The steam created condensation, and by morning, my crispy seeds were sad and chewy. Spread them out on the baking sheet and walk away for 15 minutes. They’ll crisp up beautifully.
Double the batch if you can. These disappear fast. I usually make a double batch and hide half in the freezer (see storage tips below). My husband once ate an entire single batch while watching a football game. I’m not exaggerating.
Variations & Adaptations
One of the best things about this recipe is how easy it is to play with. Here are some variations I’ve tried and loved.
Spiced Chai Pumpkin Seeds: Add ½ teaspoon ground cardamom, ¼ teaspoon ground ginger, and a pinch of ground cloves to the cinnamon sugar mixture. It tastes exactly like a chai latte in seed form. I made these for a book club meeting, and someone asked for the recipe before she even sat down.
Maple Pecan Pumpkin Seeds: Swap the granulated sugar for 2 tablespoons of maple sugar (or use 1½ tablespoons maple syrup, but reduce the butter to ½ tablespoon). Toss in ¼ cup chopped pecans before baking. The maple flavor pairs beautifully with the cinnamon, and the pecans add an extra layer of crunch.
Vegan & Gluten-Free Version: Use coconut oil or vegan butter instead of dairy butter. The recipe is naturally gluten-free, but double-check your cinnamon if you’re highly sensitive—some brands process it in facilities that handle wheat. I’ve made this version for friends with dietary restrictions, and no one could tell the difference.
Savory-Sweet Twist: Reduce the sugar to 1 tablespoon and add ½ teaspoon smoked paprika and ¼ teaspoon cayenne pepper to the cinnamon mixture. The heat sneaks up on you, balanced by the sweetness. It’s weirdly addictive—I brought a batch to a tailgate, and they were gone in 10 minutes.
Brown Sugar Cinnamon: Replace the granulated sugar with 2 tablespoons of packed brown sugar. The molasses in brown sugar gives the seeds a deeper, almost butterscotch flavor. I prefer this version on cold, rainy days when I want something extra cozy.
Serving & Storage Suggestions
These cozy cinnamon sugar pumpkin seeds are incredibly versatile. Here’s how I serve and store them.
Serving temperature and presentation: Serve them at room temperature in a pretty bowl or a mason jar. I love setting them out on a wooden board with other fall snacks—apple slices, sharp cheddar cubes, and a few dried figs. They’re also fantastic sprinkled over a bowl of vanilla ice cream or yogurt for a crunchy topping. For a party, I’ll pile them into a small cast-iron skillet for that rustic, cozy look.
Complementary dishes or beverages: These seeds pair beautifully with a hot mug of chai tea, a spiced apple cider, or even a dark stout beer. For a dessert board, serve them alongside dark chocolate, salted caramel popcorn, and shortbread cookies. They also make a lovely gift—I fill small cellophane bags tied with twine and give them to neighbors during the holidays.
Storage instructions: Store the cooled seeds in an airtight container at room temperature for up to 2 weeks. I use a glass jar with a tight-fitting lid. If you live in a humid climate, add a silica gel packet (the kind that comes in shoe boxes) to keep them crispy. For longer storage, place them in a freezer-safe bag or container and freeze for up to 3 months. They thaw instantly at room temperature—no need to reheat.
Reheating methods: If your seeds lose their crunch after a few days, spread them on a baking sheet and pop them in a 300°F oven for 3-4 minutes. Let them cool completely before eating. Don’t use the microwave—it will make them chewy and weird.
Flavor development over time: Honestly, these seeds are best the day they’re made, when the coating is at its crunchiest. But they’re still delicious for up to a week. The cinnamon flavor actually mellows and deepens after a day or two, which some people prefer. I usually make a fresh batch for special occasions, but I’m happy to snack on day-old seeds while reading on the couch.
Nutritional Information & Benefits
While these are definitely a treat, pumpkin seeds bring some surprising nutritional benefits to the table. Here’s the breakdown for a ¼-cup serving (about 30 grams).
Estimated nutritional values per serving: Approximately 150 calories, 12 grams of fat (mostly healthy unsaturated fats), 6 grams of protein, 8 grams of carbohydrates (including 5 grams of sugar), and 2 grams of fiber. Keep in mind this varies based on the exact seeds and sugar amount you use.
Health benefits of key ingredients: Pumpkin seeds are packed with magnesium, zinc, and iron—great for immune support and sleep quality. The cinnamon adds anti-inflammatory properties and may help regulate blood sugar. Even the butter contributes a small amount of vitamin A. I like to think of these seeds as a snack that tastes indulgent but gives your body a little something back.
Dietary considerations: This recipe is naturally gluten-free and can be made vegan with a simple swap. It’s not low-carb due to the sugar, but you can reduce the sugar to 1 tablespoon for a less sweet version. Potential allergens include dairy (butter) and, in rare cases, seeds themselves—though pumpkin seed allergies are uncommon.
My personal wellness perspective: I don’t believe in labeling food as “good” or “bad.” These seeds are a joyful part of my fall traditions, and I enjoy them without guilt. The protein and fiber help keep me satisfied, so I don’t end up mindlessly snacking on less nourishing things. Balance, you know?
Conclusion
These cozy cinnamon sugar pumpkin seeds are everything I love about fall cooking—simple ingredients, warm flavors, and a result that feels special without being fussy. They’ve become a staple in my kitchen every autumn, a little ritual that marks the shift from summer salads to cozy, spiced snacks. Whether you’re carving pumpkins, hosting a movie night, or just craving something sweet and crunchy, I hope you give these a try.
Don’t be afraid to make them your own. Tweak the spices, double the batch, or hide a jar in the back of the fridge for yourself. I’d love to hear how they turn out—drop a comment below and tell me your favorite variation, or tag me in your photos if you share them online. Happy snacking, and here’s to another cozy season!
Frequently Asked Questions
Can I use store-bought pumpkin seeds instead of fresh ones?
Absolutely! Look for raw, unsalted pepitas (hulled pumpkin seeds). Skip the par-boiling step since they don’t have the bitter outer layer, and reduce the baking time by 2-3 minutes because they’re smaller and thinner.
Why did my seeds turn out chewy instead of crunchy?
This usually happens for one of two reasons: the seeds weren’t dried thoroughly before coating, or they were stored before cooling completely. Make sure to pat them very dry after boiling, and let them cool fully on the baking sheet before moving to a container.
Can I make these in an air fryer?
Yes! Preheat the air fryer to 325°F (160°C). Cook the coated seeds in a single layer for 6-8 minutes, shaking the basket halfway through. Watch them closely—air fryers run hot, and sugar burns fast. Let them cool completely before eating.
How do I prevent the sugar from burning?
Stir the seeds halfway through baking and keep a close eye on them in the last few minutes. Every oven is different, so start checking at the 10-minute mark. If your oven runs hot, reduce the temperature to 325°F (160°C) and bake a few minutes longer.
Can I reduce the sugar for a less sweet version?
Definitely. Cut the sugar to 1 tablespoon for a lightly sweet coating. The cinnamon will still shine, and the seeds will be less candy-like. You can also try using a sugar substitute like monk fruit, though the texture won’t be quite as crispy.
PrintCozy Cinnamon Sugar Pumpkin Seeds: Best Easy Fall Snack
These warm, crunchy, caramelized pumpkin seeds are tossed in cinnamon sugar and roasted to perfection. A simple, cozy fall snack that’s ready in under 30 minutes.
- Prep Time: 15 minutes
- Cook Time: 15 minutes
- Total Time: 30 minutes
- Yield: 4 servings 1x
- Category: Snack
- Cuisine: American
Ingredients
- 1 cup fresh pumpkin seeds (or raw, unsalted pepitas)
- 2 tablespoons granulated sugar
- 1 teaspoon ground cinnamon (preferably Saigon or Vietnamese)
- 1 tablespoon unsalted butter, melted
- Pinch of flaky sea salt
- ½ teaspoon vanilla extract (optional)
Instructions
- Preheat oven to 350°F (175°C). Line a rimmed baking sheet with parchment paper or a silicone mat.
- If using fresh seeds, separate from pumpkin guts and rinse in a colander under cold water. You should have about 1 cup of seeds.
- Bring a medium saucepan of water to a boil. Add seeds and boil for exactly 5 minutes. Drain and rinse with cold water.
- Spread drained seeds on a clean kitchen towel or paper towels and pat dry thoroughly. Let air-dry for 5 minutes.
- In a medium bowl, whisk together sugar, cinnamon, and salt. If using vanilla, add it to the melted butter.
- Drizzle melted butter over dried seeds and toss to coat. Sprinkle cinnamon sugar mixture over seeds and toss until evenly coated.
- Spread coated seeds in a single layer on the prepared baking sheet.
- Bake for 6 minutes, then stir seeds. Return to oven and bake for another 6–9 minutes, until golden brown and fragrant. Watch closely to prevent burning.
- Remove from oven and let seeds cool completely on the baking sheet (at least 10 minutes). They will crisp up as they cool.
- Once cool, gently break apart any clusters with your fingers.
Notes
Par-boiling the seeds removes bitterness and ensures even roasting. Dry seeds thoroughly before coating to achieve a crunchy texture. Watch the sugar closely in the last few minutes of baking to prevent burning. Let seeds cool completely before storing to maintain crispness.
Nutrition
- Serving Size: ¼ cup (about 30g)
- Calories: 150
- Sugar: 5
- Sodium: 50
- Fat: 12
- Saturated Fat: 3
- Carbohydrates: 8
- Fiber: 2
- Protein: 6
Keywords: pumpkin seeds, cinnamon sugar, fall snack, easy, roasted pumpkin seeds, cozy