I was standing in my kitchen, staring at a single, lonely stick of butter that had been sitting on the counter for maybe a little too long. It was one of those gray, drizzly afternoons where the whole world felt muffled and quiet, and I had this sudden, almost desperate need for something warm and sweet. Not a whole batch of cookies, you know? That felt like too much commitment for a Tuesday. I just wanted one perfect, melty moment. That’s when I remembered Mrs. Gable from the community garden plot next to mine. She’d watched me fumbling with a leaky watering can last spring, and without a word, she just handed me a napkin with a recipe scrawled on it. “For when you need a little something, not a whole lot,” she’d said, her voice as dry as the soil she was tending. I’d tucked it away and honestly, I forgot about it until that rainy afternoon.
I found the napkin, stained and a little crumpled, in a cookbook I never use. The handwriting was tiny and precise. It wasn’t a complicated recipe—just a half-batch of classic chocolate chip cookies. But the proportions were different. Less fuss, more butter. It called for one egg yolk instead of a whole egg, which I thought was brilliant. I had everything on hand, which felt like a small miracle. I mean, isn’t that the best feeling? When the universe just aligns with your cravings? I mixed the dough in one bowl, no mixer needed, just a wooden spoon and a little bit of elbow grease. I even forgot to chill the dough the first time—I was too impatient. The cookies spread a little more than they should have, but honestly, they were still the most comforting thing I’d eaten in weeks. That’s the thing about this recipe. It’s forgiving. It’s for those moments when you need a little bit of cozy, not a whole production. It’s the cookie you make for yourself, and that makes it taste better than any bakery version ever could.
Why You’ll Love This Recipe
This isn’t just another cookie recipe. This is the one you’ll turn to again and again when the craving hits but you don’t want a mountain of leftovers. It’s been tested in my tiny apartment kitchen, approved by my skeptical neighbor, and perfected over several rainy afternoons. Here’s why it’s become my go-to.
- Quick & Easy: From start to finish, these cookies are ready in under 30 minutes. No chilling required, which is a game-changer for sudden cravings. You can have warm cookies in the time it takes to watch one episode of your favorite show.
- Simple Ingredients: You probably have all of this in your pantry right now. No fancy flours, no obscure extracts. Just butter, sugar, an egg yolk, flour, and chocolate chips. That’s it.
- Perfect for a Cozy Night In: This is the ultimate “me-time” dessert. It’s not for a party or a bake sale—it’s for you, on your couch, with a good book or a movie. It’s a hug in cookie form.
- Crowd-Pleaser (for a Small Crowd): While it makes just six cookies, those six cookies are perfect for sharing with one other person. It’s the ideal amount for a date night or a treat for you and your roommate.
- Unbelievably Delicious: The texture is the real star here. They’re crispy on the edges, chewy in the center, and loaded with melty chocolate in every single bite. It’s next-level comfort food, I promise you.
What makes this recipe different from the rest? It’s the ratio. Using just one egg yolk instead of a whole egg gives you a denser, chewier, more decadent cookie. It’s not cakey—it’s pure, buttery indulgence. And because it’s a small batch, you don’t have to worry about the second batch getting over-baked or the dough drying out in the fridge. It’s designed for immediate, unapologetic satisfaction. This recipe isn’t just good; it’s the kind that makes you close your eyes after the first bite. It’s comfort food reimagined—simpler, faster, but with the same soul-soothing satisfaction. Perfect for turning a quiet evening into something memorable, without any of the stress.
What Ingredients You Will Need
This recipe uses simple, wholesome ingredients to deliver that classic, irresistible cookie experience. The magic is in the proportions, not the complexity. Here’s what you’ll need to gather.
- 4 tablespoons (57g) unsalted butter, melted: This is the foundation of our cookie. Using melted butter gives you a chewier texture without needing to chill the dough. I always use unsalted so I can control the salt level. Let it cool slightly after melting so it doesn’t cook the egg yolk.
- 1/4 cup (50g) granulated sugar: This adds the necessary sweetness and helps create those crispy, lacy edges. It’s the backbone of the cookie’s structure.
- 1/4 cup (50g) packed light brown sugar: This is where the magic happens. Brown sugar adds moisture, a hint of molasses flavor, and that irresistible chewiness in the center. Make sure it’s packed firmly into the measuring cup.
- 1 large egg yolk: This is the secret weapon. Using just the yolk gives you a richer, denser, more tender cookie without making it cakey. Save the egg white for breakfast tomorrow or a quick omelet.
- 1/2 teaspoon vanilla extract: Pure vanilla is best, but imitation will work in a pinch. It rounds out the flavors and adds that warm, aromatic note we all associate with cookies.
- 1/2 cup (60g) all-purpose flour: Standard all-purpose flour is perfect here. Spoon it into your measuring cup and level it off with a knife—don’t scoop directly from the bag, or you’ll pack it down and get dry cookies.
- 1/4 teaspoon baking soda: This is our leavening agent. It helps the cookies spread just the right amount and gives them a little lift. Make sure it’s fresh for the best results.
- 1/4 teaspoon salt: Don’t skip this! Salt isn’t just for flavor—it balances the sweetness and enhances the chocolate. I use fine sea salt for even distribution.
- 1/3 cup (60g) semi-sweet chocolate chips: I prefer semi-sweet because it’s not too sugary and it melts beautifully. You can use dark chocolate, milk chocolate, or even chopped chocolate from a bar for those melty puddles. I really like Ghirardelli for its consistent quality, but any brand will work.
That’s it. Seven simple ingredients that come together to create something truly special. The beauty of this recipe is that it relies on what you already have, so there’s no need for a special trip to the store. If you’re out of brown sugar, you can use all granulated sugar, but the cookies will be crispier and less chewy. For a gluten-free option, a good 1-to-1 gluten-free flour blend works wonderfully here, just don’t overmix the dough.
Equipment Needed
You don’t need a fancy kitchen for this one. In fact, the simpler, the better. Here’s what you’ll need to get the job done.
- Mixing bowls: One medium bowl for the wet ingredients and one small bowl for the dry. I use a simple ceramic bowl I picked up at a thrift store.
- Whisk or fork: For whisking together the melted butter and sugars. A whisk works best to break up any lumps in the brown sugar.
- Rubber spatula or wooden spoon: For folding the dry ingredients into the wet. A spatula is gentler and helps you avoid overmixing.
- Measuring cups and spoons: Accurate measurements are key for a small batch. Use standard dry measuring cups for the flour and sugar, and liquid measuring cups for the butter if you’re melting it in the microwave.
- Baking sheet: A standard half-sheet pan works perfectly. No need to grease it if you’re using parchment paper.
- Parchment paper or silicone baking mat: This prevents the cookies from sticking and makes cleanup a breeze. I prefer parchment for the slightly crispier bottoms it gives.
- Cookie scoop or tablespoon: For portioning the dough evenly. A 1.5-tablespoon scoop is perfect for getting six uniform cookies. If you don’t have one, just use a regular tablespoon.
- Cooling rack: Optional but recommended. It lets air circulate around the cookies, preventing the bottoms from getting soggy as they cool.
Honestly, I’ve made these with just a fork and a bowl when I was traveling, and they still turned out great. Don’t let a lack of fancy equipment stop you. The most important tool is your oven, and even that doesn’t need to be perfect. A little patience goes a long way.
Preparation Method
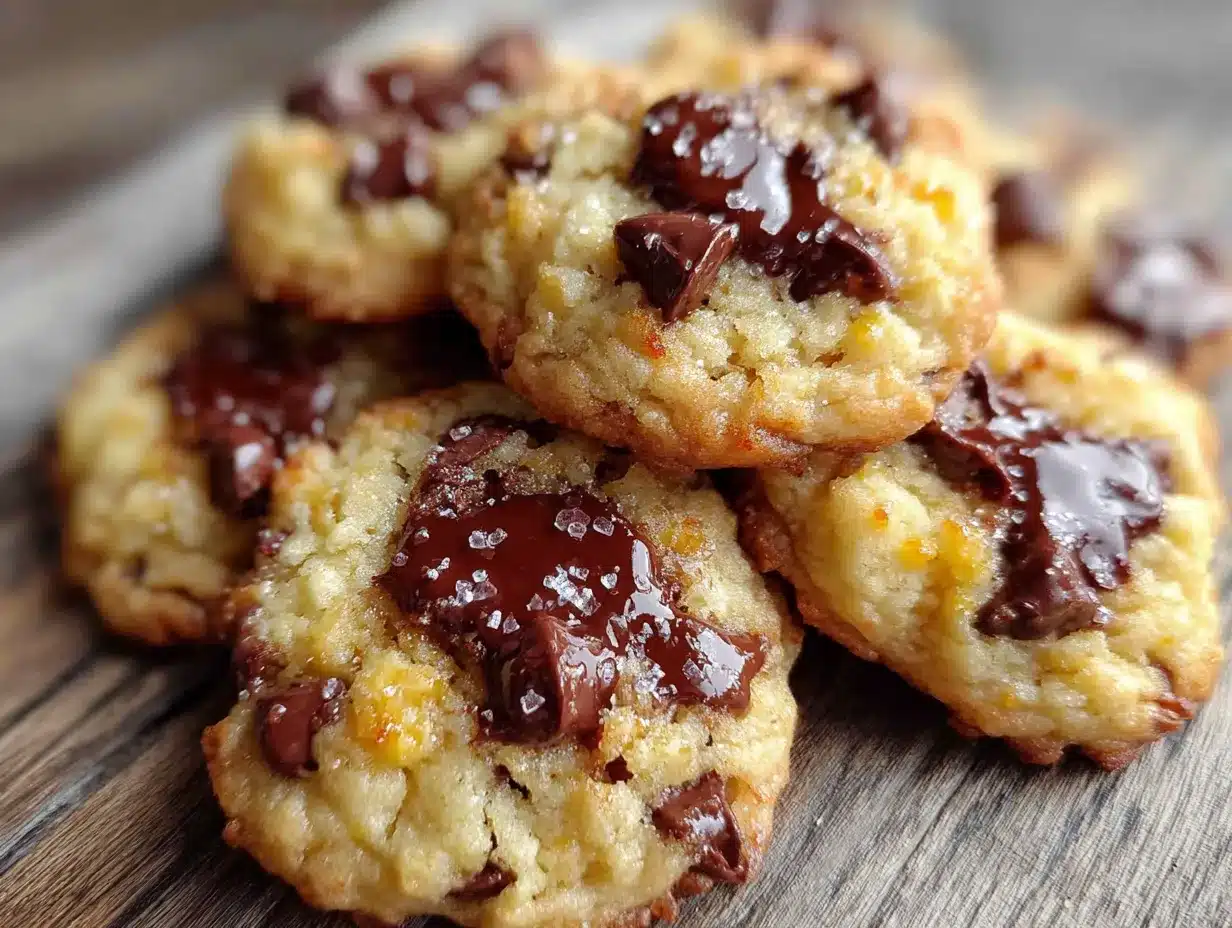
Let’s get to the fun part. Follow these steps, and you’ll have warm, gooey cookies in no time. I’ve added some little notes from my own trials so you can avoid my mistakes.
- Preheat your oven to 350°F (175°C). Line your baking sheet with parchment paper or a silicone mat. This is important—don’t skip the liner, or your cookies might stick. While the oven heats, get your ingredients ready.
- Melt the butter. Place the 4 tablespoons of unsalted butter in a microwave-safe bowl and heat in 20-second bursts until just melted. Let it cool for a minute or two. You don’t want it hot, just warm. If it’s too hot, it will scramble the egg yolk. I learned this the hard way.
- Combine the sugars and butter. In your medium mixing bowl, whisk together the melted butter, 1/4 cup granulated sugar, and 1/4 cup packed brown sugar. Whisk until it’s smooth and looks like wet sand. There shouldn’t be any lumps of brown sugar.
- Add the egg yolk and vanilla. Drop in the single egg yolk and 1/2 teaspoon of vanilla extract. Whisk vigorously for about 30 seconds until the mixture becomes thick, glossy, and slightly paler in color. This step is crucial—it’s where we get that beautiful, chewy texture. The mixture should look like thick caramel.
- Whisk the dry ingredients separately. In your small bowl, whisk together the 1/2 cup of all-purpose flour, 1/4 teaspoon of baking soda, and 1/4 teaspoon of salt. Make sure the baking soda is evenly distributed so you don’t get a weird metallic taste in one bite.
- Fold the dry into the wet. Pour the flour mixture into the butter-sugar mixture. Use your rubber spatula or wooden spoon to fold it together gently. Stir just until you no longer see streaks of flour. A few streaks are okay—overmixing will make the cookies tough. Be gentle here.
- Add the chocolate chips. Fold in the 1/3 cup of semi-sweet chocolate chips. Make sure they’re evenly distributed throughout the dough. The dough will be soft and a little sticky—that’s exactly what we want.
- Portion the dough. Using your cookie scoop or a tablespoon, scoop six equal mounds of dough onto the prepared baking sheet. Space them about 2 inches apart—they will spread. The dough mounds should be about 1.5 tablespoons each. If you want slightly larger cookies, you can make five, just adjust the baking time by a minute or so.
- Bake. Place the baking sheet on the center rack of your preheated oven. Bake for 9 to 11 minutes. Start checking at 9 minutes. The cookies are done when the edges are golden brown and the centers are still slightly puffy and pale. They will look underdone in the middle—that’s the goal. For a softer, gooier cookie, pull them out at 9 minutes. For a crispier cookie, go to 11 minutes.
- Cool on the pan. This is the hardest part. Let the cookies cool on the baking sheet for 5 to 10 minutes. They will continue to bake from the residual heat of the pan. If you try to move them too soon, they will fall apart. I know it’s tempting, but trust the process. After 10 minutes, transfer them to a cooling rack to cool completely, or just grab one and eat it warm. No judgment here.
And there you have it. Six perfect, cozy, small-batch chocolate chip cookies. The smell that fills your kitchen during those last few minutes of baking is absolutely worth the wait.
Cooking Tips & Techniques
I’ve made these cookies more times than I can count, and I’ve made every mistake in the book. Here are some tips to help you nail them on your first try.
Don’t overmix the dough. This is the number one mistake people make. Once you add the flour, mix just until it’s combined. Overmixing develops the gluten in the flour, which leads to tough, cakey cookies instead of tender, chewy ones. You want to see a few streaks of flour right at the end—that’s your cue to stop.
Use a cookie scoop for uniform size. This isn’t just about aesthetics. Uniformly sized cookies bake at the same rate. If you have one big blob and one tiny one, one will be burnt and the other will be raw. A 1.5-tablespoon scoop is perfect for this recipe. If you don’t have one, use a tablespoon measure and level it off.
Let them cool on the pan. I know, I know. The smell is intoxicating, and you want to eat one immediately. But if you try to move them right out of the oven, they will crumble. The cookies need that time on the hot baking sheet to set their structure. The residual heat finishes the cooking process in the center. Be patient—it’s only 10 minutes.
Room temperature ingredients matter, but not here. Usually, I’m a stickler for room-temperature eggs and butter. But since we’re melting the butter and using only a yolk, you don’t need to worry about it. The yolk can go straight from the fridge into the bowl. That’s one less thing to plan ahead for.
If your cookies spread too much, your butter was too hot. I had a batch that turned into one giant cookie pancake. It was still delicious, but not what I was going for. Make sure your melted butter has cooled for a minute or two before you add the sugars. If your dough feels very greasy, pop the bowl in the fridge for 10 minutes before scooping.
For extra crispy edges, use a silicone baking mat. Parchment paper gives a softer bottom, while a silicone mat promotes browning and crisping. It’s a small tweak that makes a noticeable difference if you’re a texture person.
Variations & Adaptations
This recipe is a fantastic base for experimentation. Here are a few ways I’ve adapted it to suit different moods and cravings.
Double Chocolate Chip: Replace 1 tablespoon of the all-purpose flour with 1 tablespoon of unsweetened cocoa powder. Use dark chocolate chips instead of semi-sweet. The result is a rich, fudgy, intensely chocolate cookie that’s perfect for serious chocolate lovers. I did this on a particularly gloomy Sunday, and it was exactly what I needed.
Sea Salt Finish: Just before baking, sprinkle a tiny pinch of flaky sea salt (like Maldon) on top of each dough ball. The salt crystals create a wonderful contrast to the sweet, buttery cookie. It sounds fancy, but it takes two seconds and makes the cookies taste like they came from a high-end bakery.
Nutty Crunch: Fold in 1/4 cup of toasted, chopped pecans or walnuts along with the chocolate chips. Toast them in a dry pan over medium heat for a few minutes until fragrant—this really brings out their flavor. The crunch adds a wonderful textural contrast to the soft, chewy cookie.
Gluten-Free Adaptation: Use a good quality 1-to-1 gluten-free flour blend that contains xanthan gum. I’ve had great success with Bob’s Red Mill. The cookies will be slightly more delicate, but they’ll still be delicious. Don’t overmix the dough, and let them cool completely on the pan before moving them, as they’re more fragile.
Mint Chocolate Chip: Add 1/4 teaspoon of peppermint extract along with the vanilla extract. Use dark chocolate chips or even Andes mint pieces. It’s a refreshing twist that feels perfect for the holiday season, but I’ve been known to make it in July too. No judgment.
Serving & Storage Suggestions
These cookies are best enjoyed warm, straight from the oven, with a tall glass of cold milk. That’s the classic pairing for a reason. The cold milk cuts through the richness of the buttery cookie and the sweetness of the chocolate. It’s a perfect match.
For a more indulgent experience, serve them warm with a scoop of vanilla bean ice cream on top. The hot cookie and cold ice cream create a wonderful contrast. You could even crumble a cookie over a bowl of yogurt for a quick dessert parfait.
If you somehow have leftovers (it’s rare in my house), store them in an airtight container at room temperature. They will stay fresh for up to 3 days. To bring back that just-baked softness, pop a cookie in the microwave for about 10 to 15 seconds. It works like a charm.
You can also freeze the baked cookies. Place them in a single layer in a freezer-safe bag or container. They’ll keep for up to 3 months. Thaw at room temperature or microwave for a quick treat. I’ve even been known to eat them frozen on a hot day—they’re like cookie ice cream.
For longer storage, you can freeze the unbaked dough balls. Scoop them onto a parchment-lined baking sheet and freeze until solid. Then transfer them to a freezer bag. When you’re ready to bake, just add 2 to 3 minutes to the baking time—no need to thaw. This is my secret weapon for sudden cookie emergencies.
Nutritional Information & Benefits
Let’s be real—these are cookies, not a health food. But knowing what’s in them can help you enjoy them mindfully. Here’s the estimated nutritional breakdown for one cookie (based on six cookies per batch).
| Nutrient | Amount per Cookie |
|---|---|
| Calories | ~210 |
| Total Fat | 12g |
| Saturated Fat | 7g |
| Cholesterol | 45mg |
| Sodium | 135mg |
| Total Carbohydrates | 26g |
| Dietary Fiber | 1g |
| Sugars | 18g |
| Protein | 2g |
These cookies are a source of quick energy from the carbohydrates and sugar. The butter and egg yolk provide fat-soluble vitamins like Vitamin A and D. Dark chocolate (if you use it) contains antioxidants called flavonoids. But honestly, the biggest benefit here is the mental and emotional one. Taking 30 minutes to make something delicious for yourself is a form of self-care. It’s a small act of love that can turn a bad day around. So enjoy it without guilt.
If you’re watching your sugar intake, you can reduce the granulated sugar to 3 tablespoons, but the cookies will be less crisp and slightly less sweet. For a lower-fat option, you can substitute 2 tablespoons of the butter with applesauce, but the texture will be more cakey. This recipe is best enjoyed as intended—as a treat.
Conclusion
So there you have it. My go-to recipe for those evenings when you need a little something sweet, but not a whole lot of fuss. These cozy small-batch chocolate chip cookies are more than just a dessert—they’re a moment of peace, a small ritual that connects you to the simple pleasures of life. They remind me of that rainy afternoon and Mrs. Gable’s quiet kindness, and I hope they bring you a similar sense of comfort.
I really encourage you to make this recipe your own. Swap the chocolate chips for white chocolate and macadamia nuts if that’s your thing. Add a pinch of cinnamon for a warm spice note. The beauty of a small batch is that you can experiment without wasting a ton of ingredients. And if you mess up? Well, you’ve only lost six cookies. That’s a risk I’m willing to take.
Now I want to hear from you. Did you try these cookies? Did you add your own twist? What’s your favorite way to enjoy a cozy night in? Drop a comment below and share your story. And if you loved this recipe, please share it with a friend who needs a little comfort today. Happy baking, and remember—you deserve a warm cookie.
Frequently Asked Questions
Can I use salted butter instead of unsalted?
Yes, you can. Just reduce the added salt in the recipe to a pinch (about 1/8 teaspoon) to avoid making the cookies too salty. The cookies will still be delicious.
Why does this recipe use only an egg yolk and not a whole egg?
Using just the yolk gives the cookies a richer, denser, and chewier texture. A whole egg would add more moisture and protein, making the cookies more cakey. The yolk is the secret to that perfect, melt-in-your-mouth texture.
My cookies turned out flat. What did I do wrong?
This usually happens if the butter was too hot when you mixed it with the sugars, or if you didn’t whisk the butter and sugars long enough. Make sure your melted butter is just warm, not hot, and whisk for a full 30 seconds after adding the egg yolk. Chilling the dough for 10 minutes before baking can also help.
Can I double this recipe?
Absolutely! This recipe scales perfectly. Just double all the ingredients. You’ll get about 12 cookies. The baking time should remain roughly the same, but keep an eye on them—your oven might run a little differently with a full sheet pan.
How do I get that perfect, bakery-style look?
After scooping the dough, press a few extra chocolate chips into the tops of the dough balls. This makes the cookies look loaded and beautiful after baking. Also, sprinkle a tiny bit of flaky sea salt on top before baking for that professional finish.
Pin This Recipe!
Cozy Small-Batch Chocolate Chip Cookies: Easy Recipe

This small-batch recipe yields six perfect, chewy chocolate chip cookies with crispy edges and melty centers. Made with simple ingredients and no chilling required, it’s the ultimate comfort food for a cozy night in.
- Prep Time: 10 minutes
- Cook Time: 10 minutes
- Total Time: 20 minutes
- Yield: 6 cookies 1x
- Category: Dessert
- Cuisine: American
Ingredients
- 4 tablespoons (57g) unsalted butter, melted
- 1/4 cup (50g) granulated sugar
- 1/4 cup (50g) packed light brown sugar
- 1 large egg yolk
- 1/2 teaspoon vanilla extract
- 1/2 cup (60g) all-purpose flour
- 1/4 teaspoon baking soda
- 1/4 teaspoon salt
- 1/3 cup (60g) semi-sweet chocolate chips
Instructions
- Preheat your oven to 350°F (175°C). Line your baking sheet with parchment paper or a silicone mat.
- Melt the butter in a microwave-safe bowl in 20-second bursts until just melted. Let it cool for a minute or two.
- In a medium mixing bowl, whisk together the melted butter, granulated sugar, and packed brown sugar until smooth and looks like wet sand.
- Add the egg yolk and vanilla extract. Whisk vigorously for about 30 seconds until the mixture becomes thick, glossy, and slightly paler in color.
- In a small bowl, whisk together the all-purpose flour, baking soda, and salt.
- Pour the flour mixture into the butter-sugar mixture. Fold gently with a rubber spatula or wooden spoon just until no streaks of flour remain.
- Fold in the semi-sweet chocolate chips until evenly distributed.
- Using a cookie scoop or tablespoon, scoop six equal mounds of dough onto the prepared baking sheet, spacing them about 2 inches apart.
- Bake on the center rack for 9 to 11 minutes, until edges are golden brown and centers are still slightly puffy and pale.
- Let the cookies cool on the baking sheet for 5 to 10 minutes, then transfer to a cooling rack to cool completely.
Notes
For a gooier cookie, bake for 9 minutes. For a crispier cookie, bake for 11 minutes. If your cookies spread too much, the butter was too hot; chill the dough for 10 minutes before baking. For extra crispy edges, use a silicone baking mat.
Nutrition
- Serving Size: 1 cookie
- Calories: 210
- Sugar: 18
- Sodium: 135
- Fat: 12
- Saturated Fat: 7
- Carbohydrates: 26
- Fiber: 1
- Protein: 2
Keywords: small-batch chocolate chip cookies, easy cookie recipe, chewy chocolate chip cookies, no chill cookies, single serving cookies


